
I still remember the first time I set a tiny ladder against a jam jar and waited with my little sister for a rustling or a sparkle. Those afternoons of glue-smudged fingers and whispered plans felt like a small conspiracy between us and something mischievous.
St Patrick’s Day Leprechaun Trap Crafts became a seasonal ritual, full of makeshift rainbows and careful hiding places.
Now I collect ideas that are more about delight than capture, mixing thrifted bits with bright paper and a lot of laughing.
St Patrick’s Day Leprechaun Trap Crafts keep that silly, hopeful feeling alive each March.
Tiny rainbow ladder leaning against a jar
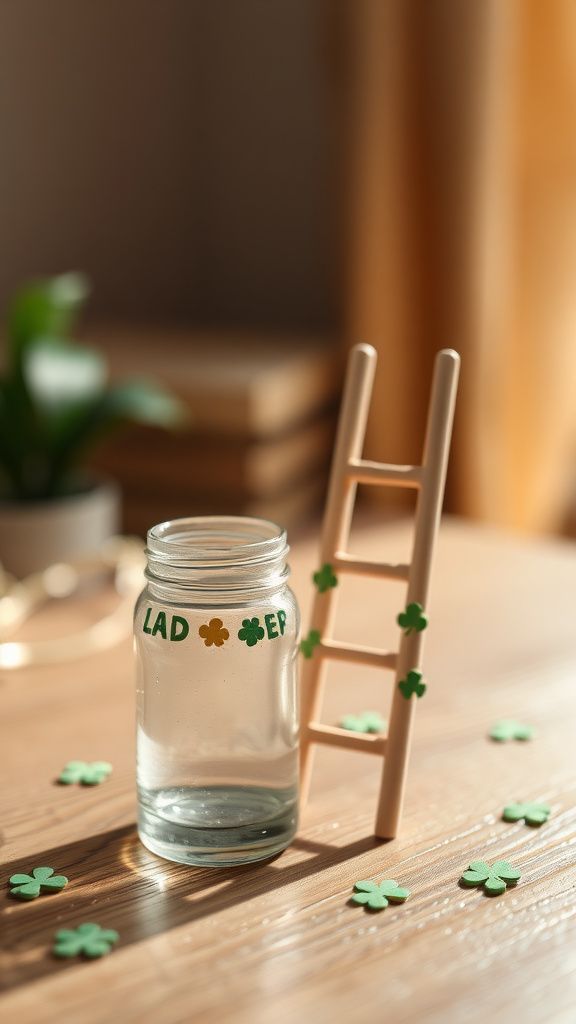
I set a narrow ladder of painted popsicle sticks against a clear jar and it immediately felt like an invitation. The glass held the reflected colors of the ladder so that sunlight scattered little bands across the table.
The ladder had a faint scent of dry paint and the popsicle wood was slightly rough at the edges, comforting to hold. I remember the hush as I arranged a few glittering shamrocks nearby, and the whole scene looked like a tiny porch for something small and curious.
Steps
- Gather a small clear jar, a handful of thin wooden sticks, green and rainbow paint, craft glue, and tiny shamrock cutouts.
- Paint the wooden sticks in alternating rainbow colors and let them dry on a protected surface until fully set.
- Glue two sticks parallel for each side of the ladder, then glue smaller sticks across to form rungs and allow to bond.
- Lean the finished ladder against the jar at a playful angle and arrange shamrocks and a little gold confetti around the base.
- Place the scene in a sunny spot where reflections will catch the colors.
Cork boat with shamrock sail and glitter
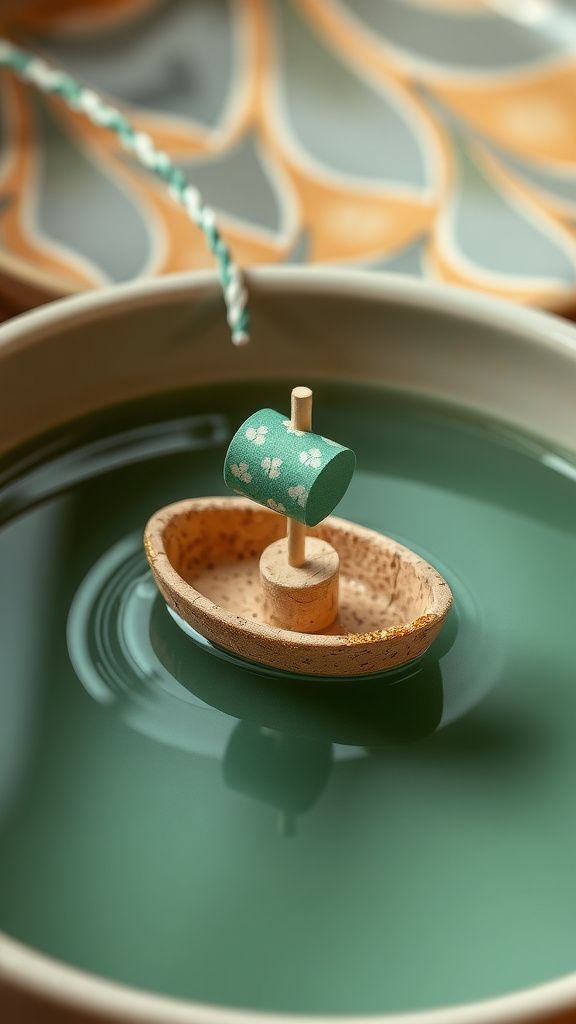
A cork carved into a little boat feels oddly nautical and festive at once. The cork surface is springy and faintly pine-scented, with tiny indentations from the bottle it once sealed.
A shamrock sail flutters with the faintest breath of air, and scattered glitter along the rim picks up light like tiny coins. I loved setting that boat on a shallow dish of water and watching the reflections shimmer.
The whole thing smelled faintly of cork and craft glue and made me grin every time it bobbed gently.
Steps
- Collect a wine cork, a small wooden dowel, paper with shamrock design, glue, and a sprinkle of gold glitter.
- Trim a shallow notch along the top of the cork to hold the dowel upright for the sail.
- Cut a small shamrock-shaped sail from the paper and attach it to the dowel, then insert the dowel into the cork’s notch.
- Apply a thin line of glue along the cork’s rim and sprinkle gold glitter for a coin-like shimmer.
- Set the cork boat in a shallow bowl of water for a gentle floating display.
Miniature fairy door beneath mossy stones
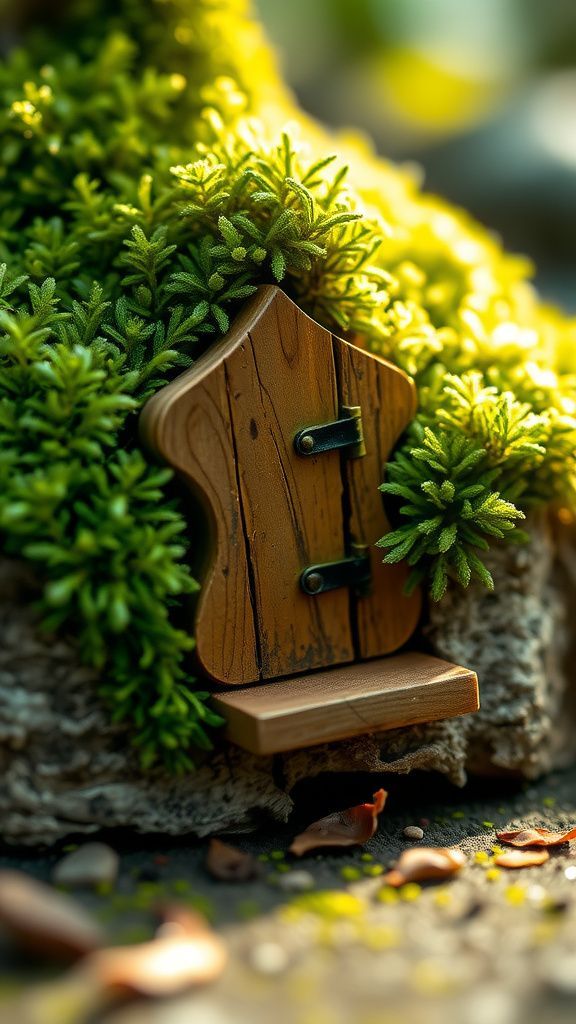
A tiny wooden door tucked under a mound of moss looks like the entrance to a pocket-sized house. The moss is cool to the touch and velvety, carrying a faint damp-earth scent that feels like a forest corner.
The little door was hand-painted in a chipped green, with a brass brad as a doorknob that glints when the light moves. I often crouched to peer at that shaded nook, imagining muffled laughter and the clink of a small coat button as something slipped inside under cover of leaves.
Steps
- Find a small piece of thin wood or heavy cardboard to form the door and select a patch of preserved sheet moss.
- Paint the door in a worn green hue and add a tiny brad or pin for a doorknob before drying.
- Arrange a low mound of moss over a shallow base, making a tiny hollow where the door can sit snugly.
- Gently press the painted door into the hollow so it appears half-hidden beneath the moss.
- Surround the entrance with a few miniature pebbles and tiny paper leaves for a woodland touch.
Trap that looks like a pot of gold

A squat black container filled with shimmering coins has a theatrical charm. The metal rim feels cool against fingers and the faux coins rattle softly when nudged, suggesting weight and promise.
When placed on a patch of green felt, the contrast is joyful; gold reflects back warm flashes that catch the eye. I remember the small thrill of nudging one coin and listening to the tiny metallic clink, as if it might wake something tiny and kin to mischief.
It sat like a treasure on a mossy island.
Steps
- Select a small black pot or tin and line the inside with a cushion of green felt or fabric.
- Fill the pot with metallic gold tokens, chocolate coins wrapped in foil, or painted wooden discs.
- Add a little tuck of shiny ribbon or a paper label that hints at treasure within.
- Place the pot on a soft green base and scatter a few coins around it to create allure.
- Position near natural textures like bark or moss for a more convincing setting.
Cardboard castle with tiny green flags
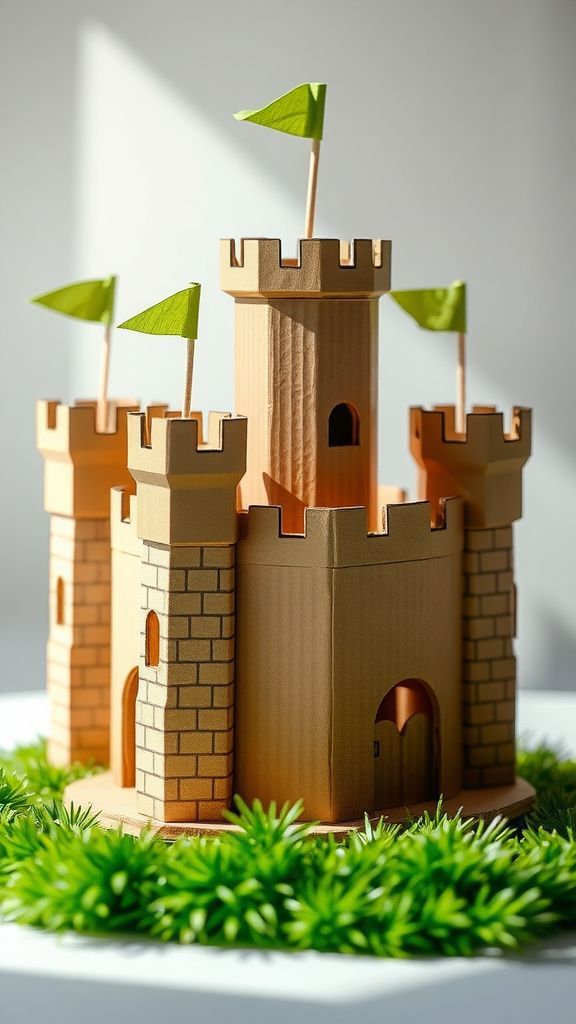
A crenelated cardboard castle felt grand despite its humble materials. The rough edges of the cardboard held tiny shadows, and when I ran my fingers along a turret the corrugated layers gave a faint scratch under my touch.
Little flags of green tissue paper fluttered with the faintest movement, adding a playful note. I liked to set it on a blanket of fake grass so the whole scene read like a playful kingdom.
The castle always invited close inspection and made the idea of a very small court feel cheerful.
Steps
- Gather sturdy cardboard, scissors suitable for crafts, glue, and green tissue paper for flags.
- Cut out a simple castle silhouette with turrets and battlements and fold tabs for assembly.
- Secure the walls together with glue and let the structure sit until stable.
- Create tiny flags by cutting squares of green tissue, folding over thin sticks or toothpicks, and attaching them to turret tops.
- Set the castle on a patch of faux grass and add small pebbles for a finished scene.
Suspended tea mug swing with ribbon banner
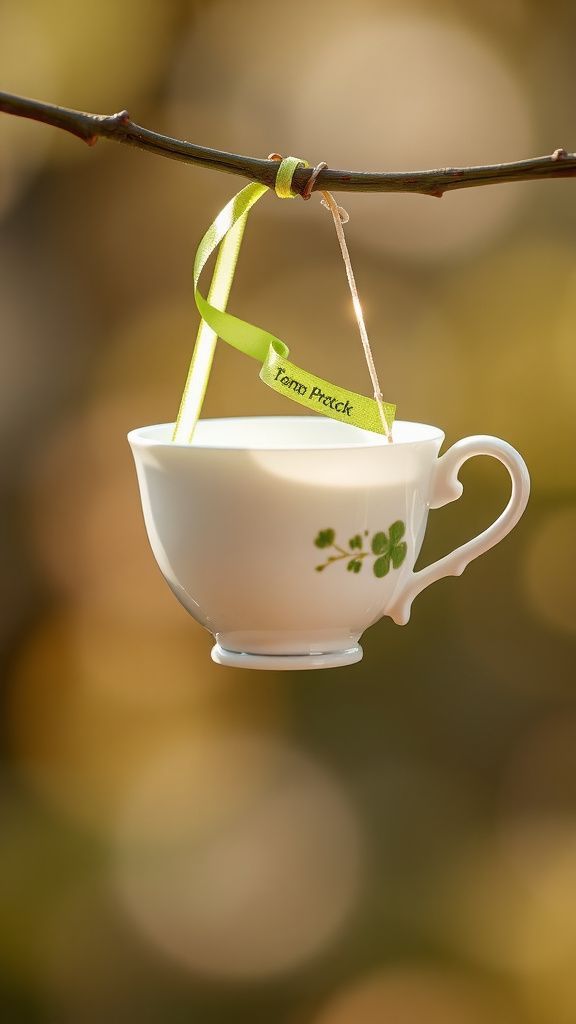
A teacup balanced like a swing feels delightfully whimsical and slightly precarious. The porcelain is smooth and cool with a faint floral decal worn at the rim.
Thin ribbon tied across a tiny branch created a banner that whispered when a breeze passed. I remember the tiny creak of the cup as it swayed and the muffled clack when it settled back.
Sprinkled confetti inside caught stray light and created a glittery nest that seemed like an invitation to something small and secretive.
Steps
- Choose a small lightweight teacup and a sturdy twig or dowel to act as a hanging arm.
- Thread narrow ribbon through two small holes near the cup’s rim and tie to the twig so the cup hangs evenly.
- Add a short ribbon banner across the twig with tiny shamrock shapes glued onto it for decoration.
- Fill the cup with tissue bits or metallic confetti to suggest treasure.
- Hang the assembly from a low branch or display hook where it can sway gently.
Matchbox mine shaft with pebble chute
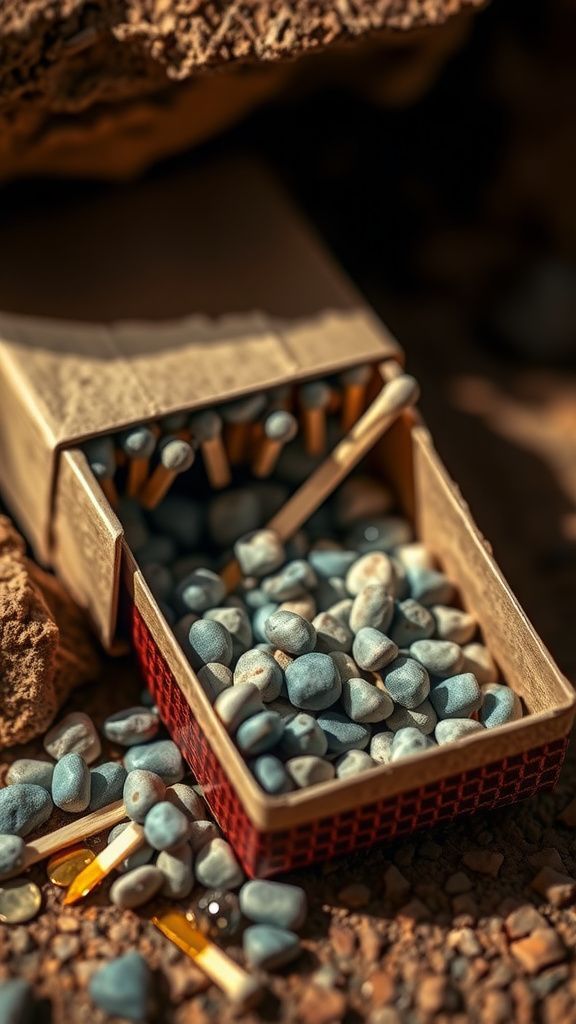
A matchbox turned mine entrance carries a playful, industrious energy. The cardboard mouth of the box has a faint smoky scent from past matches and a worn edge that feels familiar.
A tiny chute of pebbles glistens where little coins might tumble, and the shuffle of stones against cardboard gives a satisfying crisp sound when nudged. I liked angling a scrap of foil at the mouth so light would flash like metal, creating the impression of something valuable waiting just out of reach.
Steps
- Take an empty matchbox and clean out the striker surface for a neat appearance.
- Line the inside of the drawer with dark paper to create a tunnel effect.
- Glue a narrow channel of thin cardboard or rolled paper from the box mouth for a pebble chute.
- Fill the chute and the entrance with small pebbles, metallic confetti, or tiny beads to suggest ore.
- Position the matchbox on a textured base and add a small foil piece to reflect light.
Woven basket covered in clover patterns
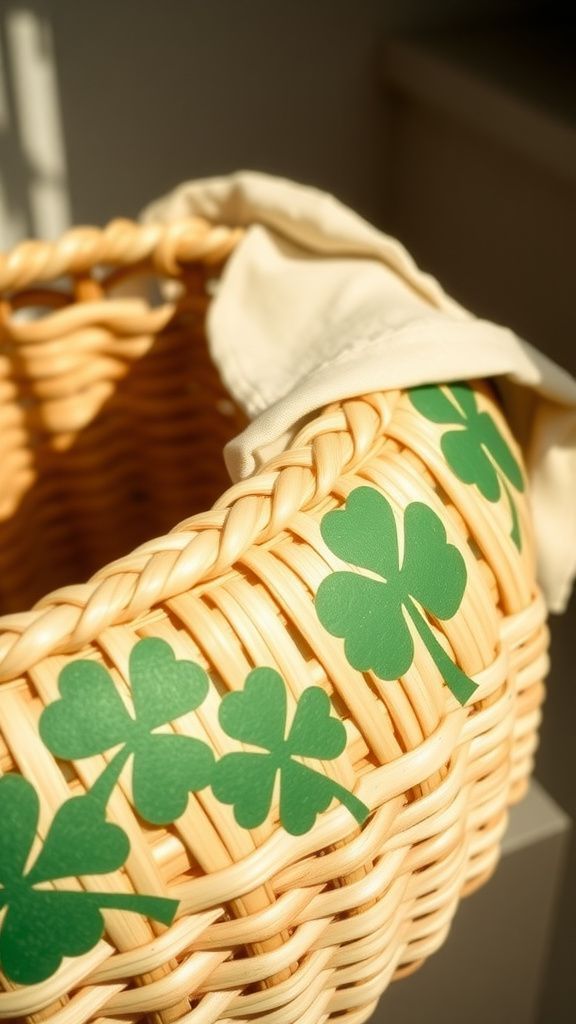
A shallow woven basket with hand-painted clovers felt like a snug nest. The weave has a tactile pattern that presses softly into the palm, and the painted green motifs are slightly raised with a faint scent of paint.
I enjoyed the contrast between the rough natural fibers and the smooth dots of color. Small fabric scraps inside rustled when touched, and an accidental leaf left a delicate green smudge on the rim.
The whole object read as a little celebration of spring and felt ready to hide something tiny.
Steps
- Find a small woven basket or shallow dish and choose green paint in two or three shades.
- Lightly sketch clover shapes around the rim and sides, then paint them in alternating tones.
- Allow the paint to dry fully before adding any decorative touches or interior lining.
- Line the inside with soft fabric and tuck in a few paper shamrocks or foil coins.
- Place the basket among other natural textures for an inviting display.
Wooden crate disguised as an old boot

A tiny wooden crate fashioned to read like a weathered boot felt charmingly cheeky. The grain of the wood showed through a thin wash of brown paint, and the little laces were twine that smelled faintly of rope.
The toe had a dull scuff and the inside held a nest of dry straw that crackled softly. When I tapped the side the sound was hollow and resonant, like a tiny footfall.
It sat as if abandoned by some pint-sized traveler who’d left treasures tucked inside.
Steps
- Select a small wooden box or crate and sand any rough edges for a safe finish.
- Apply a thin brown wash to suggest worn leather and let it dry to reveal the grain.
- Attach twine loops in front to mimic laces and tuck straw or shredded paper inside to form a nest.
- Add a faint smudge or scuff with darker paint for a used look.
- Place on a small mat of faux grass or bark to enhance the outdoorsy feel.
Tiny lighthouse glowing with fairy lights
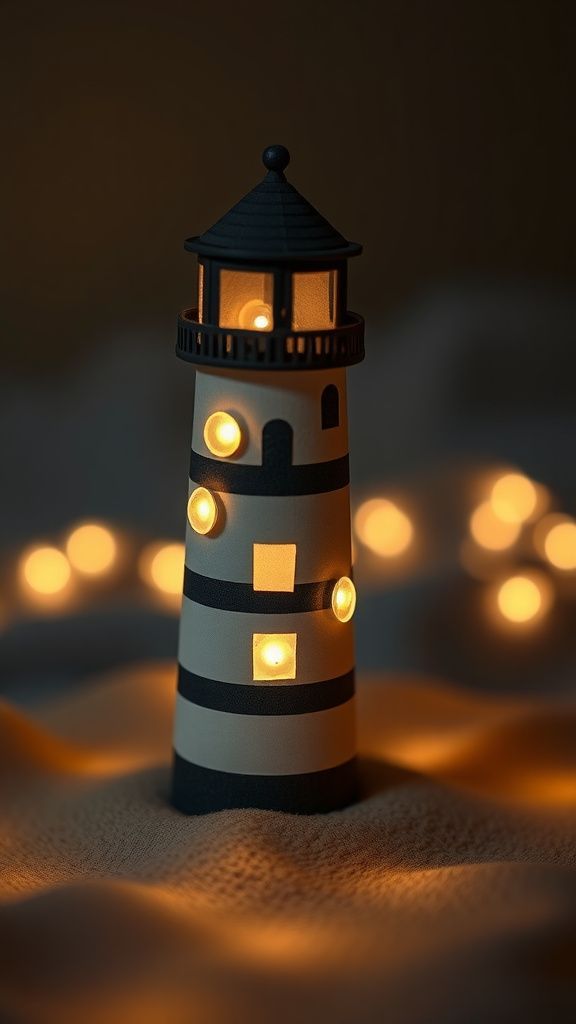
A little lighthouse made from a paper tube and wrapped in white had a gentle, lantern-like quality. The paper’s matte finish softened the glow of a single string of tiny lights within so that warm beads of light peeked from striped windows.
I enjoyed the faint hum of electricity and the tiny warmth when I cupped my hand nearby. The structure stood on a base of sand-colored paper, and the whole assemblage felt like a beacon on a very small shore, quietly inviting attention and wonder.
Steps
- Find a sturdy paper tube and wrap it with white paper, securing the seam out of sight.
- Cut small window slots and paint soft stripes on the exterior for a classic lighthouse look.
- Insert a short string of battery-powered fairy lights into the tube and arrange so light filters through the windows.
- Create a sand-colored base from textured paper or fine sand glued to a disc and mount the lighthouse.
- Switch on the lights for a warm, gentle glow in a dim room.
Tin can carnival with paper flags
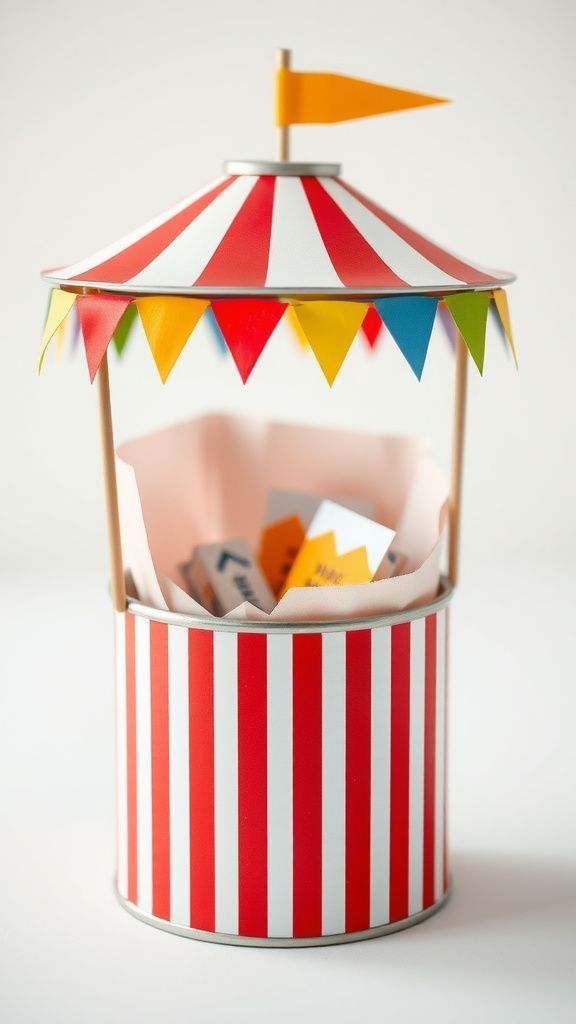
A repurposed tin can turned into a carnival stand felt spirited and loud even when quiet. The metal surface had small dents and a faint echo when tapped, and strips of colorful paper flags created a festive fringe that rustled slightly.
Inside, tissue paper and foil glinted like prizes, and the scent of metal mixed with a hint of adhesive lingered. I liked arranging tiny handmade tickets and a little paper clown that leaned against the rim; the entire piece felt improvisational and lively, like a traveling fair shrunk to pocket size.
Steps
- Clean an empty tin can and remove any sharp edges for a safe finish.
- Paint the outside in bright stripes or cover it with decorative paper and allow to dry.
- Create a string of small paper flags and attach it across the can’s top edge for a festive banner.
- Line the interior with tissue paper and tuck in small foil-wrapped candies or paper tokens as prizes.
- Place the can on a colorful base and add miniature signage for a playful carnival feel.
Rainbow slide made from foam and ribbon
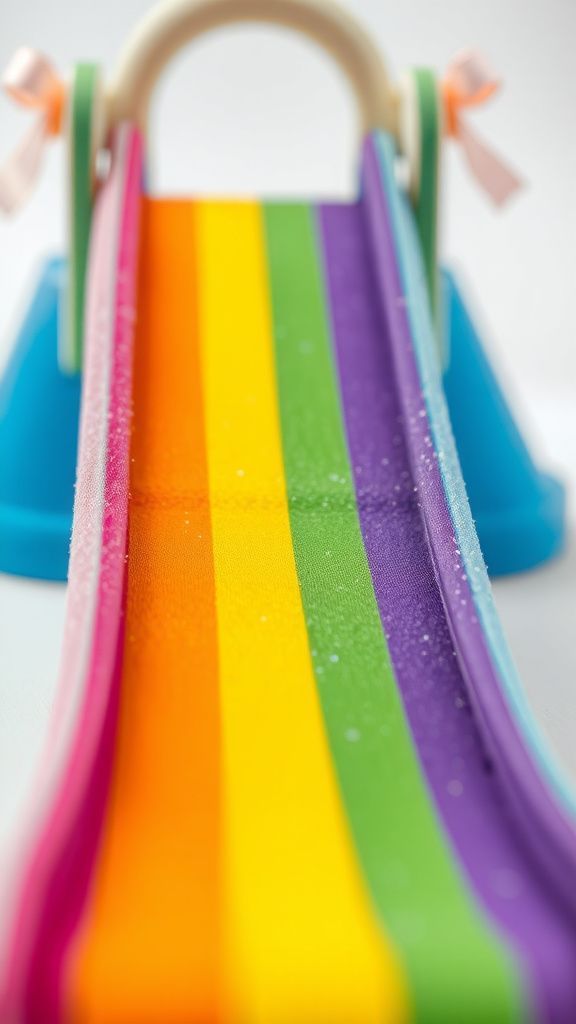
A smooth foam ramp striped in rainbow colors invited the eye with promise of motion. The foam felt pleasantly springy under fingertips and the ribbon trim added a flirty edge that moved when brushed.
Glitter dusted the surface, catching light in thin streaks that made the colors sing. I liked the sense of a tiny downhill journey, imagining a small figure or coin skittering and catching the ray of sun as it slid.
The whole piece smelled faintly of craft foam and fresh adhesive, warm and homey.
Steps
- Cut a gentle arc from a sheet of craft foam to create a ramp shape.
- Paint or adhere strips of colored foam or paper to form a rainbow across the ramp.
- Attach narrow ribbon along each edge and add a light dusting of fine glitter for shimmer.
- Mount the ramp on a low base so it sits stably at an angle.
- Add a small platform at the top and place tiny coins or a bead to suggest descent.
Book hollowed out into secret trap
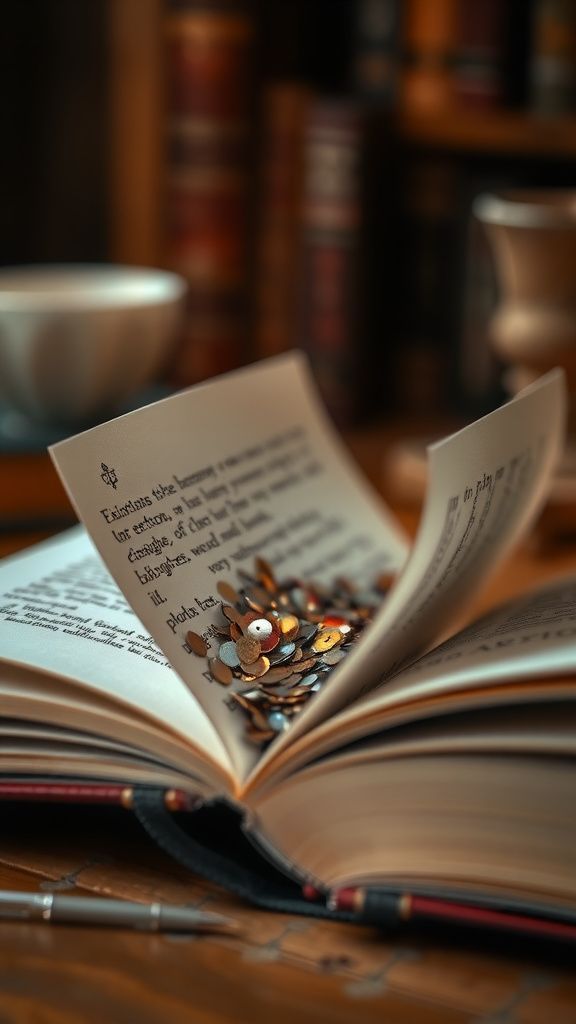
An old hardcover with a hollowed interior felt like the kind of hiding place that belonged in a whispered story. The paper edges gave off that papery scent of old print and the cover had a softened spine from years of handling.
Inside, the carved cavity cradled a tiny pile of metallic confetti that shivered when the book was nudged. The tactile contrast between stiff cover and soft paper edges always made me run my thumb along the rim.
It looked like a private chest that waited patiently on a shelf.
Steps
- Select a sturdy hardcover book and mark a rectangular area on the inside pages to remove.
- Carefully remove the marked pages with a craft knife, creating a neat cavity while leaving a border intact.
- Line the hollowed space with dark paper for a finished look and hide cut edges.
- Fill the cavity with metallic confetti, foil tokens, or a small fabric pouch of coins.
- Close the book and display it on a shelf where it blends in with other volumes.
Clay mushroom village hiding a lid
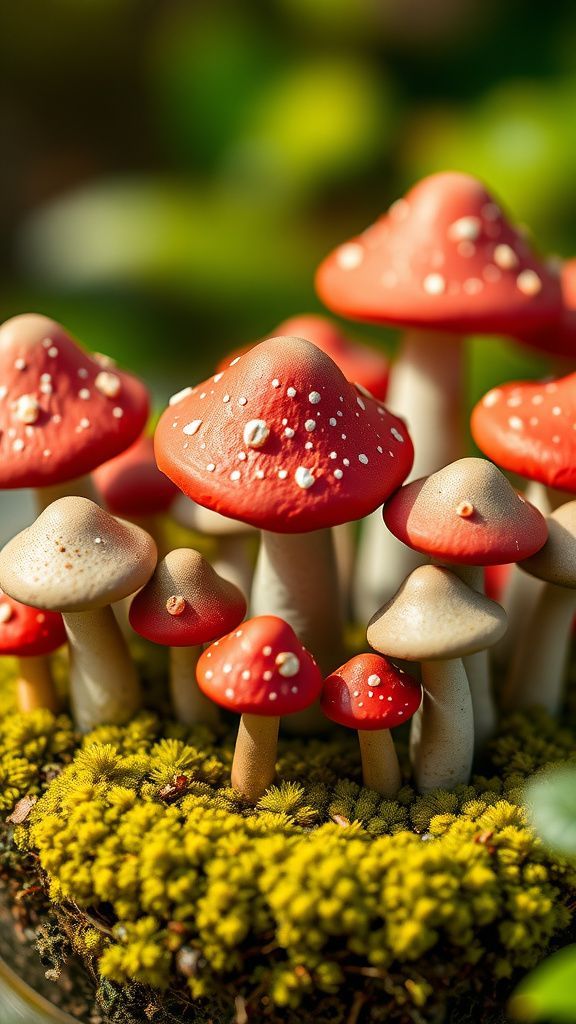
A ring of little clay mushrooms surrounding a hidden lid felt like a secretive ring of guardians. Each cap had a matte finish and faint fingerprints that told of hands shaping them.
The clay had an earthy scent and the sturdy bases sat firmly on their patch. When I lifted a mossy cap the lid underneath revealed a small hollow lined with velvet, which made the opening feel ceremonious.
The scene looked like a tiny council under which treasures might be passed around in low, muted whispers.
Steps
- Sculpt several small mushrooms from air-dry clay, varying cap shapes for interest, and allow them to harden fully.
- Paint caps in soft reds and whites or shades of green and add tiny speckles for character.
- Arrange the mushrooms in a circle on a shallow base and fit a concealed lid at the center.
- Line the interior of the lid space with soft fabric to cradle tiny items.
- Place preserved moss around the bases to finish the village look.
Lantern hut with moss roof and glow
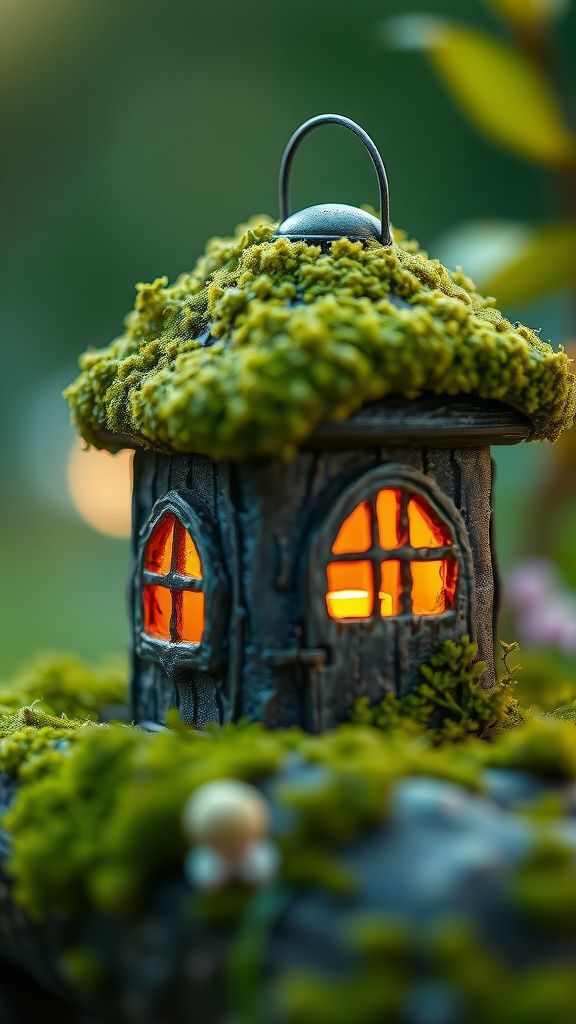
A little hut with a mossy roof and a warm glow felt cozy and protected. The dried moss was dry and soft with a gentle forest scent, and the tiny windows threw weak beams of light that suggested an interior hearth.
The hut’s walls had a faint texture like bark and the lantern inside hummed quietly, bathing surrounding surfaces in honeyed light. I often sat nearby with a cup of something warm and watched the lamplight play over the moss, feeling that small piece of wonder quietly reassure a busy evening.
Steps
- Construct a small hut shape from lightweight cardboard or thin wood and cut tiny window slits.
- Cover the roof with preserved sheet moss, securing it with adhesive around the edges.
- Place a battery-operated tealight or tiny fairy light inside so warm light filters through the windows.
- Add bark-textured paint or paper to the walls for a rustic look and let dry.
- Position the hut on a natural base and surround it with soft fabric or moss.
Garden gnome mailbox with tiny treats
A miniature mailbox styled like a gnome’s domain felt delightfully domestic. Painted reds and greens on a small wooden box were slightly dulled by finger marks, lending a well-loved air.
The tiny door creaked faintly when opened and inside lay a scattering of foil candies that caught light in cheerful flashes. I liked slipping a tiny note inside and imagining post delivered by a punctual, bearded resident.
The smell of paint mixed with sugar from the candies made the scene feel homely and a touch mischievous.
Steps
- Choose a small wooden box or match safe and paint it in bright gnome-like colors.
- Add tiny embellishments such as a painted door, a faux window, and a little roof detail.
- Place a few foil-wrapped candies or mini paper treats inside as inviting content.
- Attach a small flag or sign to the side for a mailbox feel.
- Position near a patch of faux grass or a small potted plant to suggest a garden setting.
Paper mâché tree stump with secret hole
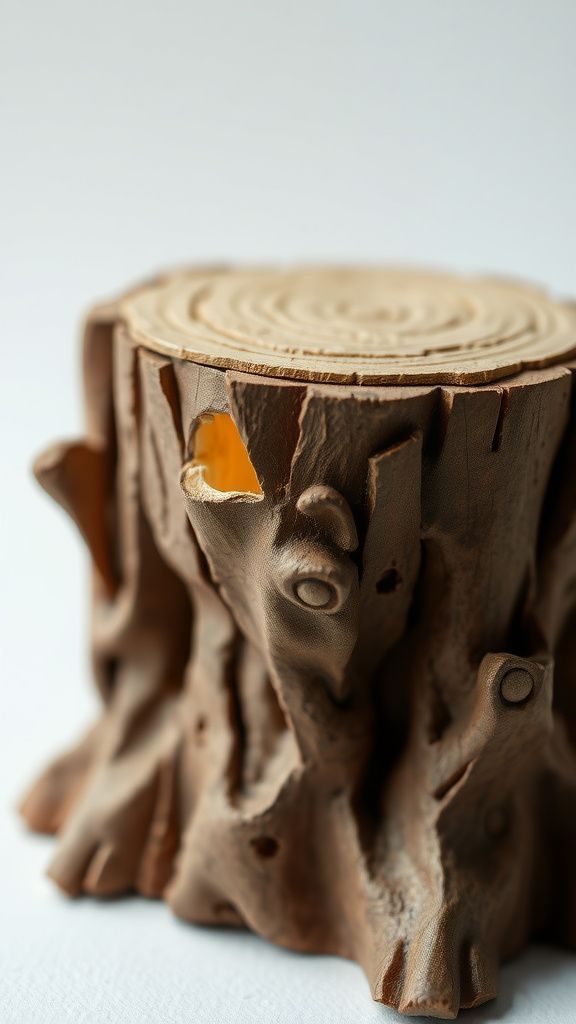
A small tree stump molded from paper mâché had a satisfying roughness and a faint smell of paste and torn paper. The bark texture was built up in layers, creating ridges that invited fingers to trace them.
The secret hole at the top held a little cushion of fabric that rustled softly. When light skimmed the outer ridges it cast a tiny forest of shadows across the table, and the whole piece felt like an ancient object scaled down, patient and ready to conceal something delicate beneath its surface.
Steps
- Build a basic stump form using crumpled paper and tape as an armature, then layer paper mâché strips until sturdy.
- Once dry, sculpt bark texture with additional layers or light carving and let set.
- Paint the exterior in layered browns and grays to mimic weathered wood.
- Create a shallow secret hollow at the top and line it with soft fabric for a snug interior.
- Position the stump on a natural-textured base and add tiny leaves around it.
Felt cupcake disguised as grassy knoll
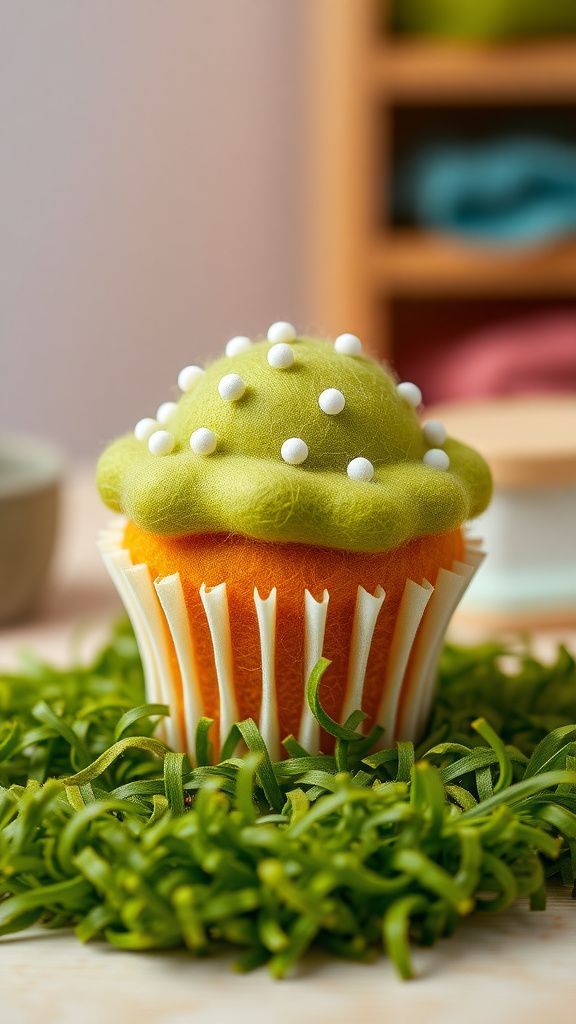
A felt cupcake with a green swirl of wool looked sweet and deceptively natural. The wool was soft under a thumb and the felt base had the matte, cozy feel of handmade fabric.
Tiny seed bead ‘sprinkles’ caught light like little dewdrops, and the whole shape sat low and inviting on a plate of faux grass. I would smile at the surprise of finding something confection-like that read like a patch of lawn at a glance.
The combination of textile textures made it feel like a soft, secret celebration.
Steps
- Sew a small felt cupcake base and stuff it lightly to create gentle volume.
- Needle-felt green wool into a swirled frosting shape and attach it securely to the base.
- Add tiny seed beads or sequins as sprinkles by sewing or gluing them in place.
- Arrange the cupcake on a circle of faux grass or green felt for camouflage.
- Place near other natural elements to enhance the grassy illusion.
Tiny swing set made of twigs

A miniature swing set crafted from twigs felt elemental and unexpectedly sturdy. The twigs retained little bumps and the faint scent of bark, grounding the piece in the outdoors.
Thin thread seats hung with a gentle sway and made a soft whisper when brushed. I liked balancing a small bead on one swing and watching it tilt, the whole structure creaking in a very small voice.
It read like the backyard of a different scale, a place where tiny beings might pause to rest in sun dappled shade.
Steps
- Collect straight twigs of similar thickness and break them to uniform lengths for the frame.
- Bind the top crossbar to the side posts with strong thread or thin wire to form a stable A-frame.
- Cut a small fabric or paper seat, attach lengths of thread for ropes, and knot them to the crossbar.
- Trim ends and tidy knots, then anchor the frame to a small base with glue or wire.
- Add tiny props like a bead or paper leaf to suggest use.
Mason jar greenhouse filled with clover
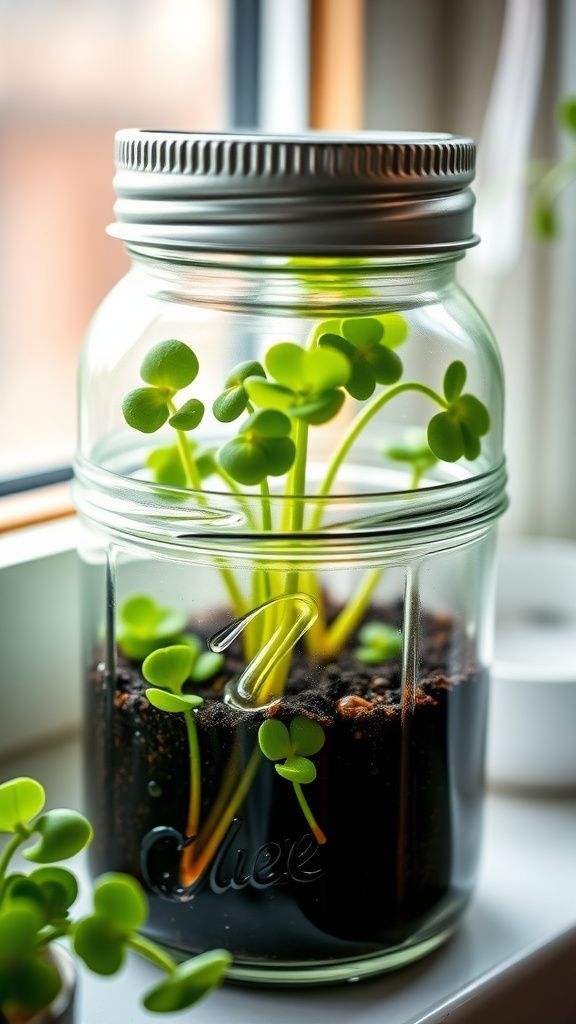
A mason jar topped with a clear lid and filled with tiny clover plants felt intimate and alive. The glass was cool and the trapped air smelled faintly of damp soil and green leaves.
Tiny water droplets clung to the inner surface and magnified the clover stems like tiny lenses. When I tapped the glass a small, bright sound rang out and the plants wavered.
The contained green felt like a breath of spring captured and stored on a windowsill, cheerful and quiet.
Steps
- Clean a small mason jar and add a layer of fine potting soil suitable for small plants.
- Plant a few tiny clover seedlings or sprigs and press them gently into the soil.
- Lightly mist the interior and secure the lid to create a humid mini greenhouse environment.
- Place the jar in a bright but indirect light spot and monitor moisture levels.
- Remove the lid occasionally to air the plants and enjoy the mini ecosystem.
Mini treasure chest with velvet lining
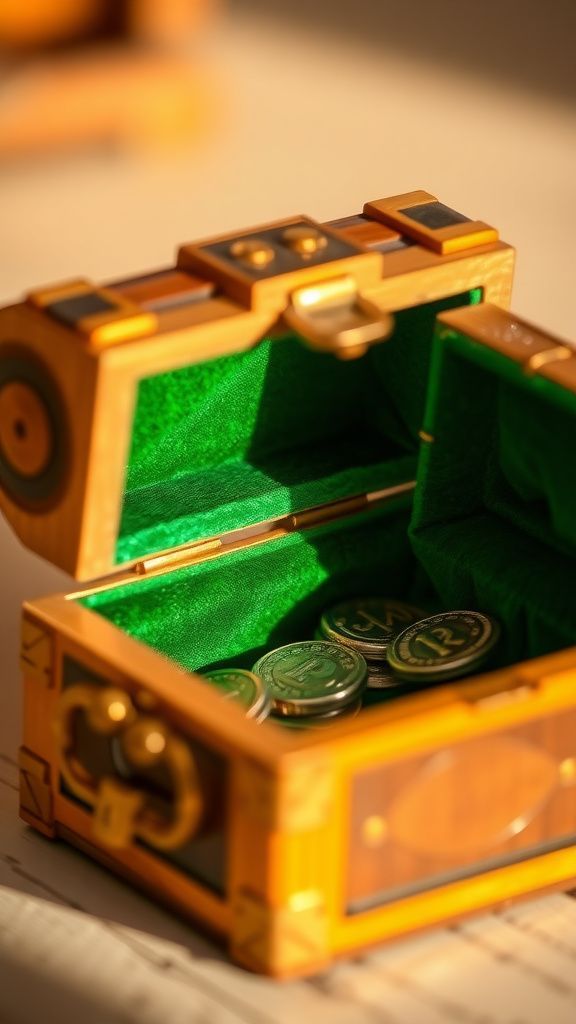
A tiny wooden chest lined with deep green velvet felt indulgent at a small scale. The wood had a warm grain and the velvet was soft under fingertips, absorbing light and creating plush shadows.
Little brass hinges gave a soft metallic whisper when opened, revealing a handful of glittering tokens that flashed like coins. I liked the contrast between the stern exterior and the sumptuous interior; opening it felt ceremonial, as if each coin mattered in a private ledger of small joys and imagined fortunes.
Steps
- Find or craft a small wooden box and sand it smooth for finishing touches.
- Line the interior with a piece of soft green velvet or plush fabric, trimming to fit snugly.
- Attach tiny hinges if not already present and ensure the lid opens smoothly.
- Fill the chest with small metallic tokens, beads, or foil-wrapped chocolates.
- Display on a small velvet pad to complement the lining and enhance the treasure feel.