
I still remember the first time I turned an empty jar and a pile of bottle caps into something that felt joyful and useful. There was a sticky, satisfying weekend air as glue dried and colors came together, and that afternoon became a tiny ritual each year.
Earth Day Recycled Crafts have a way of nudging quiet creativity out of the everyday.
Gathering odd bits from drawers and the recycling bin, I found that making small things felt like a gentle celebration of the world we share.
Tin can herb planters with rustic charm
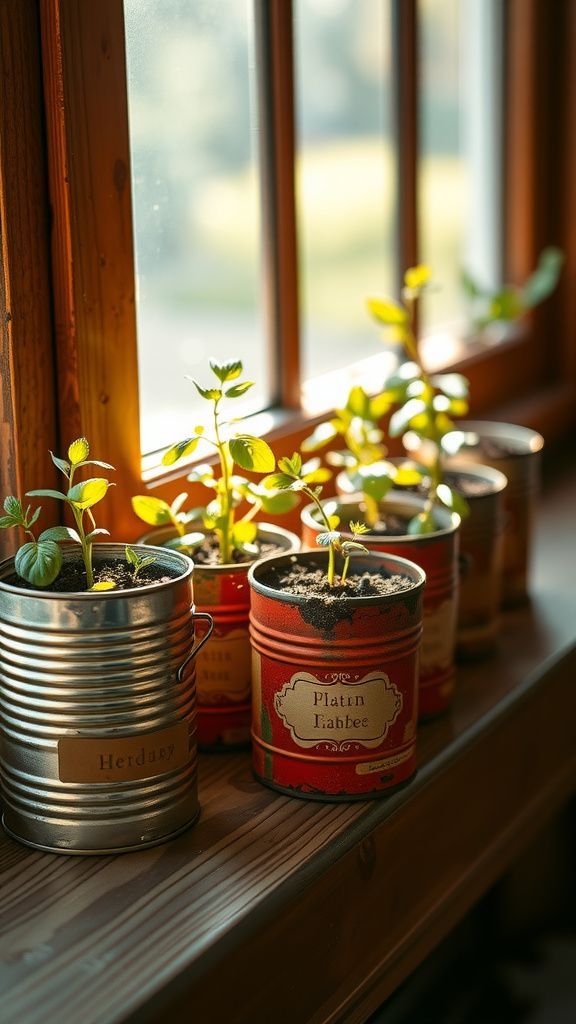
There’s a warm comfort in a line of tin cans clustered on a sunny sill, their metal rims catching the light and the soil smelling faintly of earth. I remember running my thumb along a dent that gave one can character, while a faded label made another feel like a thrifted find.
The whole display looked homely and lived-in, with little green shoots peeking above the rim. Rainy mornings made the drip of leftover water a quiet companion to the fresh herb scent drifting through the kitchen.
Steps
- Remove any sharp edges from cans and rinse thoroughly.
- Apply a base layer of primer, then add acrylic or spray color for a uniform finish.
- Fill cans with drainage gravel, then potting mix, and nestle chosen herb plants into each.
- Label each can with chalkboard tags or painted names, and position them on a sunny windowsill.
- Water gently and rotate the line occasionally so all plants get even light.
Plastic bottle bird feeder full of color
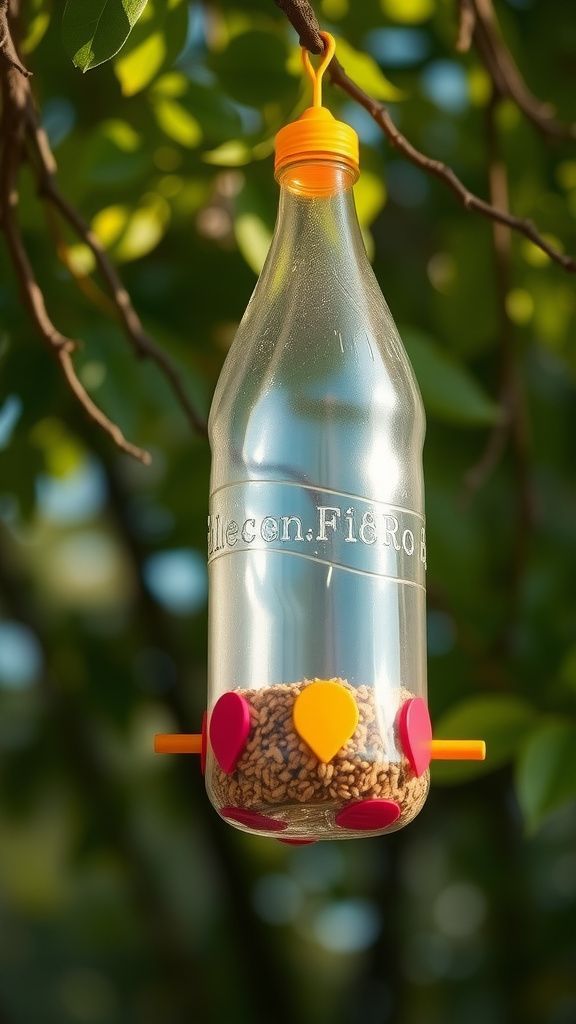
I found that a translucent plastic bottle transformed into a little wildlife magnet, catching early light and attracting curious sparrows. The plastic carried a faint scent of sun-warmed resin, and the dangling beads added a cheerful clink in breezy weather.
When the birds arrived, their wings made a brief hush before returning to soft chirps, and watching them felt like a tiny ritual that slowed the afternoon. The feeder’s movement in wind gave a playful rhythm to the backyard skyline.
Steps
- Cut openings in the sides of a cleaned plastic bottle to create feeding ports.
- Insert small wooden perches below each opening and smooth any rough edges.
- Fill the bottle with birdseed through the top and cap it securely.
- Decorate the bottle with weatherproof paint and tie a cord around the neck for hanging.
- Hang from a tree branch at a sheltered height and refill as needed.
Newspaper seed starting pots with earthy texture
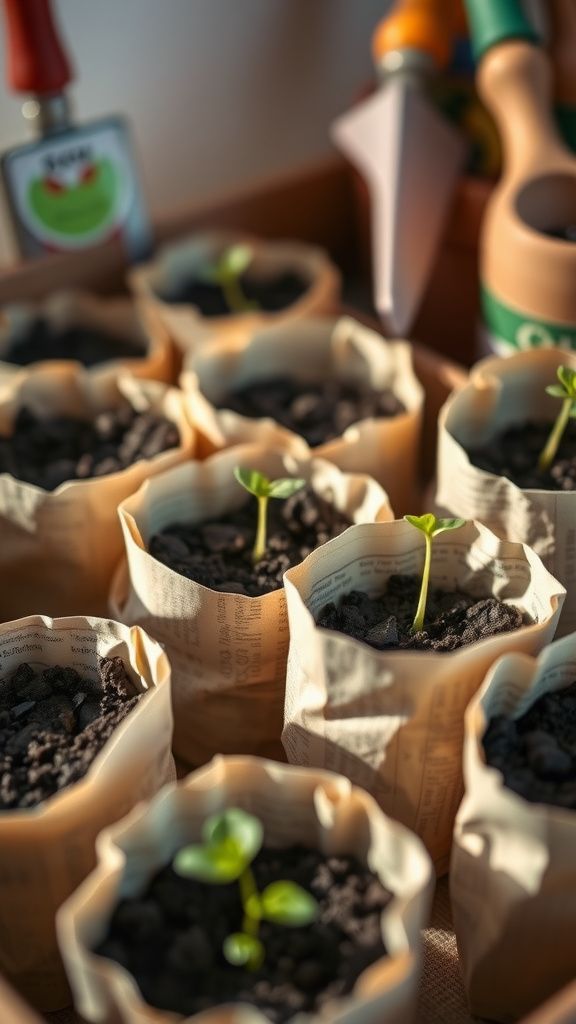
There’s a papery rustle when I fold a strip of newsprint into a small pot, and a scent of ink that somehow feels nostalgic. The little cups sit in an old baking tray, each one cupping a pinch of dark soil and the promise of a green shoot.
I liked how the edges softened when damp, turning crisp paper into something almost fabric-like. When the seedlings appeared, the fragile pots held them gently until they were ready for the garden, offering a quiet, biodegradable cradle for early growth.
Steps
- Cut newspaper sheets into rectangular strips and roll them around a small jar to form pots.
- Fold and tuck the bottom to secure each pot, then crease the rim for stability.
- Fill each pot with seed starting mix and press seeds gently into the surface.
- Place pots in a shallow tray and water carefully to moisten without soaking.
- When seedlings have a couple of true leaves, transplant pots directly into garden soil.
Glossy magazine bead necklace with old-time shimmer
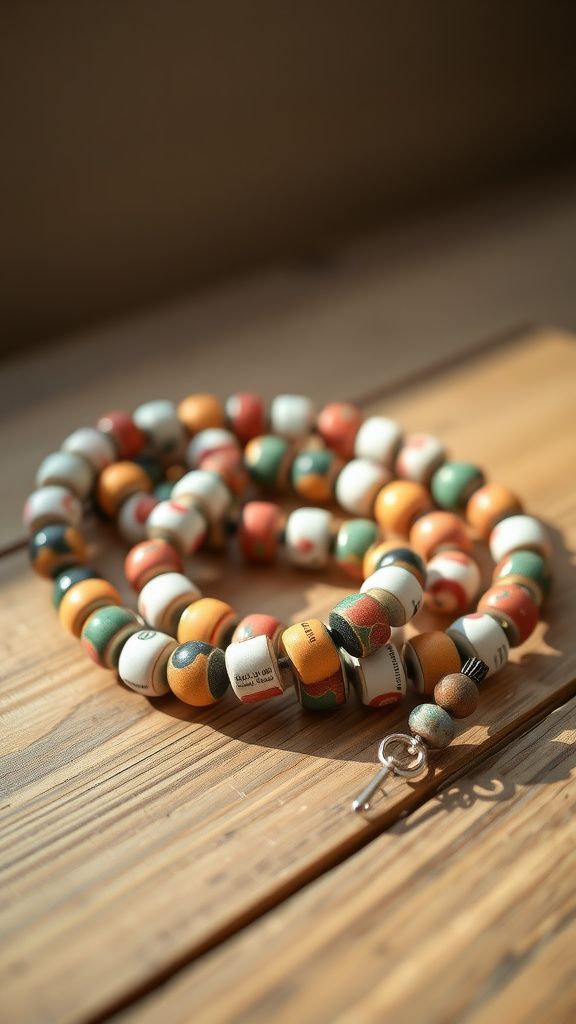
Rolling glossy magazine strips into beads felt like slow treasure hunting, each page offering a flash of color or a sliver of text. The finished necklace had a pleasant weight and a tactile rhythm as the beads clinked together.
When I turned it in my hands, little images peeked out, like tiny memories stitched into the piece. The surface caught sunlight and made small gleams that moved with wearer’s breath, and that quiet sparkle gave the necklace an approachable, handmade elegance.
Steps
- Cut magazine pages into long triangular strips and apply a thin line of glue along each strip.
- Roll each strip tightly from the wide end toward the point and allow beads to dry.
- Seal beads with varnish or decoupage medium for sheen and durability.
- String the beads onto cord or wire, alternating sizes for balance.
- Finish with a clasp or tie a secure knot and trim excess.
Cardboard kaleidoscope that catches sunbeams
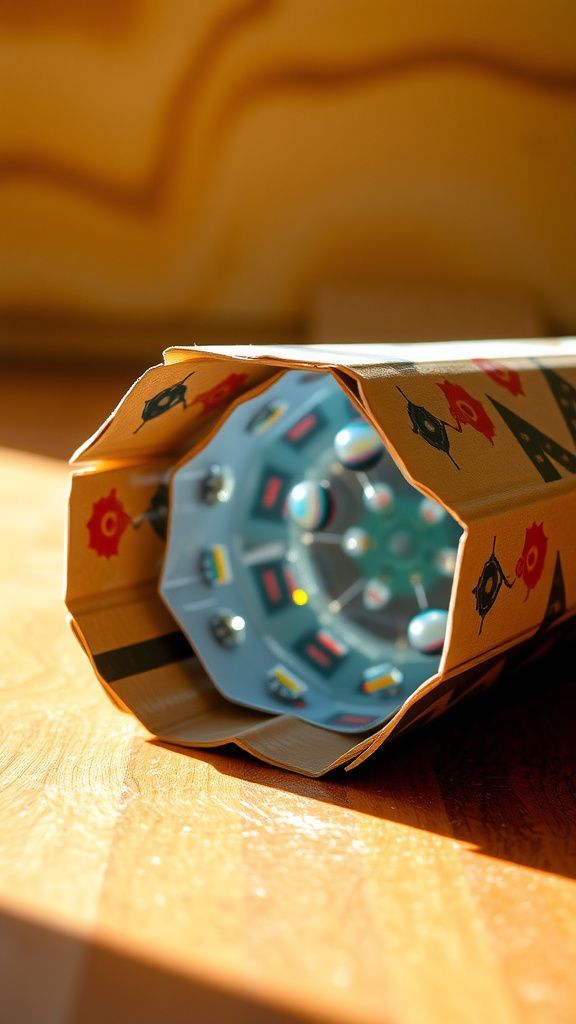
Peering into a cardboard tube transformed into a kaleidoscope felt like unlocking a tiny secret world of color. Light fractured into starbursts that shifted with the gentlest tilt, and the inner surfaces held a matte cardboard warmth against the eye.
I remember the soft scratch of patterned paper glued to the outside, a contrast to the optical glints inside. Each turn offered a fresh arrangement of fragments, small and ephemeral, and the device sat comfortably in one hand like a pocket-sized theater of light.
Steps
- Prepare a sturdy cardboard tube and line the interior with mirrored strips or reflective film.
- Create a rotating end chamber with transparent beads or colored cellophane to form the viewing mosaic.
- Seal the viewing end with a clear window and ensure mirrors are angled correctly.
- Decorate the exterior with patterned paper or paint for a finished look.
- Hold the kaleidoscope up to light and rotate the end chamber to view changing patterns.
Denim pocket organizer from favorite old jeans
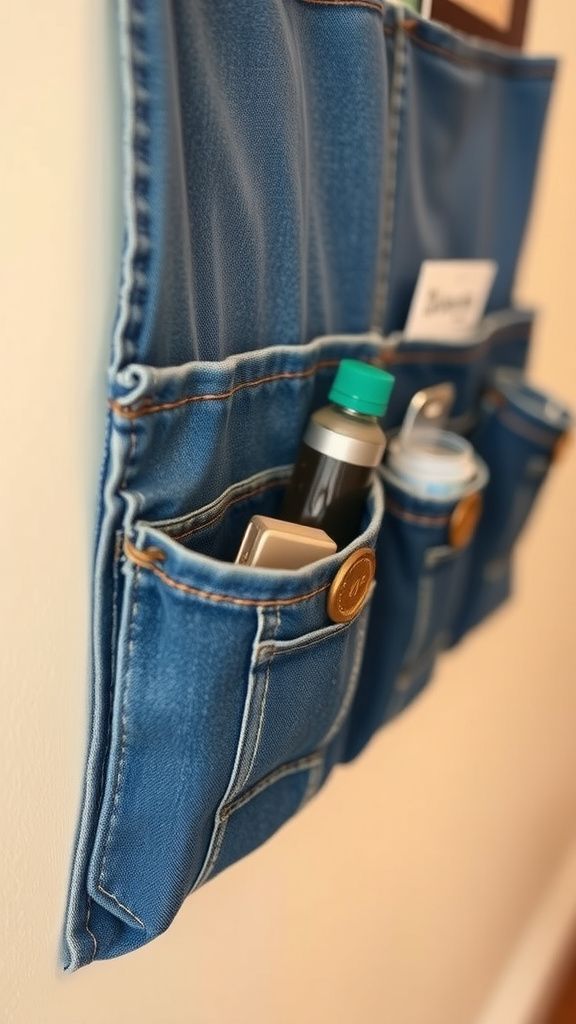
There’s an instant sense of familiarity when pockets from worn jeans become a wall organizer, the denim still carrying faint traces of past afternoons. The rough weave felt reassuring under my fingers, and the pockets’ shapes made natural nesting spots for pens, notes, and small tools.
I hung it near the door and enjoyed the way coins and receipts tumbled into pockets with a soft thud. The faded seams and occasional threadbare patch added honest character, making the whole piece feel hand-me-down comfortable rather than manufactured.
Steps
- Cut pocket sections from washed denim and arrange them on a backing fabric or board.
- Secure pocket edges with stitching or heavy-duty fabric adhesive, reinforcing stress points.
- Add a rod or sturdy tape across the top for hanging support.
- Embellish pockets with buttons, patches, or embroidery for personality.
- Mount on a wall at reachable height and tuck in small everyday items.
Egg carton succulent display with soft palette
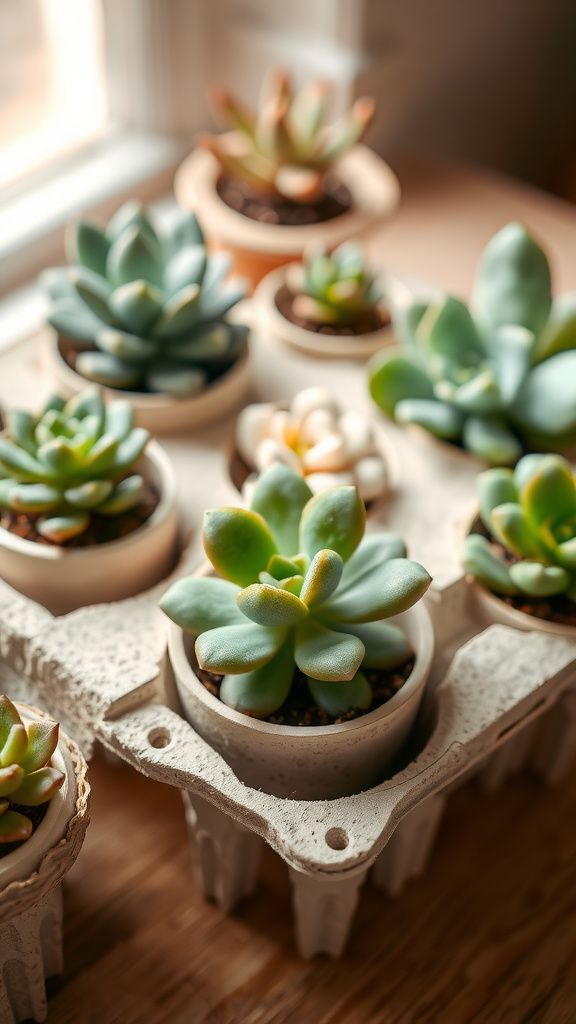
Egg cartons offer a quiet, modular stage for tiny succulents, each cup holding a small world. The carton fibers had a gentle roughness beneath my fingertips and a muted color that made green leaves sing.
I liked the arrangement of different shapes and textures as succulents nestled side by side, their plump leaves contrasting with the carton’s matte surface. The whole display felt compact and calm, a miniature desert landscape that fit on a sunny shelf, offering a small ritual of care when checking soil moisture.
Steps
- Separate clean egg carton cups and, if needed, cut them into smaller clusters.
- Add a small layer of gravel for drainage and fill with succulent potting mix.
- Place tiny succulent cuttings into each cup and press soil gently around roots.
- Set the cluster in a shallow tray to catch excess water and provide stability.
- Position in bright indirect light and water sparingly once soil is dry.
Wine cork bath mat with warm, tactile texture
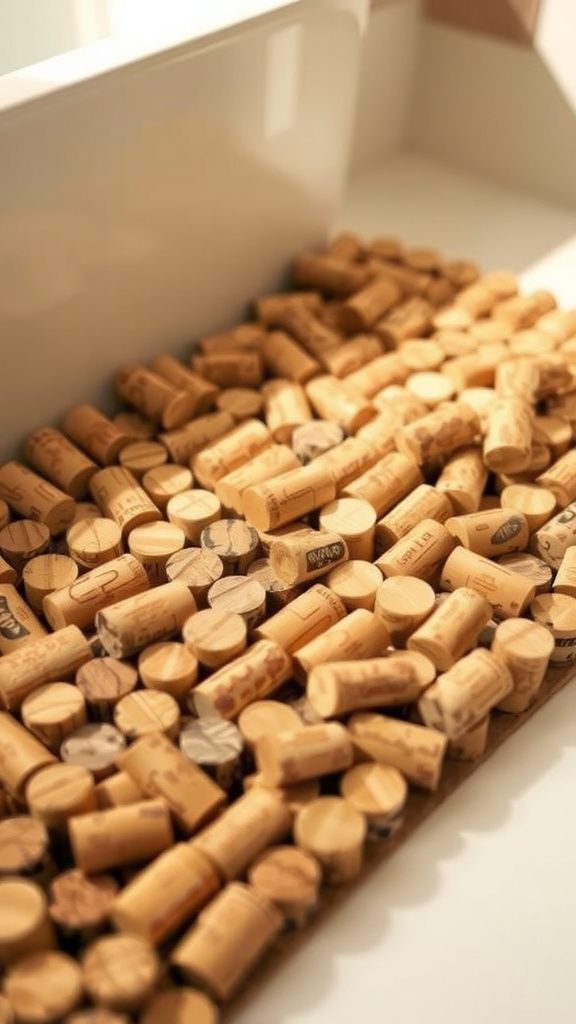
A mat made of wine corks carried the slow warmth of evenings spent with friends, each cork holding a fragment of a shared story. The corks’ grainy texture felt comforting under bare feet, and the faint scent of oak lingered like a memory.
Arranged tightly together, they formed an almost puzzle-like surface that yielded slightly with weight. Stepping onto it after a shower offered a gentle, grounding moment; the mat’s color palette of tan and caramel felt earthy and quietly domestic beneath toes.
Steps
- Collect a large number of wine corks and clean them of residue.
- Slice corks lengthwise for a flatter surface, or use whole corks for a raised texture.
- Arrange corks on a non-slip backing, aligning edges closely for a snug fit.
- Secure corks to the backing with strong adhesive or by stitching through cork centers.
- Trim edges for shape and allow adhesive to cure before placing in a dry area.
Jar lid wind chime that gently tinkles
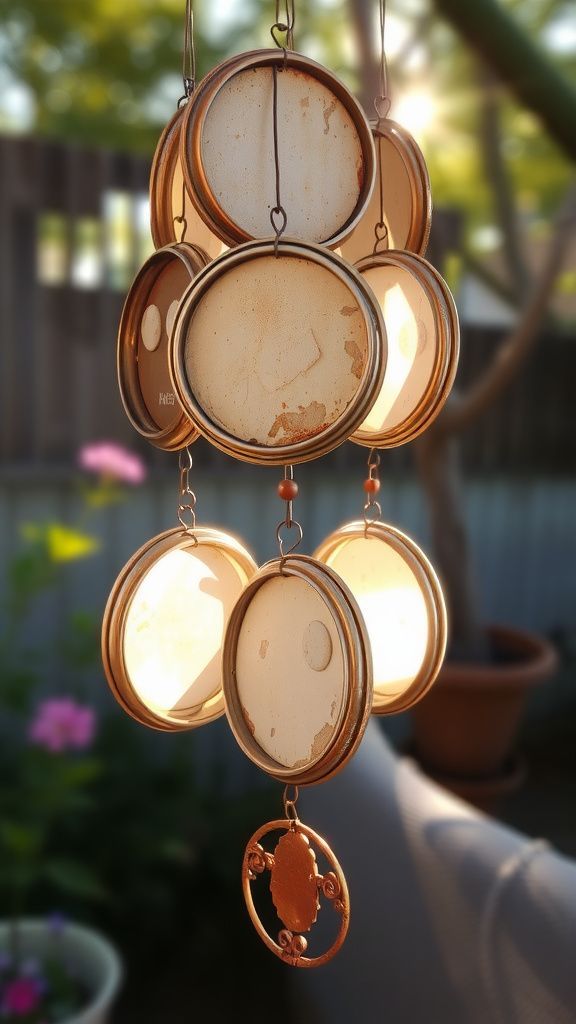
Hanging a string of jar lids and metal bits from a porch beam introduced a faint tinkling that felt companionable on breezy afternoons. The lids’ painted undersides and rusted edges added a layered patina that caught sun and shadow.
When the wind moved them, the sound was playful and slightly metallic, like small bells joined in a casual chorus. I enjoyed the visual rhythm of round shapes linked by cord, each lid turning its face to the sky and reflecting a slice of light back into the yard.
Steps
- Gather metal jar lids and small metal objects, cleaning and drying each piece.
- Drill small holes near lid edges and thread nylon cord or twine through them.
- Arrange lids on multiple strands at varying lengths to create movement.
- Anchor strands to a wooden ring or beam and secure with knots.
- Hang the chime in a spot with gentle breeze and adjust spacing for sound.
Pallet photo frame with weathered, earthy appeal

A frame built from reclaimed pallet wood carried the grain and tiny nail holes of other lives. Its rough-hewn edges and uneven stain evoked afternoons in a workshop, fingers dusted with sawdust.
The frame’s surface absorbed light in irregular ways, making photos feel like artifacts in a small shrine. I enjoyed leaning it against a mantel and watching dust settle into the grooves, the whole object bringing a grounded, tactile presence that made images feel closer and somehow more lived-in than a glossy store frame.
Steps
- Disassemble a pallet and select straight boards, removing any nails and rough splinters.
- Cut boards to frame dimensions and dry-fit corners to ensure square alignment.
- Join corners with wood glue and nails or screws, sanding rough spots gently.
- Stain or leave natural, then install a backing board and photo mount.
- Add hanging hardware or a stand and insert a favorite photograph.
CD mosaic coaster with shimmering, prismatic surface
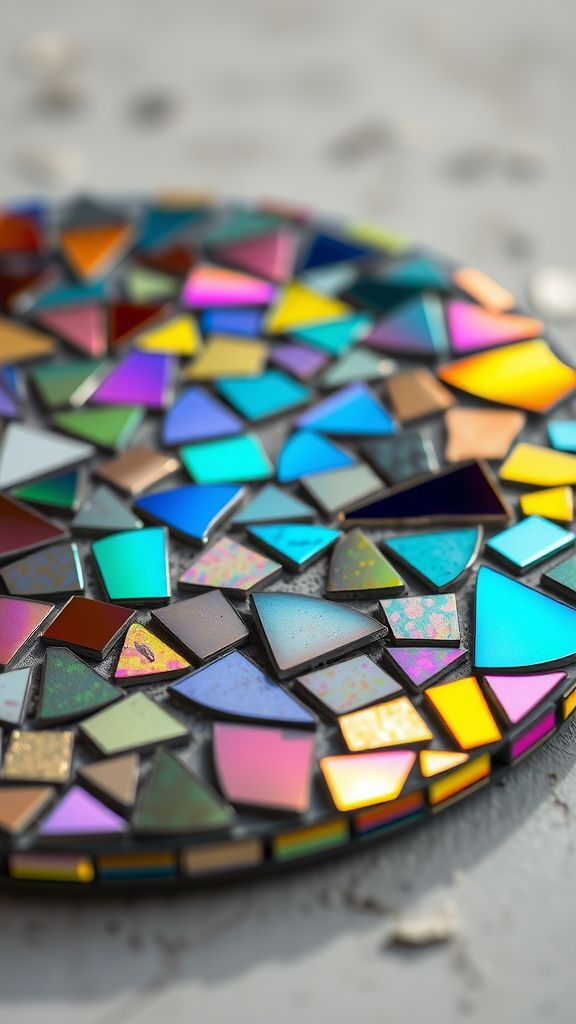
Cut shards of old CDs scattered light like tiny rainbows across a tabletop, catching angles and making conversations pause for a reflective moment. The surface held a glassy, cool feel under my hand when I lifted a coaster, and the tiny mirror-like pieces threw flecks of color onto the tablecloth.
I appreciated the contrast of slick, iridescent fragments against a matte base, and the coasters felt both modern and nostalgic, like tiny fragments of past playlists reframed as functional art in the present.
Steps
- Break old CDs into small mosaic pieces, wearing eye protection and gloves.
- Arrange disc fragments onto ceramic or cork coaster bases to plan a design.
- Adhere pieces with strong clear adhesive and allow to set fully.
- Fill gaps with grout or clear resin, wiping excess from surfaces.
- Seal the coaster with a top coat to smooth edges and protect the finish.
Toilet roll napkin rings with playful patterns
A stack of cut toilet paper tubes became small, hollow bracelets with personality when wrapped in fabric and ribbon. The cardboard felt warm and slightly papery when handled, and the patterns added festival energy to the table.
I liked arranging them around folded napkins, watching how light and plateware changed the rings’ appearance. They carried the kind of homemade charm that invites conversation, and seeing guests pick one up always prompted a small smile at the juxtaposition of humble material and thoughtful detail.
Steps
- Cut toilet paper tubes into equal ring heights and sand any rough edges lightly.
- Wrap each ring with decorative paper or fabric, securing seams with adhesive.
- Add embellishments like twine, buttons, or small dried flowers for texture.
- Apply a clear sealant if needed to protect against moisture.
- Place around napkins to complete a handmade table setting.
Cereal box bookmarks with layered collage flair
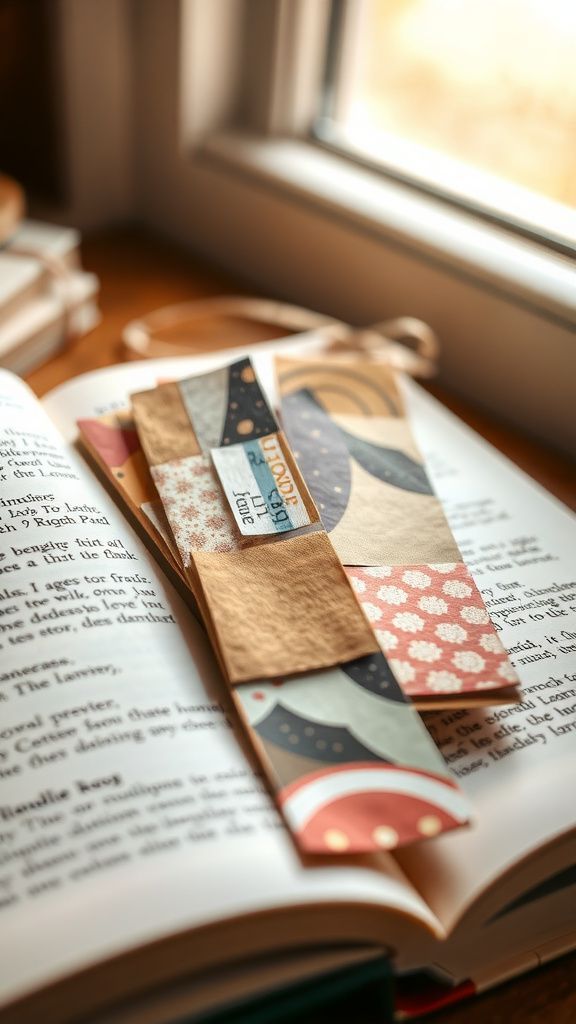
Cereal box cardboard offered a pleasing stiffness that felt right between pages, while its slick printed side provided bits of color to highlight. I remember trimming edges and layering torn magazine scraps for texture, the glue leaving a faint glossy sheen.
Each bookmark developed a little personality, some bold and brash, others quiet and textured. Tucking one into a book felt like a tiny gift, and the tactile contrast of cardboard against the paper pages was a small, satisfying detail during long reading afternoons.
Steps
- Flatten and cut cereal boxes into rectangular bookmark shapes and round corners if desired.
- Adhere collage elements like torn paper, stickers, or stamps to the front surface.
- Laminate or cover with clear adhesive film to protect from wear.
- Punch a hole at the top and add a ribbon or tassel if desired.
- Slip into a favorite book and enjoy the handmade touch.
Old sweater mittens with lived-in softness
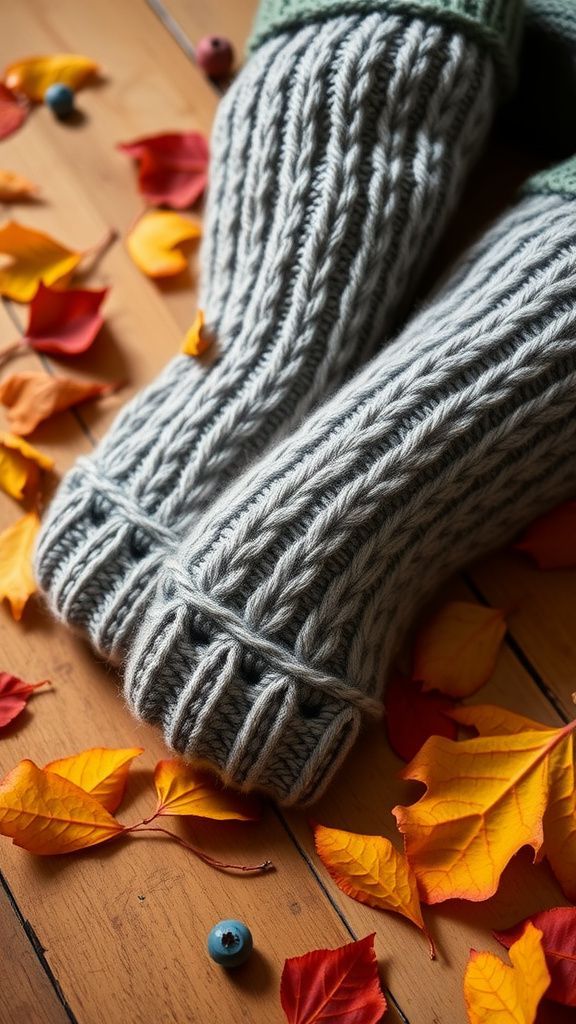
There’s an immediate coziness when fingers slide into mittens knitted from an old sweater, the fabric carrying the warmth of past winters. The wool held a faint scent of lavender from a long-ago wash, and the ribbed cuff hugged the wrist gently.
The knitted texture smoothed into palm-shaped contours with wear, creating a personal fit that felt familiar. I liked the slightly imperfect seams and the way different yarn colors blended into stripes, each mitten telling a story of comfort and a season well spent.
Steps
- Trace hand shapes onto folded sweater fabric and cut out mirrored mitten pieces.
- Sew edges together inside out, leaving an opening for the wrist cuff.
- Turn mittens right side out and reinforce the cuff with additional stitching.
- Finish raw edges and add lining if extra warmth is desired.
- Wear to break them in and enjoy the snug, recycled softness.
Glass jar lanterns that catch twilight glow
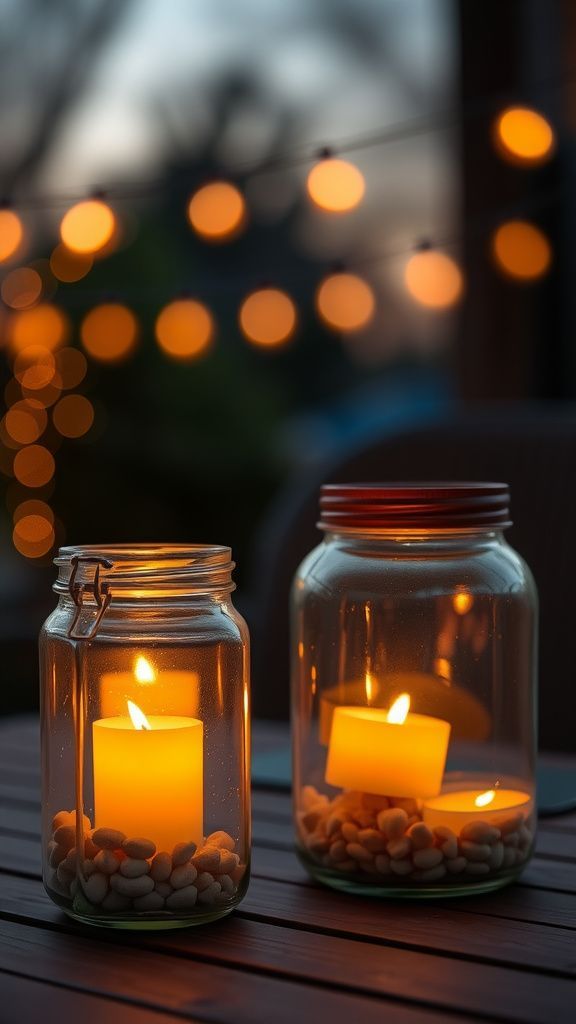
A string of jars with small candles inside created a gentle pool of light that shifted as dusk settled. The glass held a faint coolness when lifted, and the flame’s glow turned labels into warm halos.
I liked how the jars reflected nearby colors, making a soft collage of light on the patio. The gentle clink when moving them reminded me of beach glass collected on a walk, and the clustered lanterns made an intimate nook where conversations felt easier and time slowed to a calmer pace.
Steps
- Clean jars thoroughly and remove labels, then dry completely.
- Place a candle or LED tea light inside each jar and add decorative elements like sand or pebbles around the base.
- Wrap jar rims with twine or wire for hanging if desired.
- Group jars on a table or hang at varying heights to create depth.
- Light candles at dusk and enjoy the soft ambient glow safely monitored.
Map-covered bowl with travel memory texture
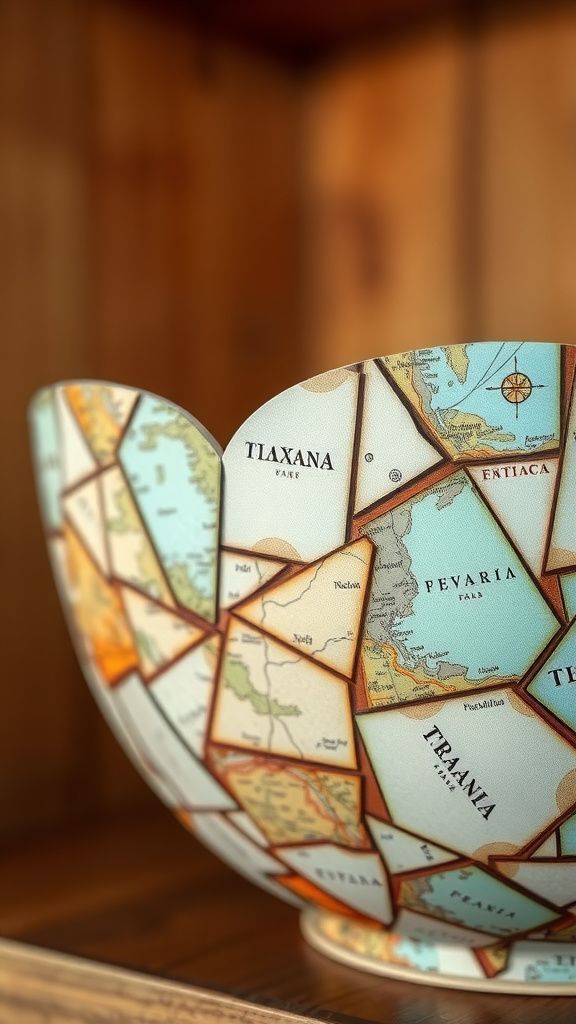
Layers of old maps molded over a simple bowl shape carried the thrill of routes and destinations folded away in drawers. The paper’s thin edges created a textured rim, and the lines of cities and coastlines gave a sense of distant places pooled together.
Handling the bowl felt a bit like holding a collage of small adventures; the map fragments creased into valleys and ridges that caught light differently. When set on a shelf, it drew questions and comments, prompting little exchanges about remembered trips and the places those maps once guided.
Steps
- Cut map pieces into manageable shapes and apply them to a bowl form with decoupage medium.
- Smooth each map section carefully to avoid bubbles and overlap edges neatly.
- Allow layers to dry and add additional coats for strength and sheen.
- Trim any overhang and reinforce the rim if needed with paper or fabric.
- Use as a decorative bowl for dry items or display on a shelf.
Bottle cap garland with bright playful rhythm
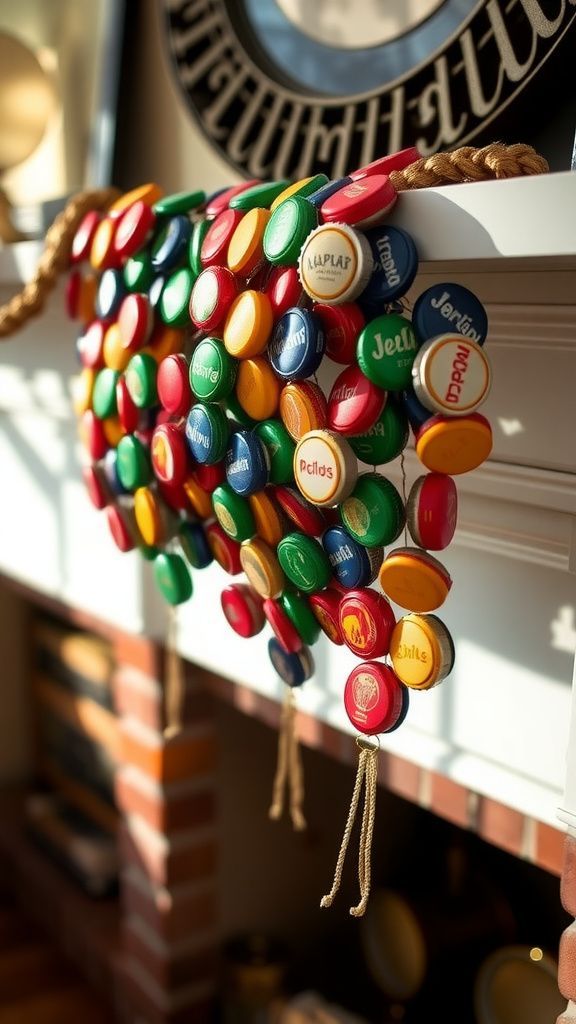
A garland strung from bottle caps offered a festive clatter when curtains moved, the small circles catching light like tiny discs of color. Each cap kept traces of its past label in miniature, and the metal felt cool against the fingertips when adjusting length.
Hung across a mantel or window, the garland turned ordinary space into a corner of celebration, the colors and shapes creating a casual pattern. I found myself smiling at how such small parts could shift the mood of a room with their jaunty presence.
Steps
- Flatten or leave bottle caps as-is, cleaning each thoroughly.
- Drill or punch small holes near the rim of each cap for threading.
- Thread caps onto a strong cord or wire, spacing them evenly or in clusters.
- Secure ends and hang the garland in a chosen spot for seasonal decoration.
- Replace caps or rearrange strands to refresh the look over time.
Wine bottle herb garden for a slim windowsill
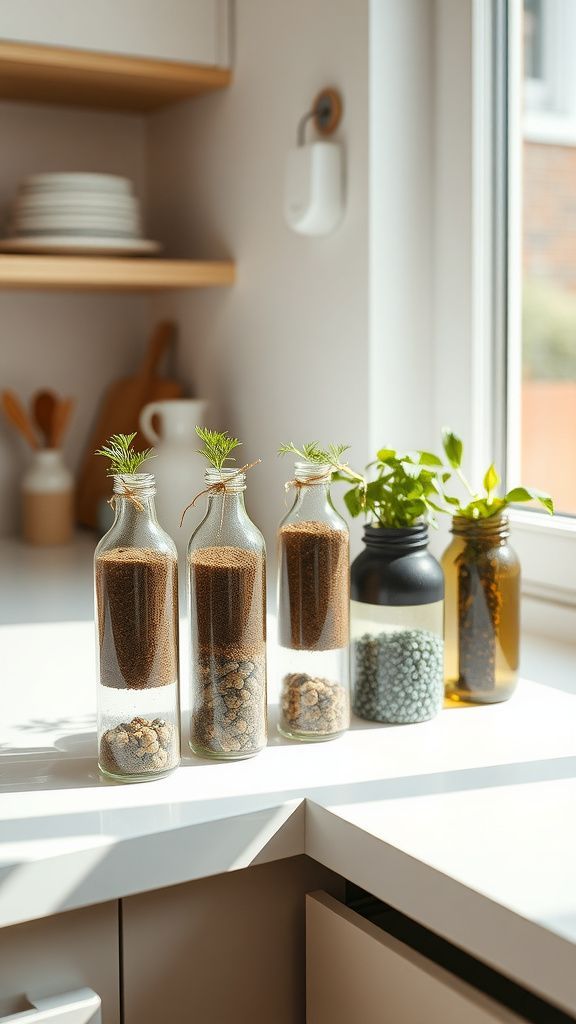
Cut glass bottles turned into narrow planters that fit neatly along a kitchen ledge, their smooth surfaces catching reflections of passing clouds. The soil inside looked like a little dark river, and the green sprigs rose like small announcements of flavor.
I appreciated the slender profile that allowed several plants to share a single sunny rail, and the translucence made watering times easier to judge. The arrangement smelled faintly of basil and rosemary when crushed in passing, a tiny reminder of seasons and simmering dinners yet to come.
Steps
- Cut the top off cleaned wine bottles and smooth the cut edge with sandpaper.
- Add drainage material like pebbles, then fill with light potting mix.
- Plant small herb seedlings into each bottle and firm soil gently around roots.
- Place bottles on a sunny windowsill and water carefully to avoid over-saturation.
- Rotate bottles periodically for even light exposure and thin overcrowded plants as needed.
Cardboard pinhole camera with vintage, tactile feel
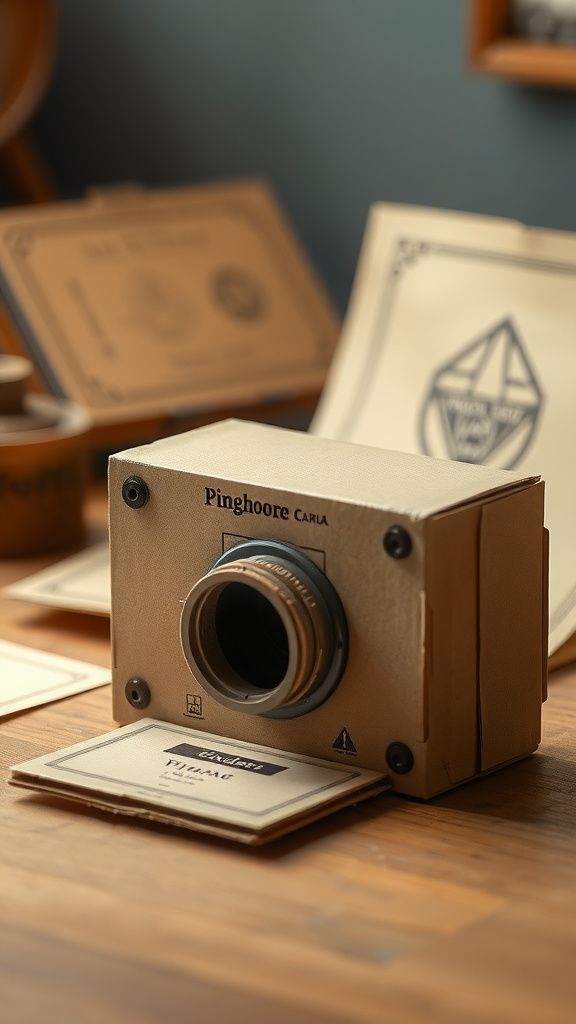
Building a simple camera from cardboard brought back a slow, focused way of making images. The box’s edges and folds gave a handcrafted look, and the tiny pinhole framed the world in a constrained, intimate way.
Holding it up to an eye produced a softer, dreamlike field where light pooled differently than through modern lenses. I liked the patient process of waiting for a captured exposure and the quiet surprise of the developed image, which carried grain and mood like a snapshot from another decade.
Steps
- Construct a light-tight cardboard box with an interior blackened to reduce reflections.
- Create a small pinhole in a metal foil patch and mount it securely on the front face.
- Install a removable back panel for placing photographic paper or film inside.
- Expose the paper or film according to light conditions, then develop in a darkroom process.
- Experiment with placement and exposure time to achieve different tonal results.
Broken mirror mosaic tray with sparkling fragments
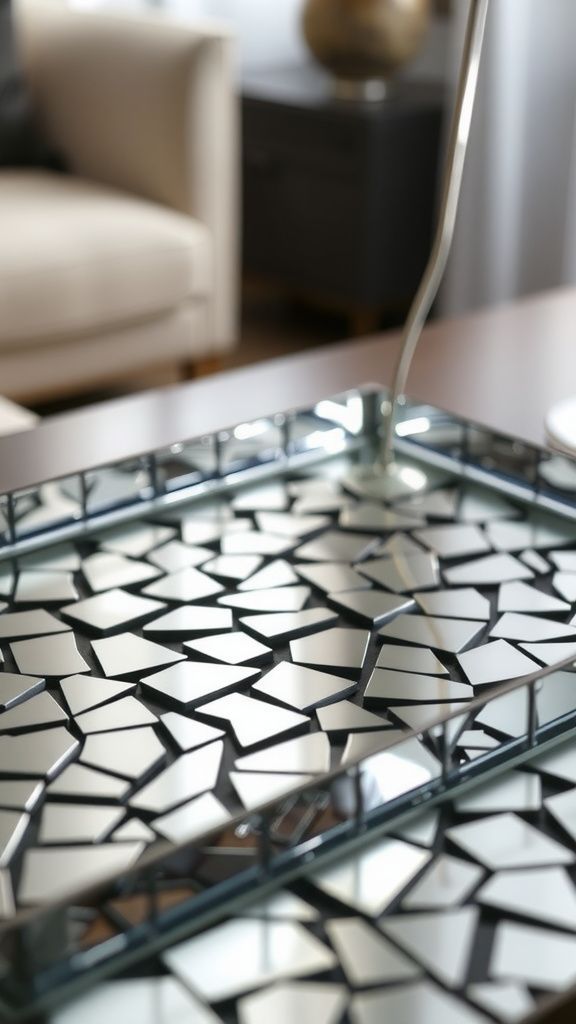
A serving tray inlaid with tiny mirror pieces threw fractured reflections across a coffee table, making sunlight feel playful and slightly mischievous. The mirror fragments held edges that glinted coldly and surfaces that softened when brushed with a polishing cloth.
I remember tilting the tray to catch a ray and watching the room map itself in a thousand small slices. The contrast between the tray’s smooth base and the glittering surface created a tactile tension that felt modern yet handcrafted, a decorative pulse on an otherwise quiet shelf.
Steps
- Prepare a sturdy tray base and plan a mosaic layout with cleaned mirror fragments.
- Adhere mirror pieces with strong adhesive, keeping edges snug to reduce movement.
- Fill gaps with grout or clear resin to stabilize the mosaic and create a smooth surface.
- Wipe away excess grout and polish the mirror faces gently once cured.
- Seal edges of the tray and use a felt base to protect tabletops.
Plastic spoon flower wall art with delicate sheen
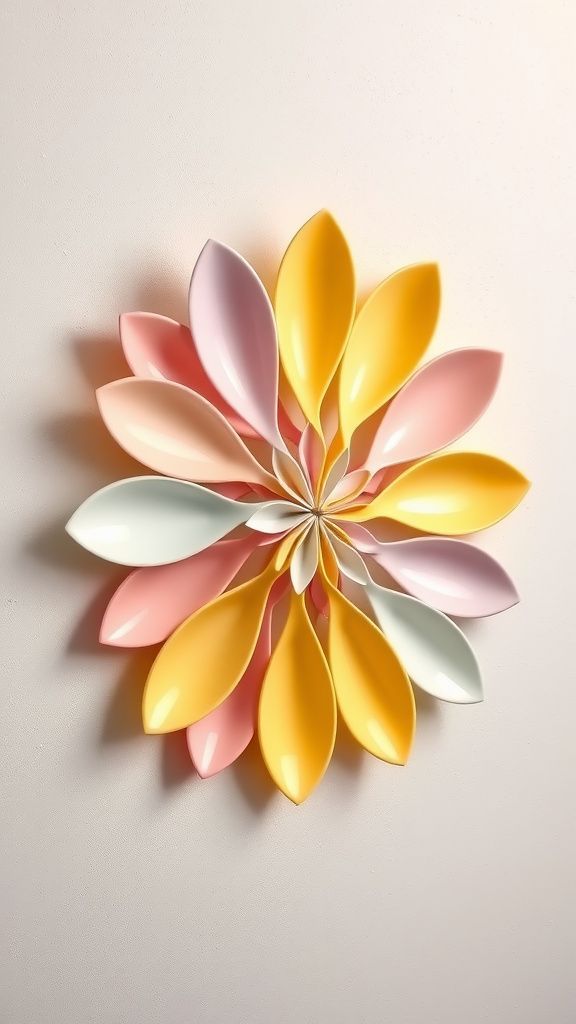
A bouquet of flowers made from recycled plastic spoons felt unexpectedly elegant, the curved bowls catching light like small petals. The plastic had a faint, smooth coolness when held, and painted colors took on a porcelain-like finish.
Mounted against a matte wall, the assembly produced a low-relief garden that shifted gently in light. I enjoyed the sculptural silhouette the piece created from across the room, the repetition of shape yielding a calming pattern.
It was a little reminder that everyday objects could be coaxed into something lyrical and decorative.
Steps
- Heat the handles of cleaned plastic spoons briefly and bend them to form petal shapes.
- Layer spoon petals around a central base and secure with adhesive or wire.
- Paint assembled flowers with acrylic paint and finish with a clear sealant for durability.
- Arrange flowers onto a backing board in a pleasing composition and secure firmly.
- Mount the artwork on a wall using hanging hardware appropriate for its weight.