
Planning a celebration calls for DIY Graduation Party Decor Crafts that feel personal and playful. DIY graduation party decor brings handmade banners, centerpiece ideas, and photo-backdrop touches that carry personality. Graduation party decor crafts mix paper, metallic accents, and fairy lights for a festive scene.
Graduation decor crafts can transform a simple space into a warm celebration corner. DIY graduation crafts bring texture and color while graduation party DIY decor ties the whole evening together.
DIY Graduation Banner with tassel accents and flair
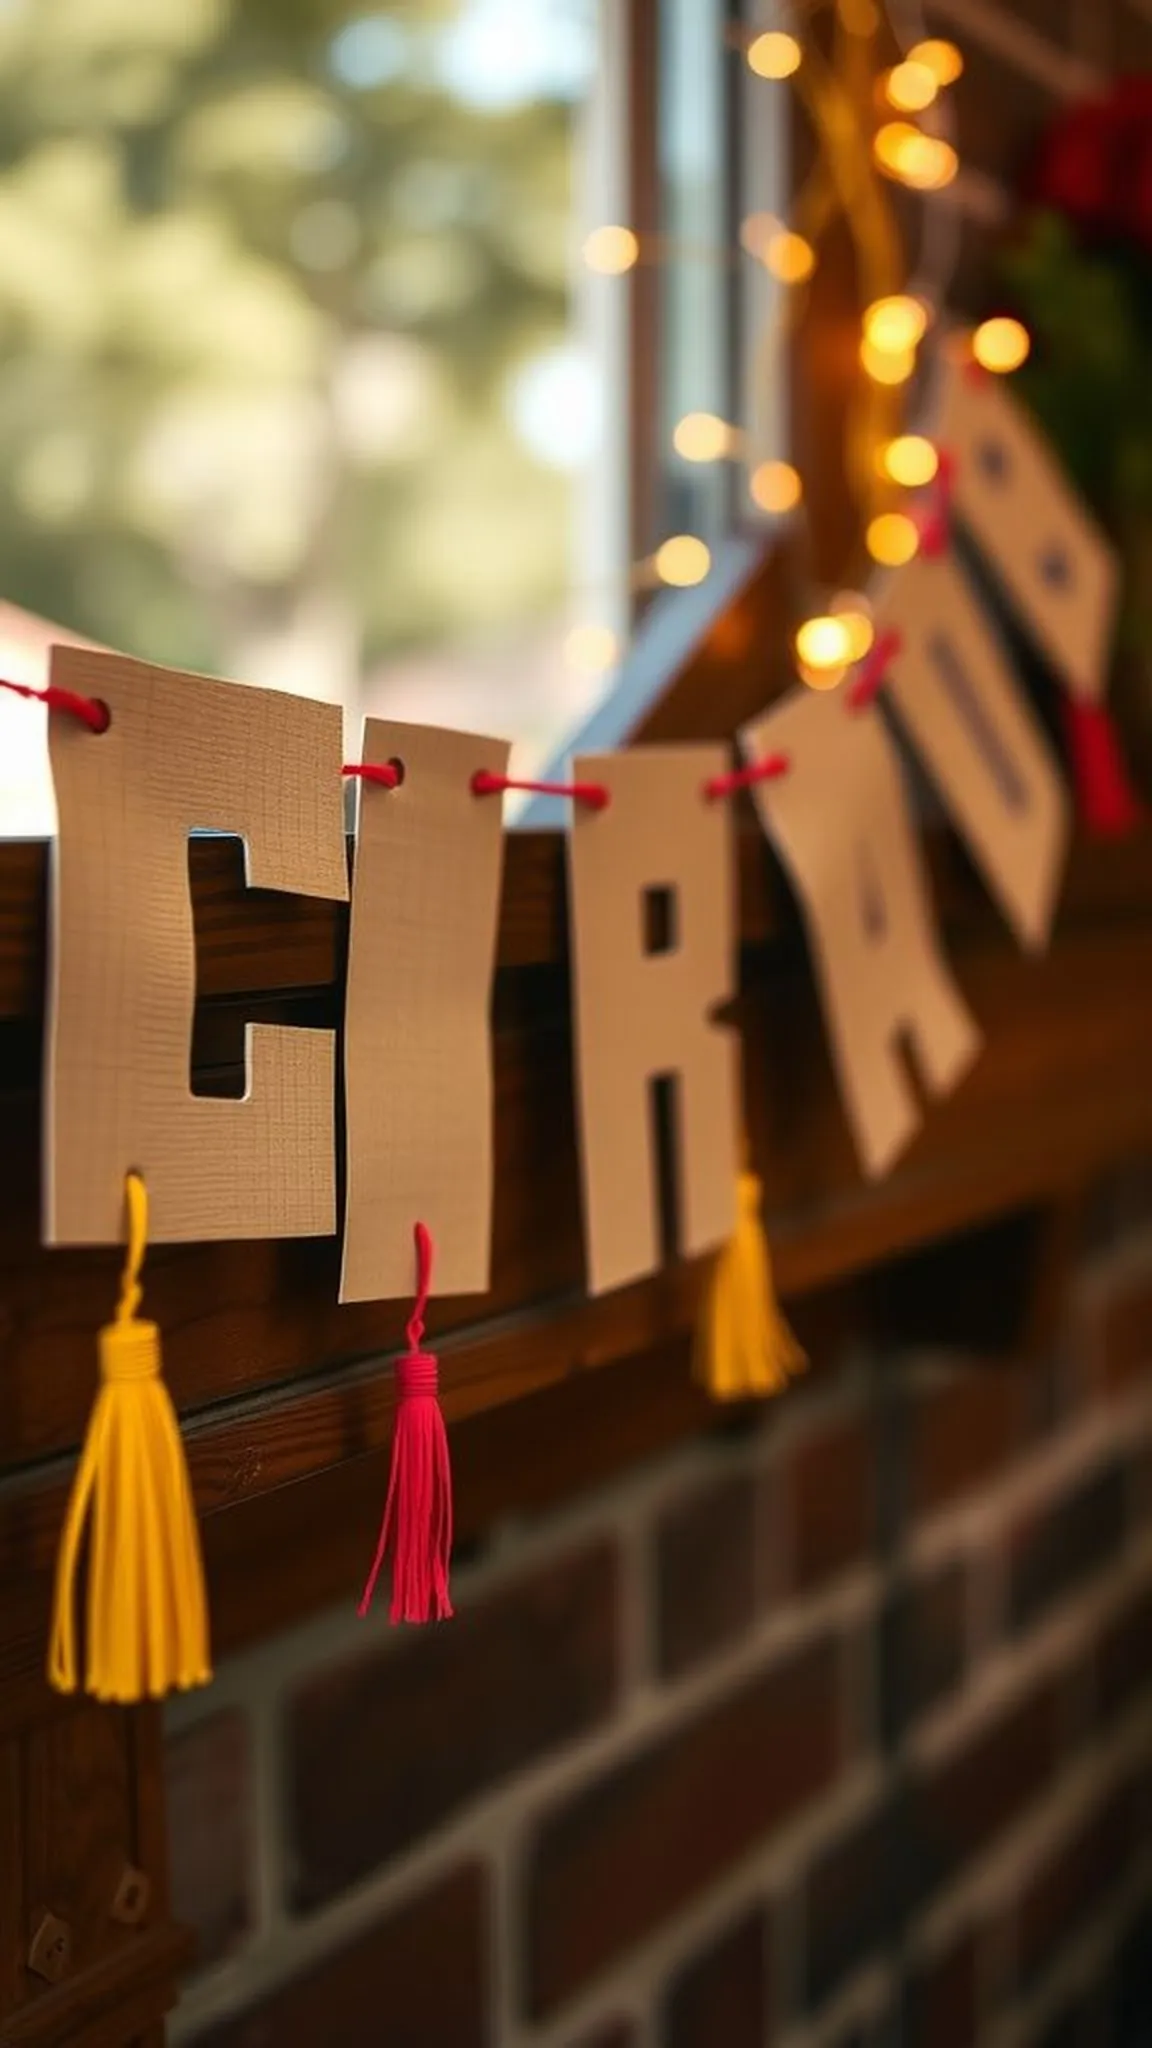
There is a quiet joy in a handmade banner that sways above a dessert table. The paper feels crisp under fingertips and the tassels have a soft, whispering movement when a breeze passes. Metallic thread catches lamp light with a subtle shimmer while letter shapes offer a playful rhythm across the length.
When a banner like this hangs, the room gains a collected, lived-in vibe that feels both celebratory and intimate, stirring smiles from anyone who pauses to read the names and colors.
Steps
- Prepare rectangular panels from sturdy cardstock and lay them in school colors on a flat surface.
- Punch two small holes near the top edge of each panel and string a sturdy cord through for spacing.
- Create tassels from metallic thread by looping, securing the top, and trimming the ends for uniform length.
- Adhere or press letter pieces onto panels to spell the greeting and slide tassels along the cord between panels.
- Adjust spacing along the cord and drape the banner at the event area until it sits with gentle movement.
Balloon arch backdrop with school colors and texture
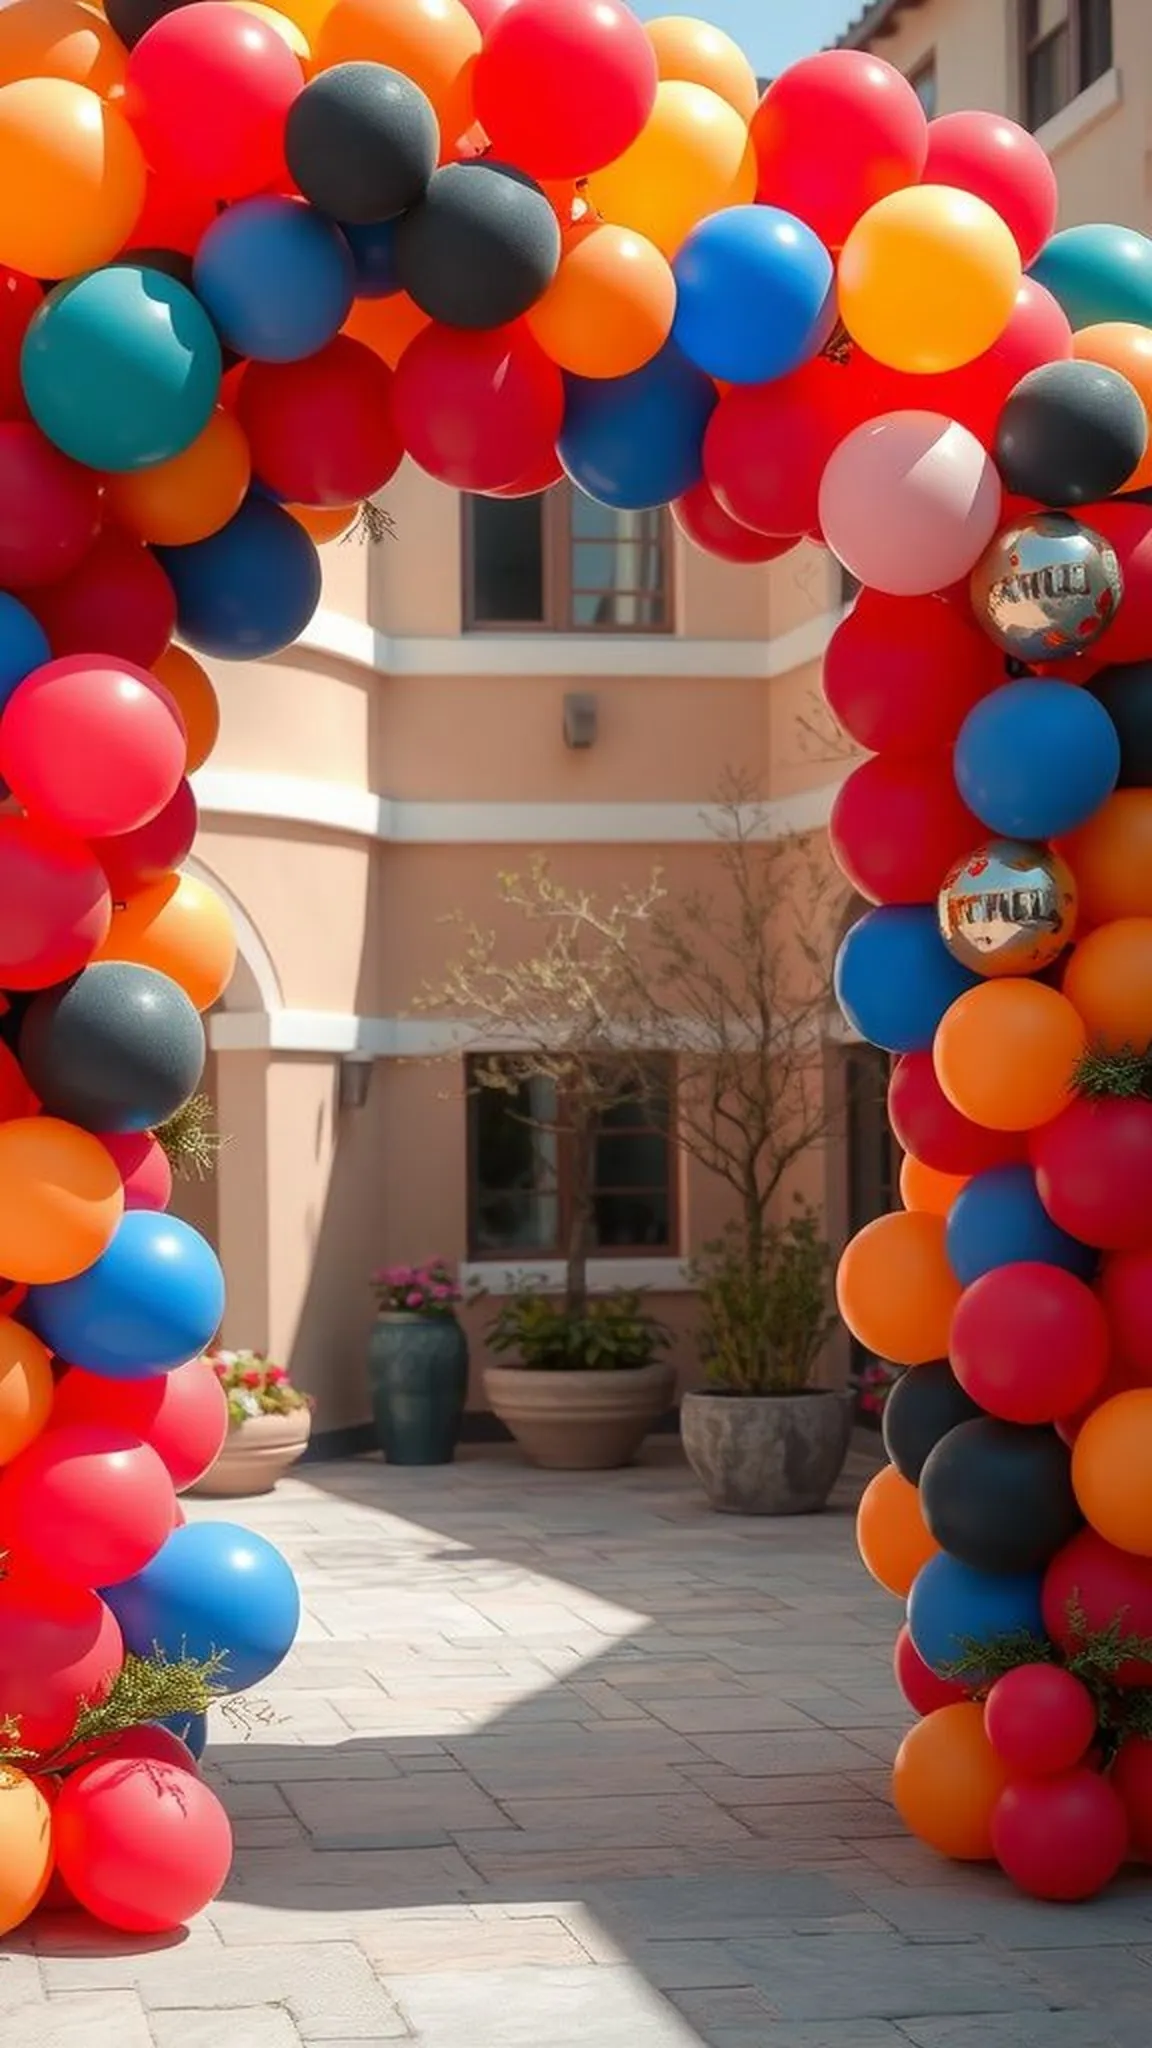
A balloon arch creates an immediate focal point that invites guests to pause and smile. Matte and gloss balloons sit side by side, creating a playful contrast where light kisses the round surfaces. Clusters of smaller balloons nestle against larger ones, adding a lumpy, cloudlike texture that feels buoyant.
The arch frames photos with a sense of ceremony, and nearby reflections in glassware pick up tiny hints of color. Standing beside this arch, conversations seem to find their rhythm, as if the shape itself encourages celebratory chatter.
Steps
- Inflate balloons in varied sizes and mix matte and glossy finishes for depth.
- Bundle small balloons into clusters and secure each cluster with a short piece of cord.
- Arrange clusters along a flexible arch frame, alternating sizes and shades to create organic texture.
- Tuck in a few metallic accents or faux foliage to break the balloon surface and add contrast.
- Position the arch near the photo area and adjust the curve for a flattering frame.
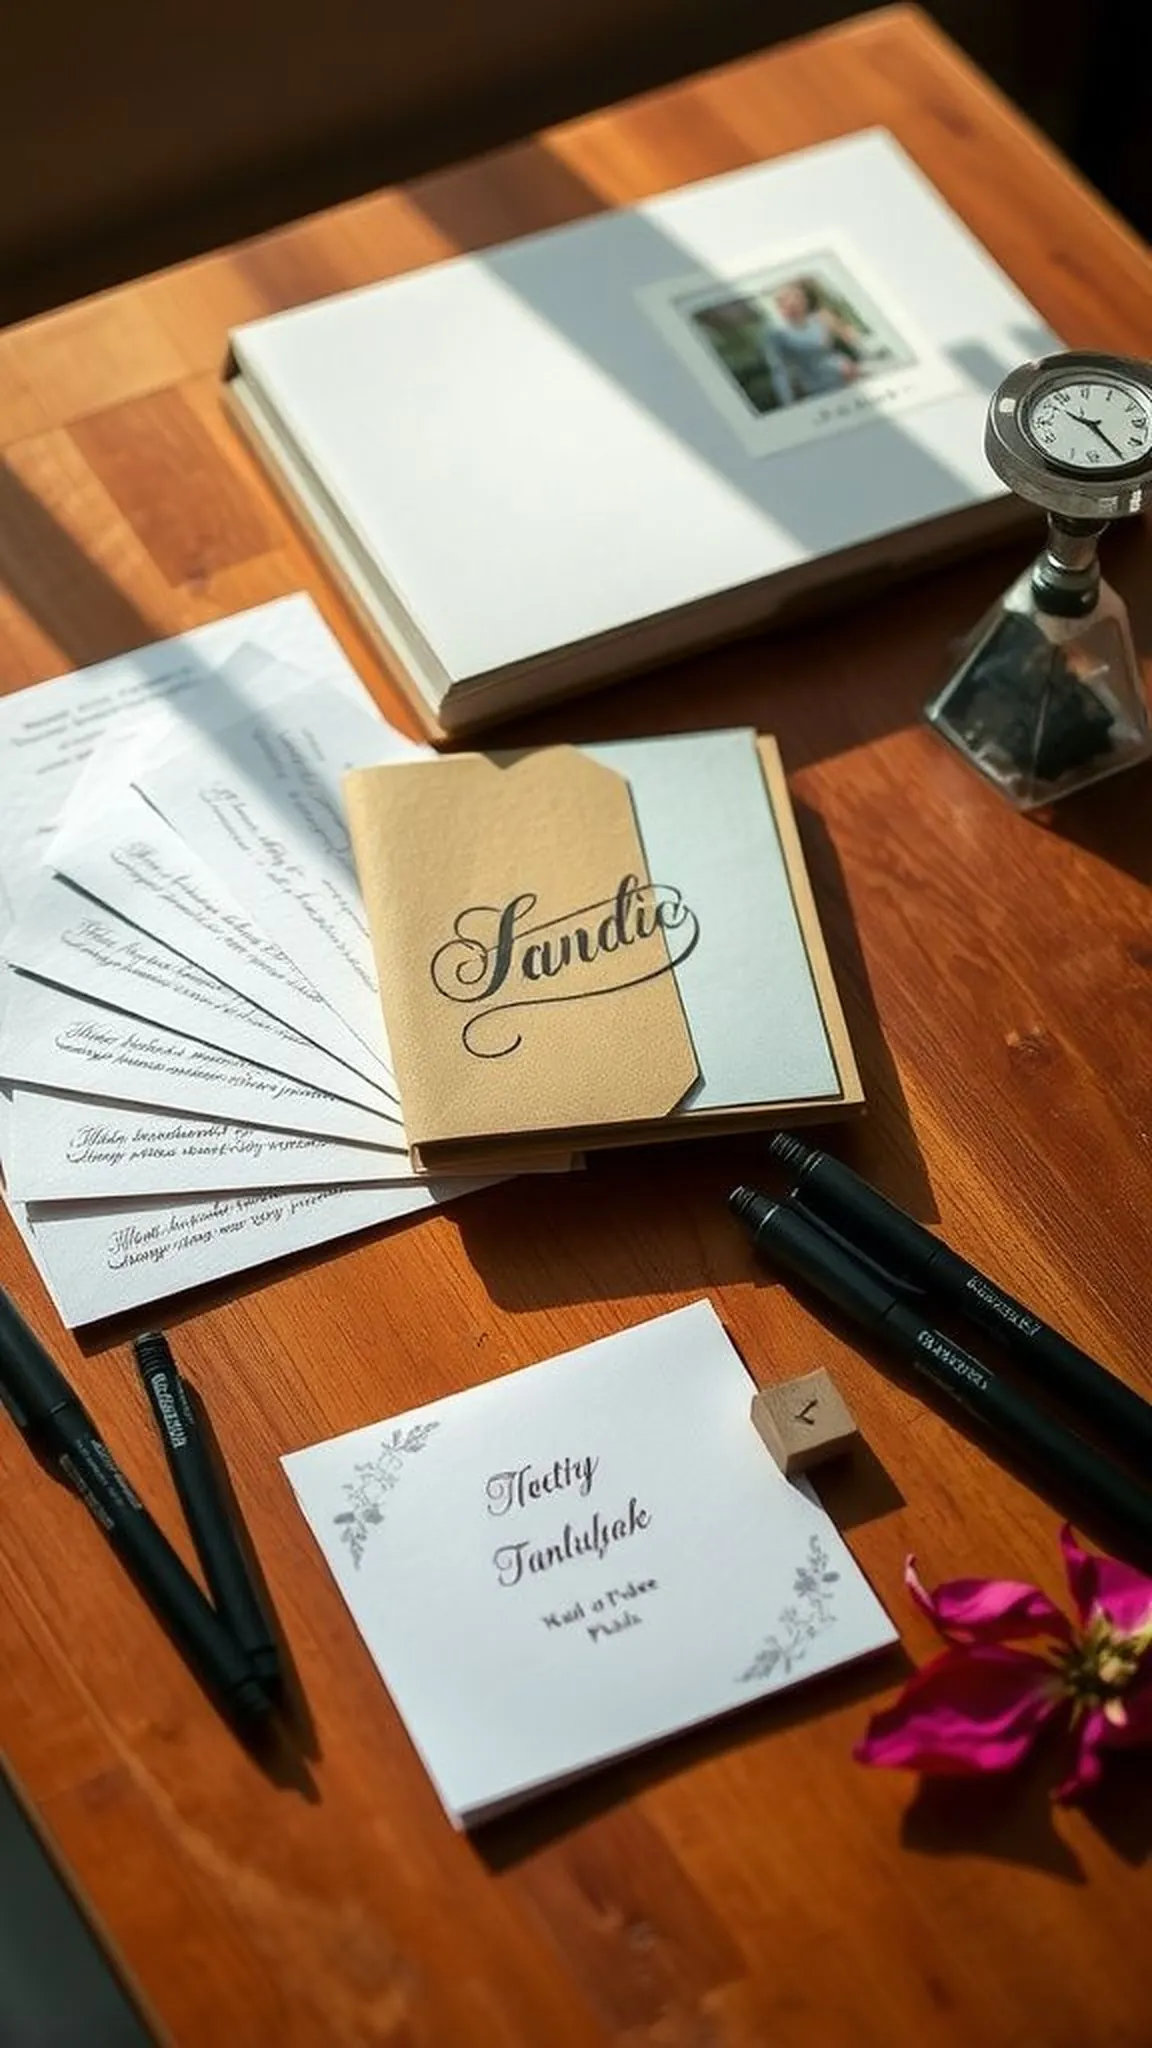
Memory jar for heartfelt notes and keepsakes
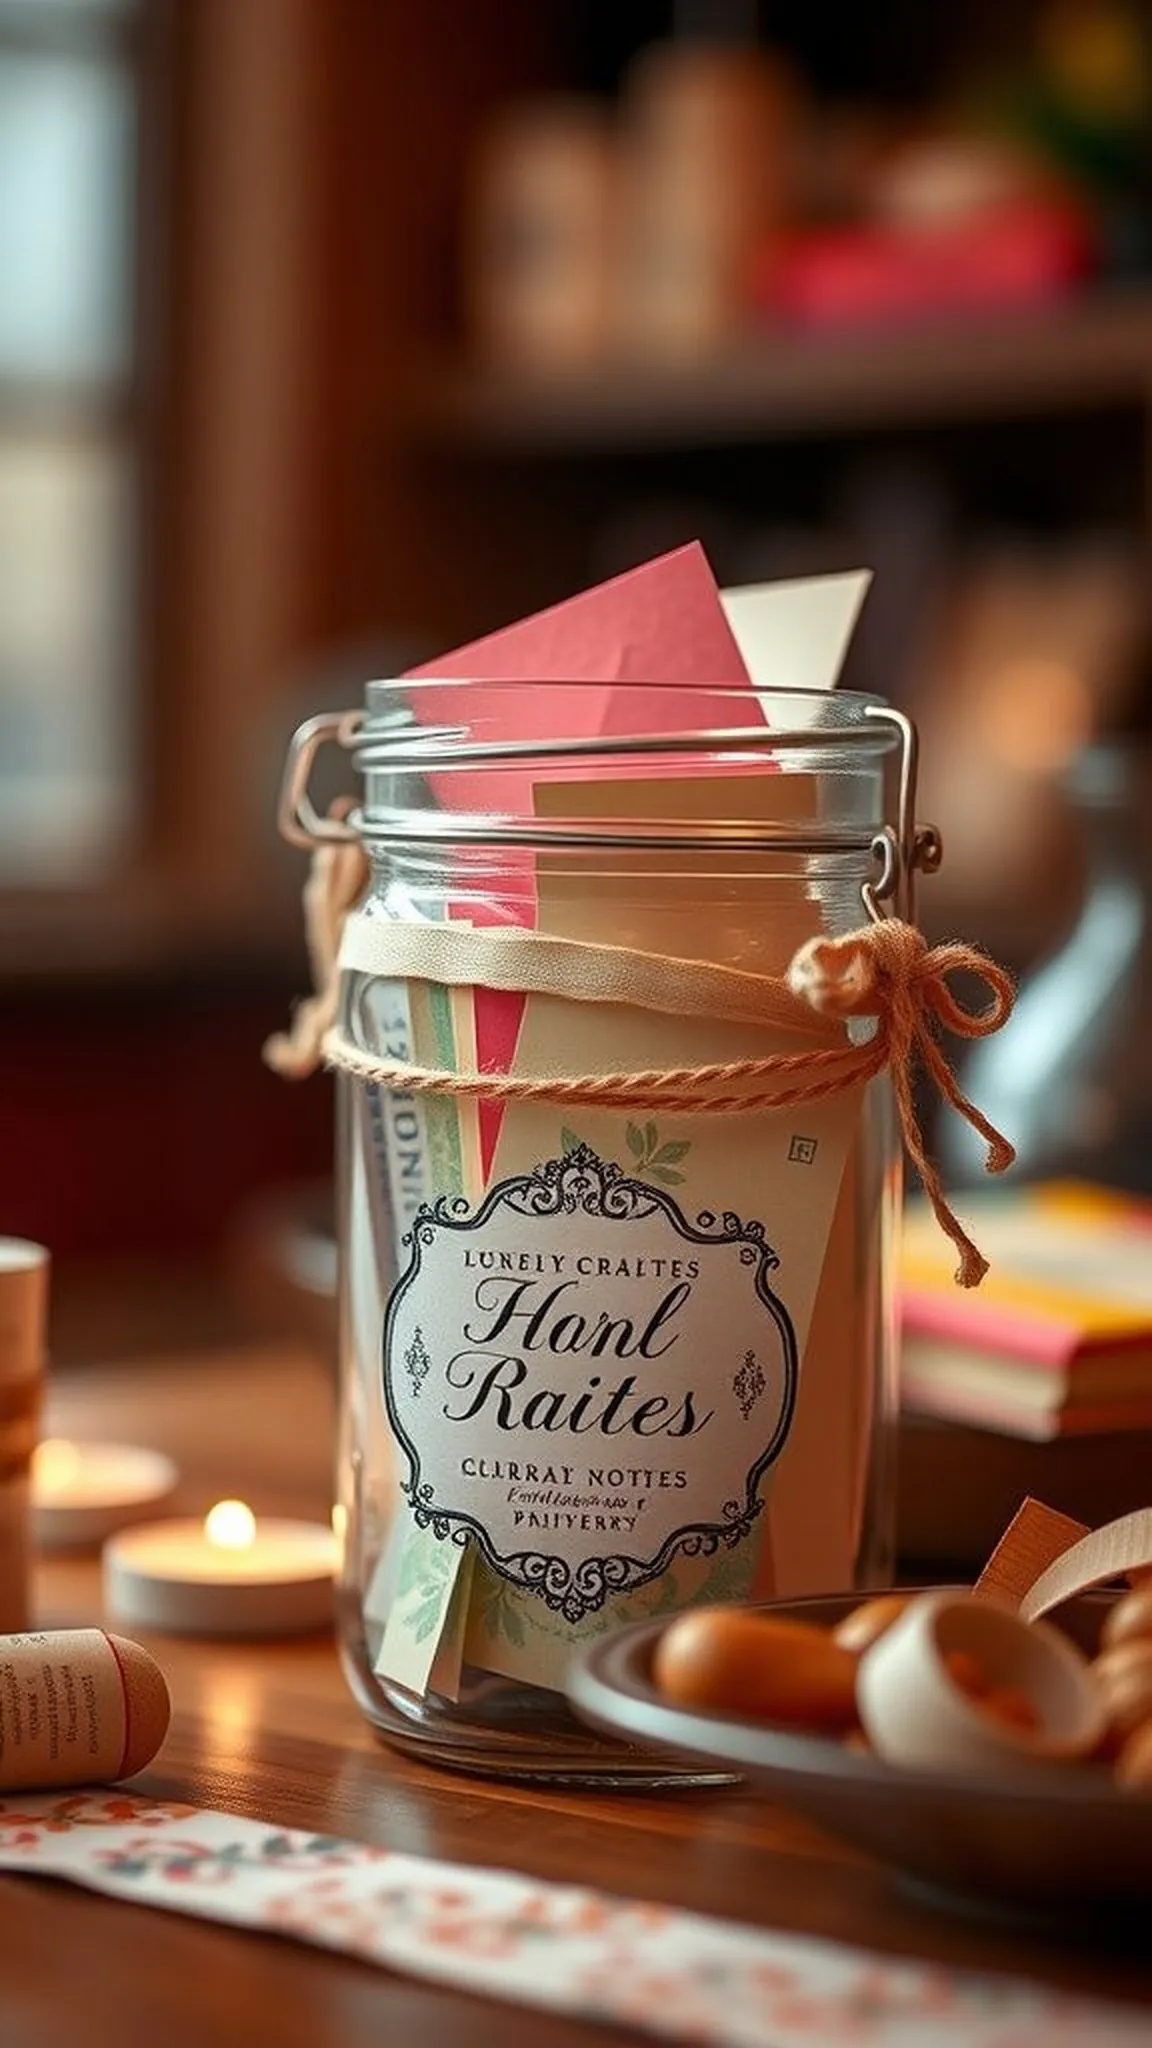
A glass jar filled with folded notes carries a hush of nostalgia. The cool weight of the jar contrasts with the warm paper inside, each slip offering a small, private story. Labels on the jar add a handcrafted charm and the lid holds a cluster of ribbons that rustle softly when moved.
Sitting beside a stack of pens, the jar invites quiet moments where people share brief, bright recollections. The collection becomes a tactile archive that feels personal and oddly comforting to thumb through after the crowd has faded.
Steps
- Choose a clear glass jar with a wide mouth and clean the interior for clarity.
- Prepare small squares of colorful paper and a nearby holder of pens for easy access.
- Place a decorative label on the jar with a celebratory phrase and arrange ribbons around the neck for a soft touch.
- Set the jar on a small table with gentle lighting and encourage guests to drop in notes during the event.
- After the celebration, read the notes aloud or keep them stored as a sentimental memento.
Mason jar centerpieces glowing with tiny lights

Mason jars turned centerpieces have a friendly, familiar quality that feels casually elegant. The cool glass encloses a cluster of tiny lights that twinkle like a pocket of stars, and the glow softens faces nearby. Leaves or delicate paper flowers cushion the base inside the jar and add a hint of organic texture.
The jars reflect nearby candles and glassware, multiplying small points of light. Placed along a table runner, these centerpieces create a warm corridor of illumination that encourages slow conversations and relaxed laughter.
Steps
- Select clean mason jars and place a coiled string of battery fairy lights inside each jar.
- Add a base layer of dried leaves or faux florals around the light cluster to soften the look.
- Close the jar with a rustic lid or leave the top open for a casual feel and tuck the battery pack discreetly beneath the base layer.
- Arrange jars along the center of the table at varying intervals to create a rhythm of light.
- Turn on the lights just before guests arrive to set a gentle, inviting glow.
Tassel garland countdown with playful color pops
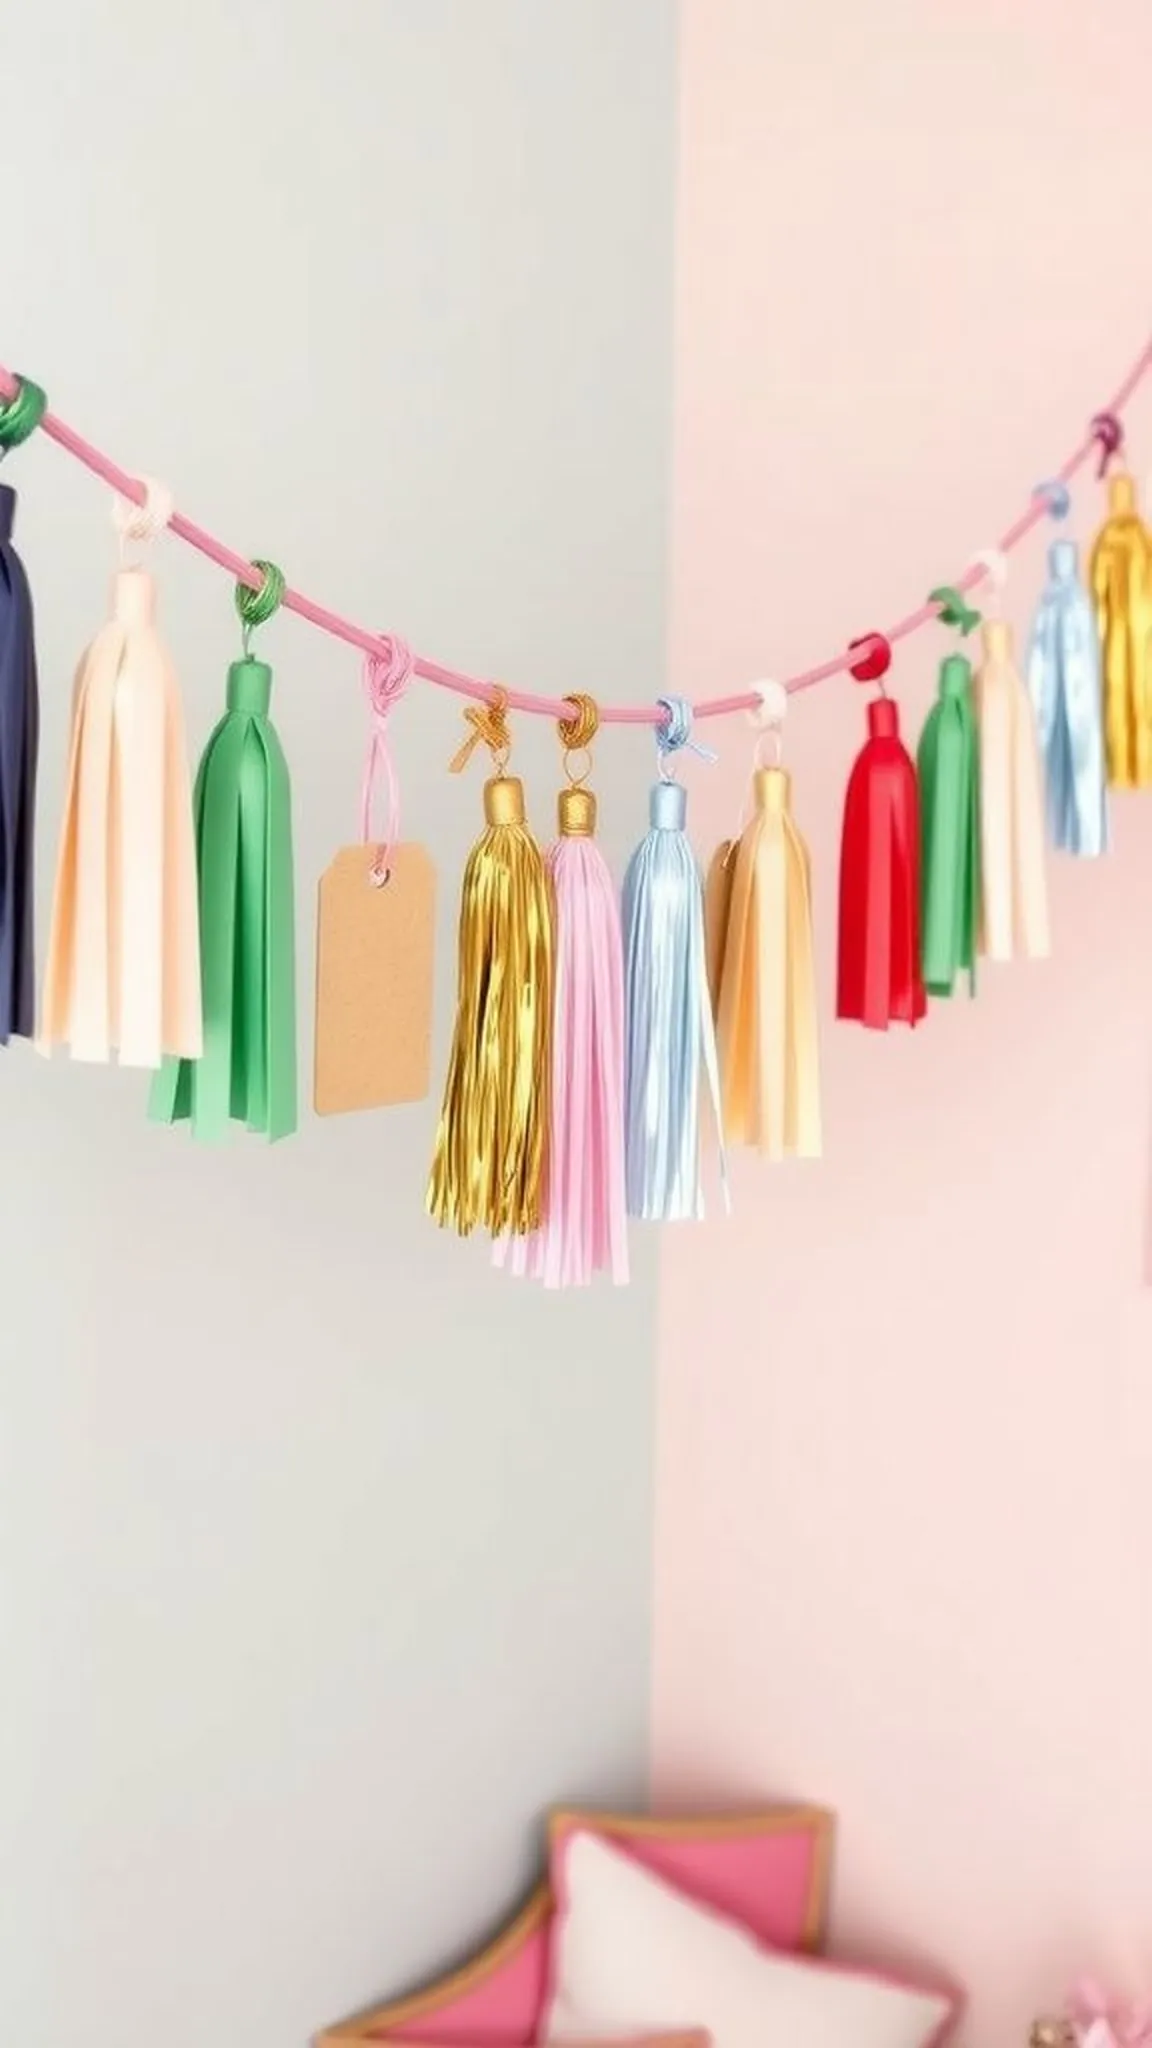
A tassel garland snaps words into motion with its soft, dangling texture. Each tassel brushes the air and gives the eye a layered rhythm as it moves along the cord. The combination of kraft paper tags and shimmering tassels creates an interesting dialogue between matte and glint.
When the garland stretches across a wall, it draws attention to a particular corner without shouting. There is a small, pleasing sound as the tassels meet, and that rustle carries a festive promise that something worth celebrating waits nearby.
Steps
- Prepare colored tassels in alternating shades and place them in a neat sequence.
- Thread tassels onto a strong cord, spacing them evenly for balanced movement.
- Add small paper tags between tassels with celebratory words or the graduation year.
- Stretch the garland across a focal wall or above the dessert table so it frames the area.
- Adjust tassel spacing to achieve a playful, fluttering effect when there is air movement.
Chalkboard photo booth frame with handwritten captions
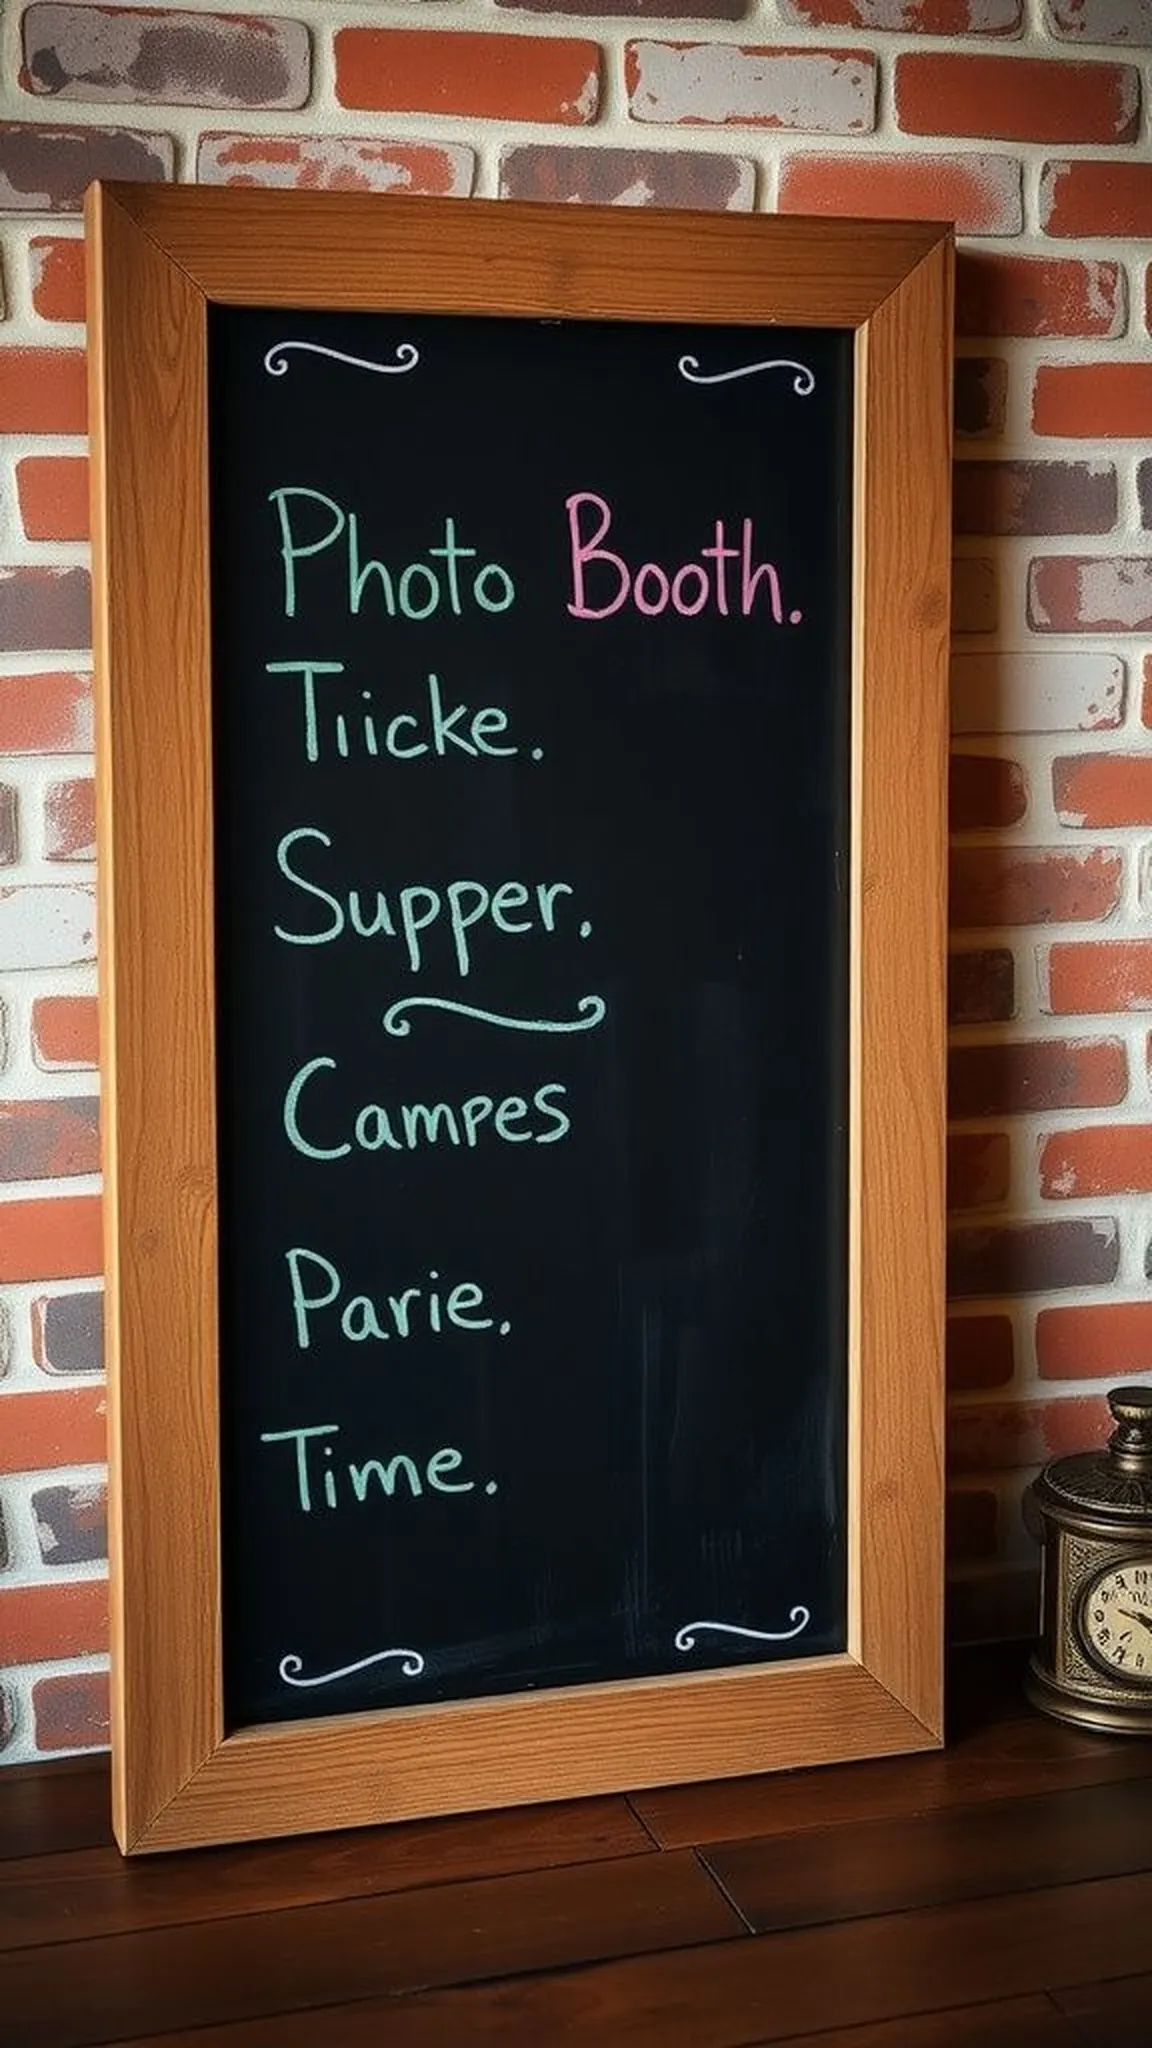
A chalkboard frame brings a relaxed, handcrafted vibe to a photo corner. The matte black surface contrasts with bright chalk strokes and the handwriting adds personality that feels friendly and slightly nostalgic. Smudges and faint erasures tell small stories of earlier messages, making the frame feel lived in.
When guests lean in to pose, their laughter echoes against the chalky backdrop, and the frame helps freeze those expressions into charming images. The rough texture of chalk fills the air with a faint dust that, oddly, enhances the tactile experience.
Steps
- Select a sturdy frame and paint the inner panel with smooth chalkboard paint until the surface is even.
- Season the chalkboard surface with a light rub of chalk and then erase to create a clean, receptive finish.
- Handwrite a playful prompt at the top and leave room for guests to add their own captions with colorful chalk sticks.
- Position the frame near good lighting and a small shelf of chalk for easy access.
- Replace or refresh chalk prompts between photo sessions to keep the board lively.
Mini cap and gown table accents for a witty nod

Tiny cap and gown accents sit like miniature reminders of a milestone, small enough to prompt a smile and large enough to be charming. Felt textures and tiny tassels create an approachable, playful scale that invites close inspection. When scattered across tables, they create a series of miniature surprise moments that catch the eye.
The juxtaposition of these small academic motifs with floral arrangements or dessert platters makes the scene feel thoughtful rather than kitschy. Each little piece seems to whisper congratulations in a quiet, tongue in cheek way.
Steps
- Fashion miniature caps from stiff felt and form simple gown silhouettes from matching fabric.
- Create tiny tassels and secure them to the cap tops with a small loop of thread.
- Arrange the miniatures across centerpieces and near place settings to create delightful little accents.
- Mix the miniatures with natural elements like sprigs or small blooms for balance.
- Keep extras on hand to dot around a dessert tray or photo area as needed.
Confetti-filled lanterns that glow and scatter color
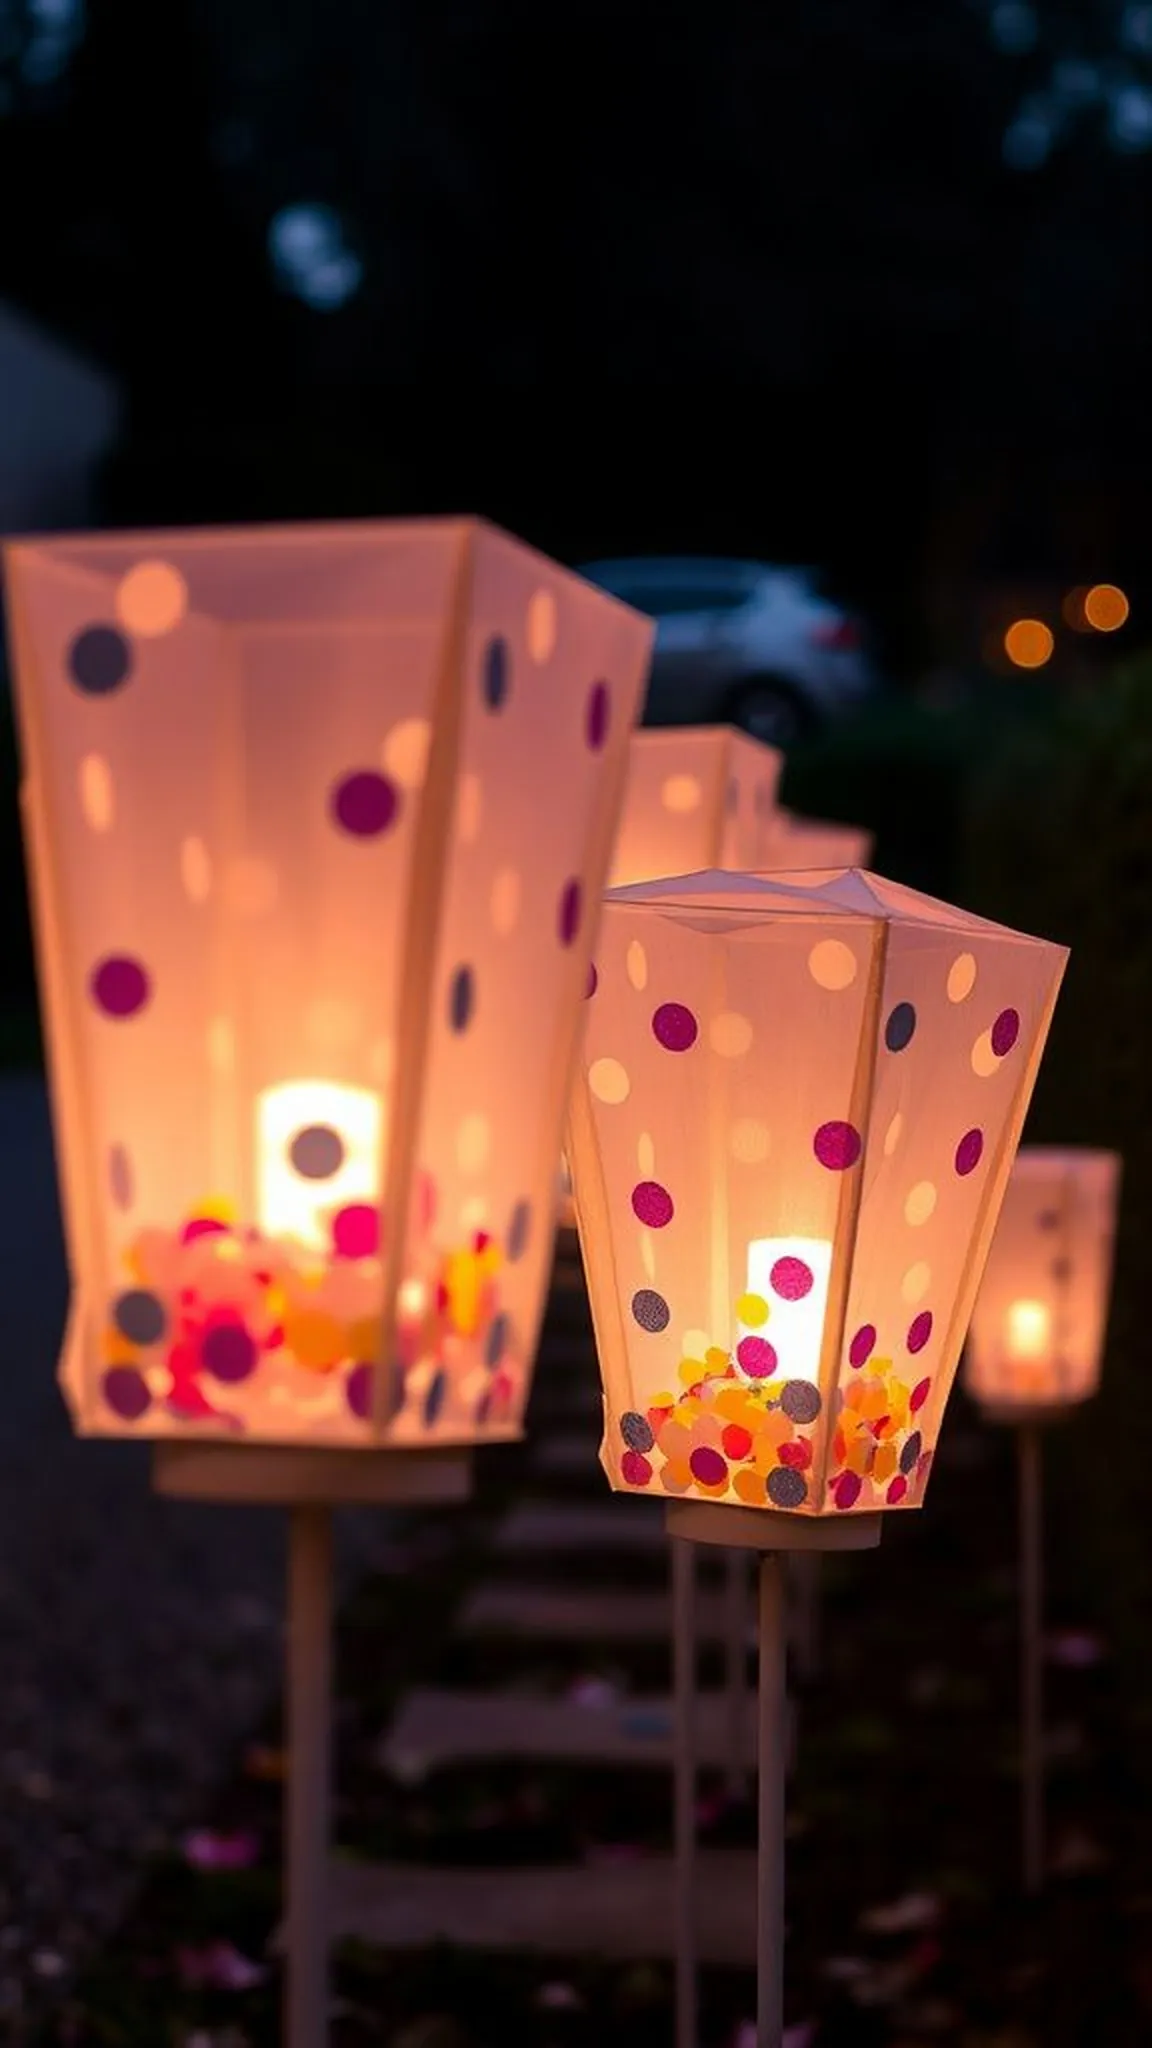
Transparent lanterns packed with confetti catch light in unexpected ways, casting playful speckles across nearby surfaces. The confetti pieces have a tactile crunch when shuffled and their colors punctuate the gentle glow inside the lantern. Warm light seeps through tiny gaps and the overall effect feels whimsical and bright without being loud.
When placed along walkways or perched on steps, the lanterns offer pops of celebration that ripple outward, encouraging passing glances and soft smiles from guests as they move through the space.
Steps
- Fill clear paper lanterns with loose confetti in a complementary color palette and shake lightly to distribute.
- Insert a battery-operated tea light or small LED inside each lantern for safe illumination.
- Arrange lanterns at varying heights along walkways, steps, or table edges to create depth.
- Replace the batteries as needed and lightly reposition lanterns to maintain an even glow across the area.
- Store unused confetti in a sealed container for touchups during the event.
Personalized napkin rings with tiny tassel surprises
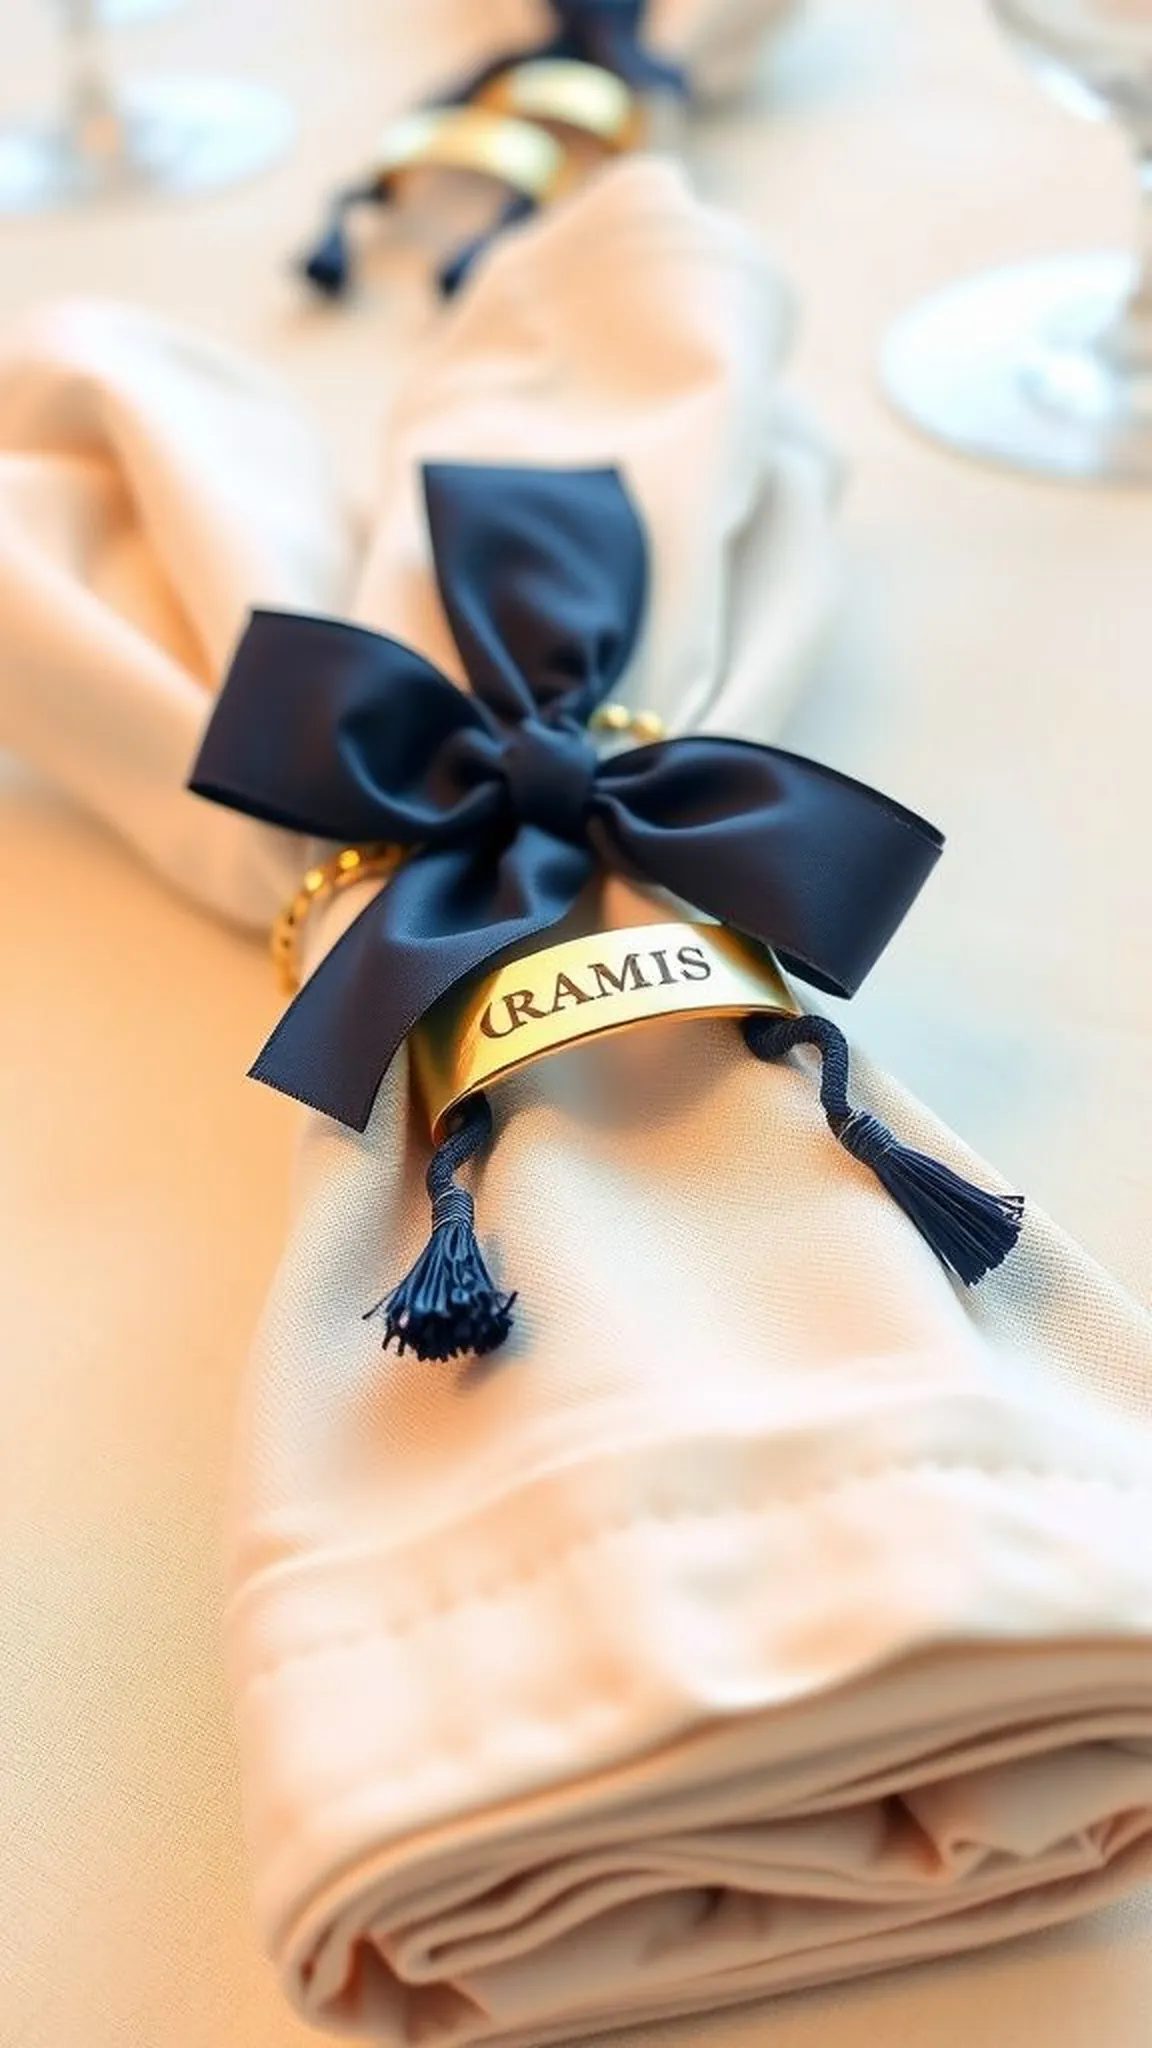
Personalized napkin rings introduce a moment of attention to each place setting that feels surprisingly intimate. Smooth ribbon loops and a small tag with a name create a tactile moment as guests settle into their seats. The subtle brush of a tiny tassel against the wrist proves unexpectedly pleasant, and the combination of textures—silky ribbon, crisp napkin fabric, and soft tassel—creates a layered sensory impression.
When guests notice their names, there is a brief, connective smile that sets a welcoming tone before any plates arrive.
Steps
- Select ribbons or bands in coordinating colors and cut them to match napkin circumference.
- Slip small name tags onto each band and add a delicate tassel for texture.
- Form the band into a loop around a folded napkin and close the seam with a small adhesive tab or stitch.
- Place the finished napkin rings at each setting so guests find a personal touch at their seat.
- Keep a few extras for last minute seating changes or unexpected guests.
DIY diploma scroll favors tied with ribbon and charm
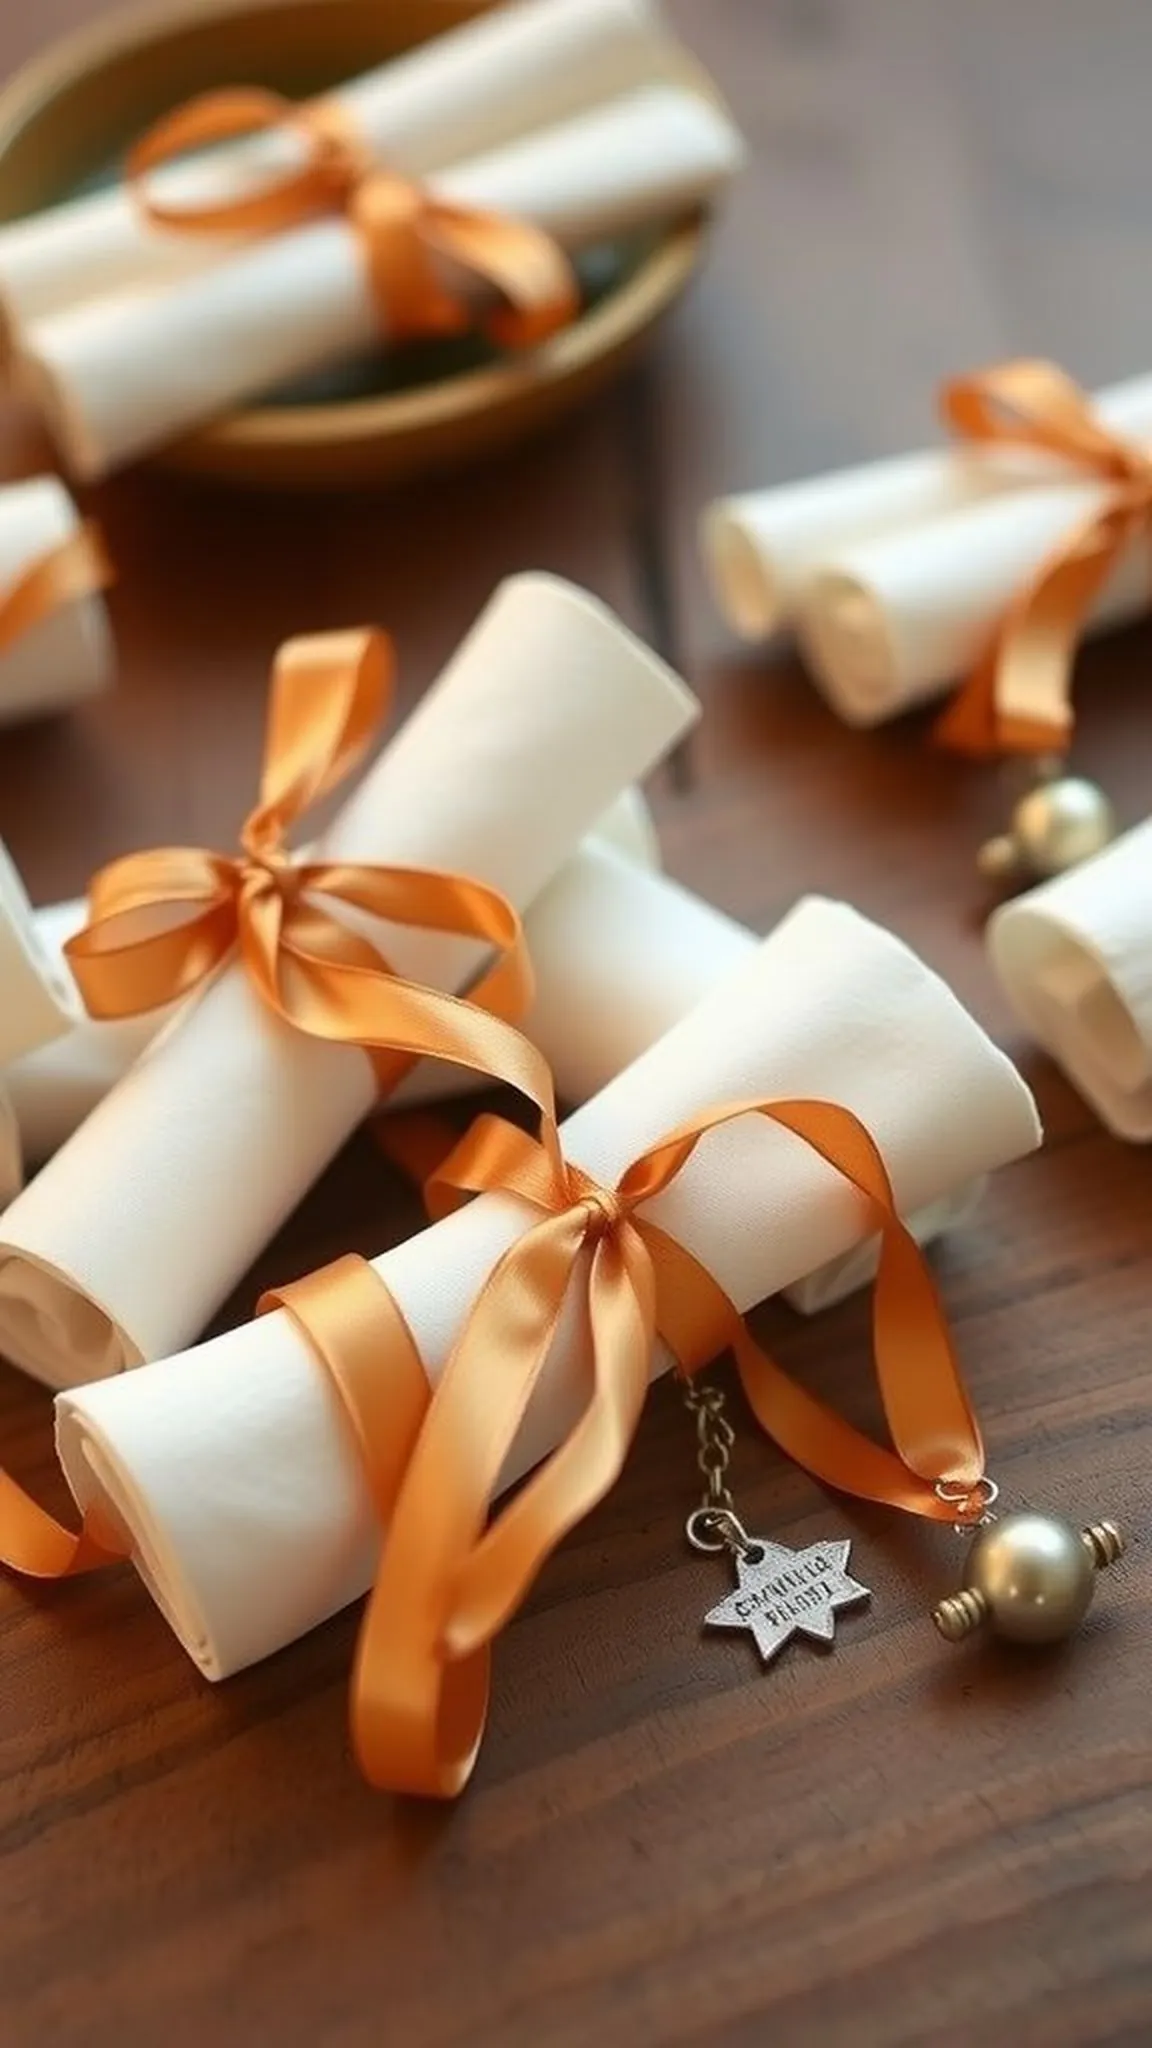
Tiny diploma scrolls have a charming, ceremonial feel that fits the mood of a graduation gathering. The parchment has a warm, fibrous texture and the ribbon offers a soft sheen against the paper. A small charm adds a metallic note that catches the light when a guest picks one up.
These little scrolls sit well in favor bowls or beside place cards, offering a playful echo of the main event. There is a satisfying, tactile quality to unrolling them slowly and reading any short message inside.
Steps
- Cut narrow strips of parchment-style paper and write a short congratulatory message on each.
- Roll the strips into tight scrolls and secure them with a band of ribbon tied in a neat bow.
- Add a small charm or tag to the ribbon loop for a metallic accent.
- Arrange the scroll favors in a decorative bowl or next to place settings for guests to collect.
- Top up the favor bowl as needed throughout the event to keep the display full.
Photo clip string display for candid snapshots and notes
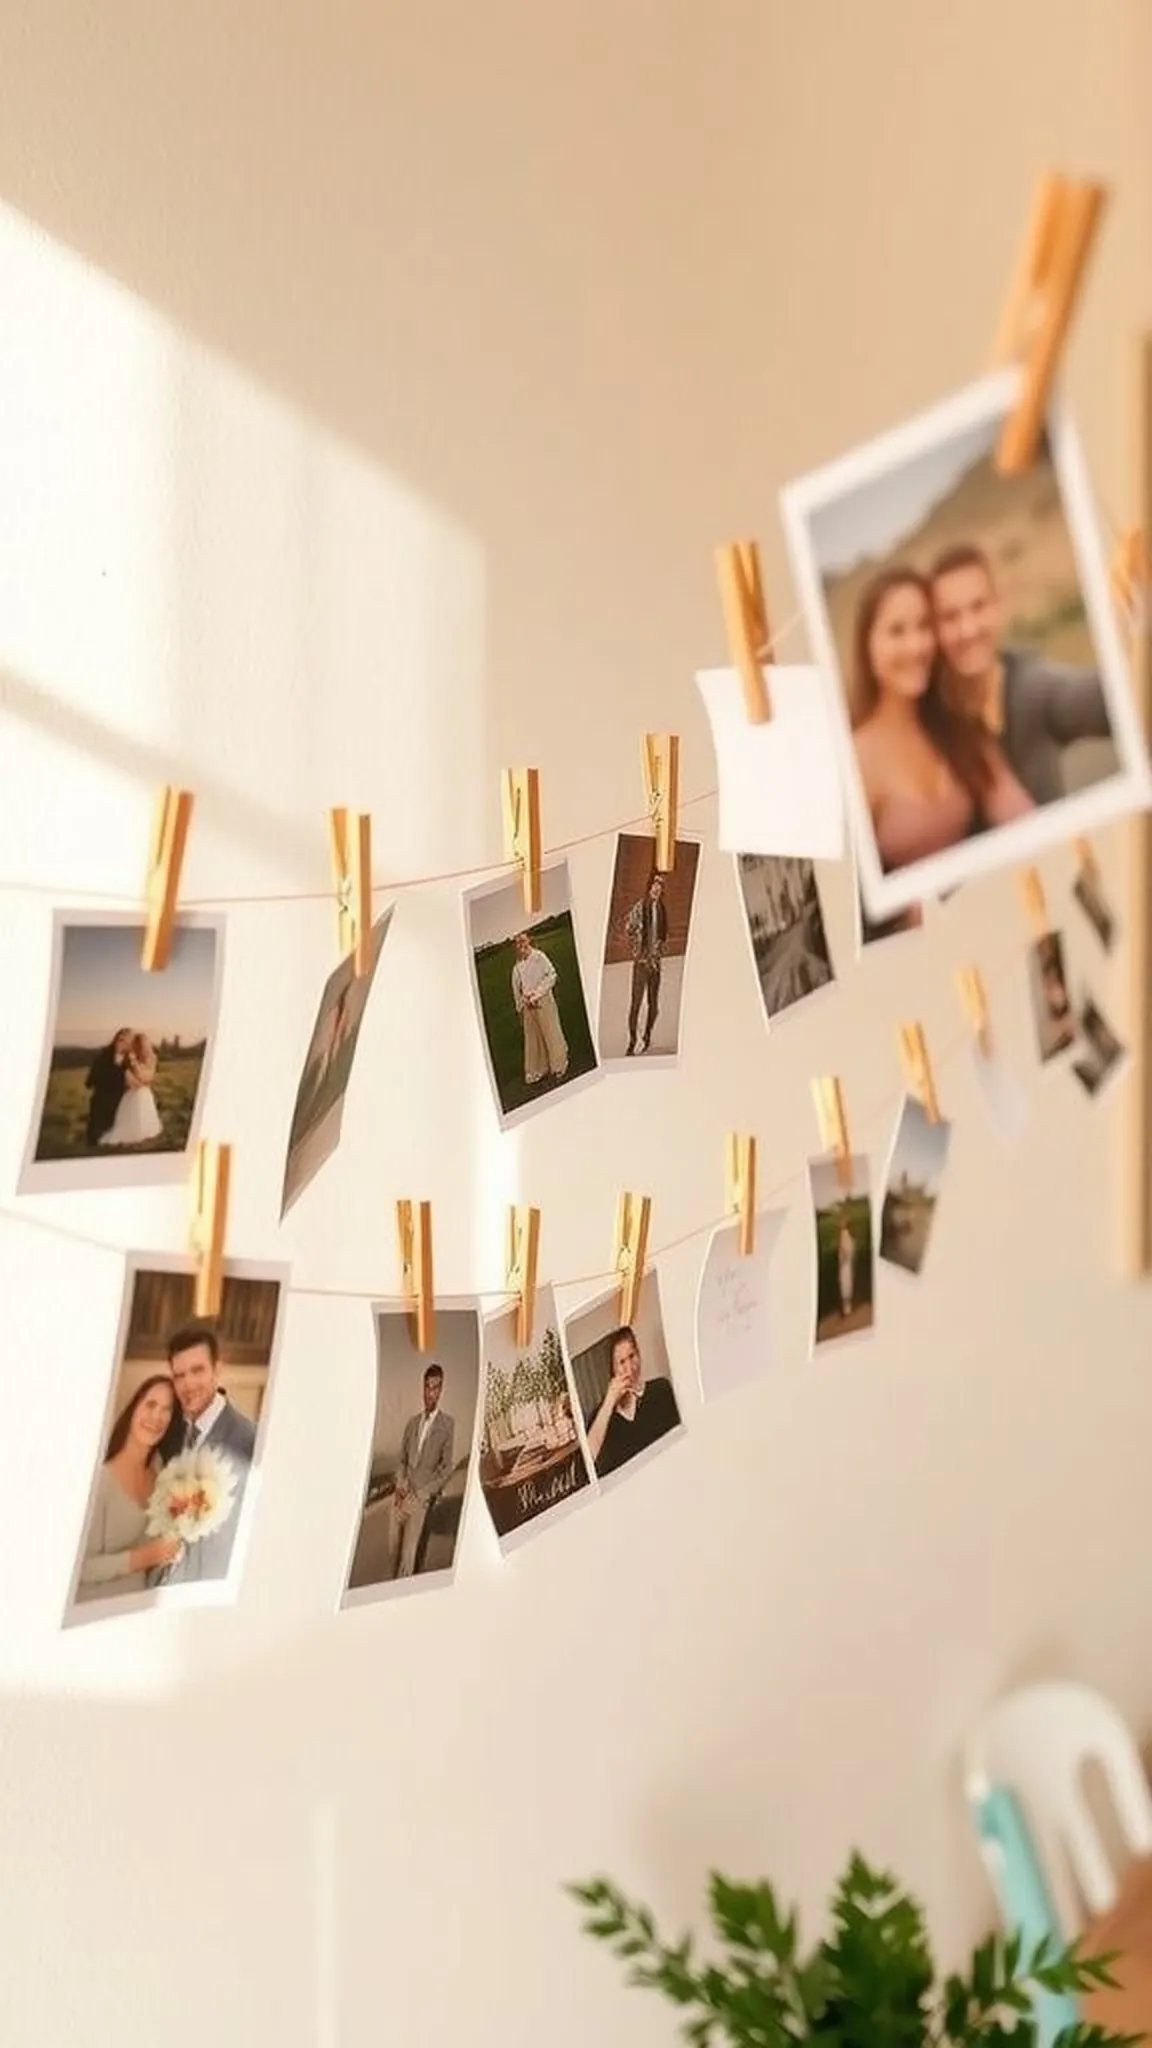
A string line dotted with clipped photos transforms a wall into a living timeline. The paper edges of printed photos curl slightly, which adds a tactile, well-loved look. Clips have a gentle metallic smell and produce a faint click when photos are moved, adding a small auditory layer to the display.
Snippets of handwriting and Polaroid borders peek out between images, creating a patchwork of memory. People tend to linger here, trading stories about the faces in the pictures and pausing to relive a moment before the string moves on to the next image.
Steps
- Stretch a length of sturdy twine across a wall or between two supports and secure the ends.
- Print and trim photos to a consistent size and mix in a few handwritten notes for variety.
- Clip photos onto the twine using small clothespins or metal clips at casual intervals.
- Add a few decorative elements like paper tags or small greenery for contrast.
- Encourage guests to swap in instant photos during the event to keep the display evolving.
LED bottle lights painted in classic school colors
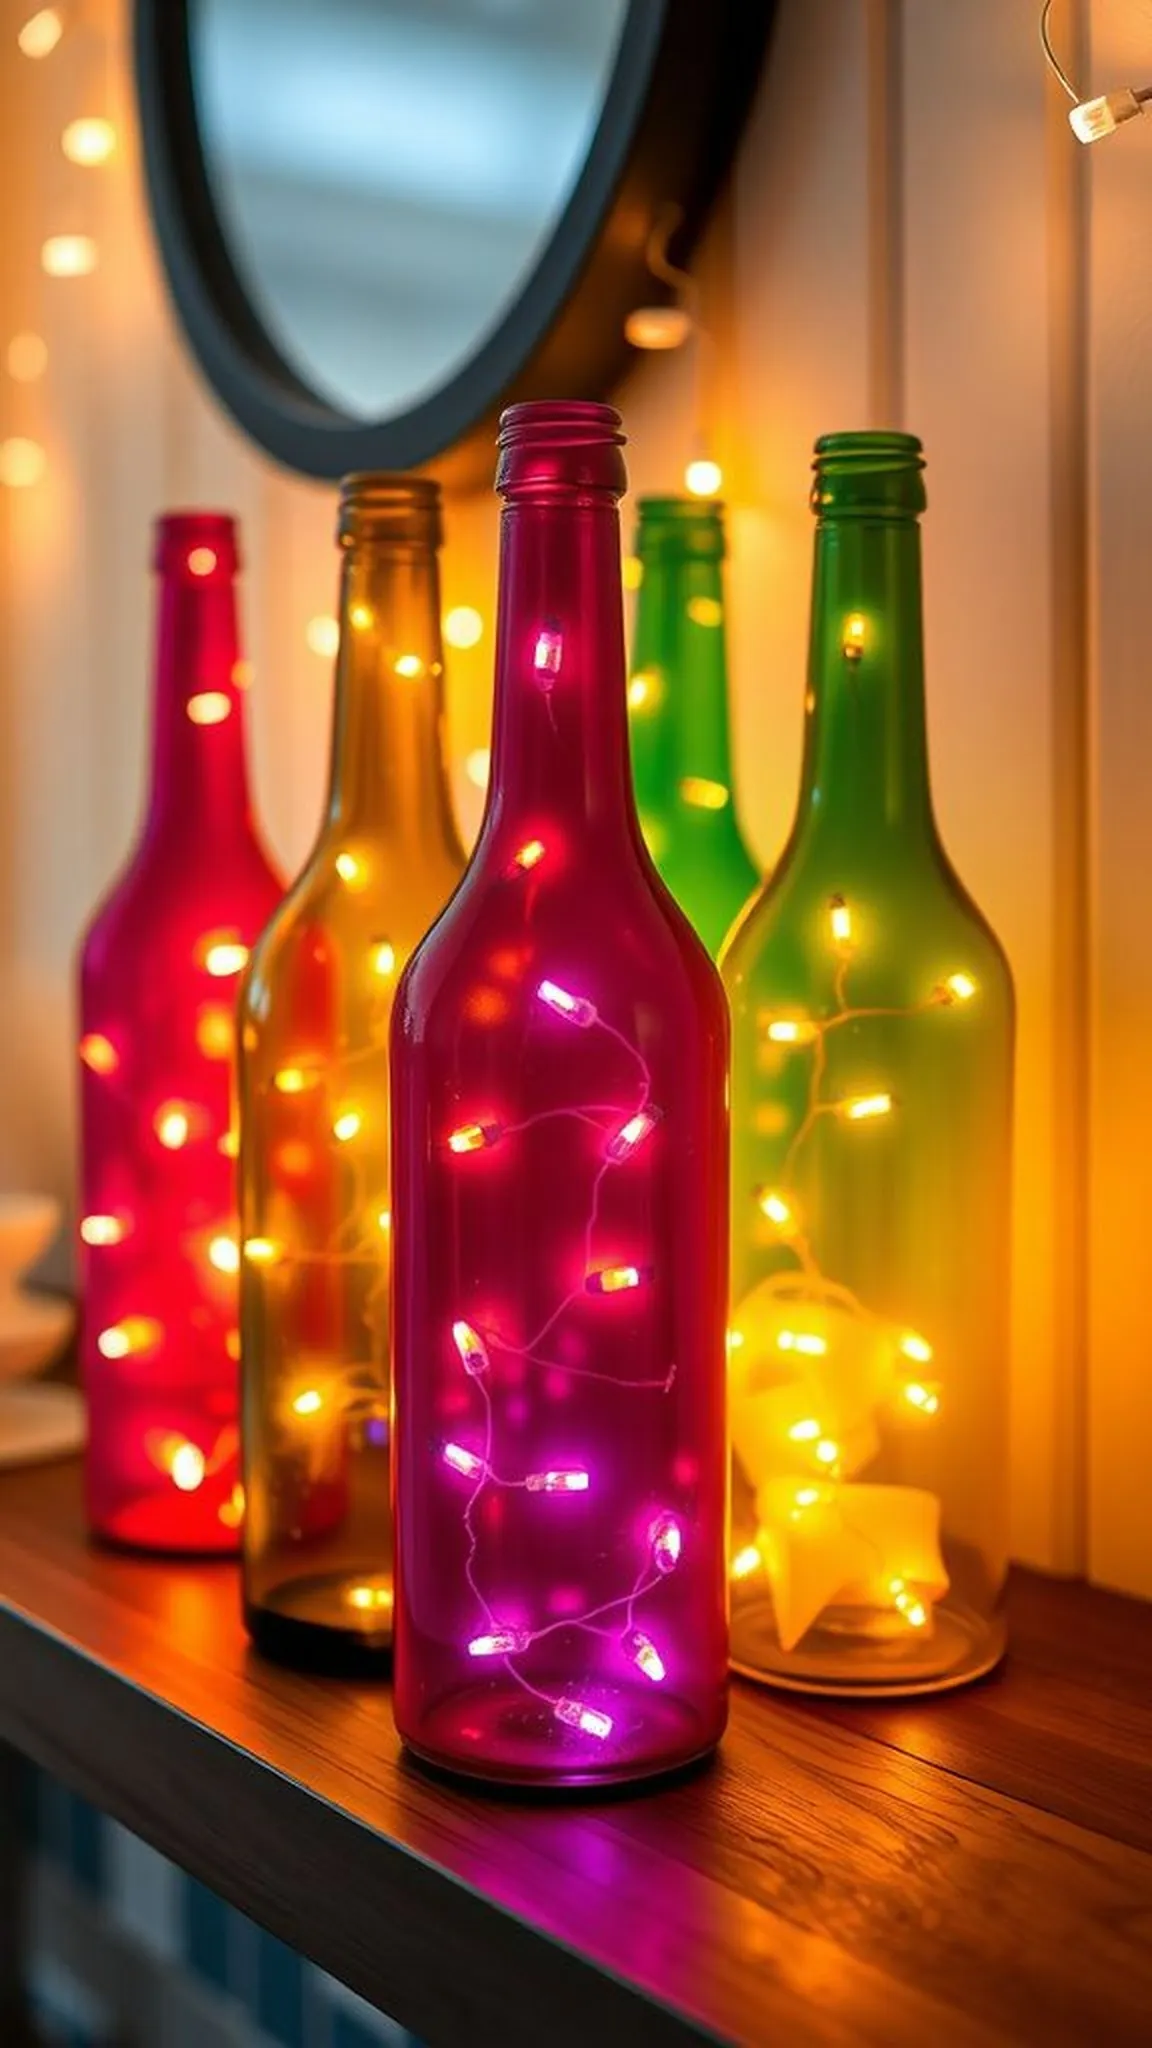
Recycled bottles refilled with tiny LED lights become quiet, architectural accents. The painted exteriors have a matte or gloss finish that absorbs or reflects light differently, creating small pools of mood around the base. Tiny bulbs inside dot the glass with gentle points of brightness that feel restrained and elegant.
The bottles vary in height and silhouette, which adds a collected, eclectic sensibility to the arrangement. When placed on a mantle or clustered on a table, they create a low, steady glow that feels thoughtful and calm in the evening.
Steps
- Clean and dry empty glass bottles, then apply paint in school colors to the exterior for a uniform palette.
- Insert a string of battery-operated LED lights into each bottle, arranging the cord neatly toward the base.
- Vary bottle heights and groupings on mantles or tabletops to create visual interest.
- Place the battery packs out of direct sight and test the lights to ensure even illumination.
- Swap batteries as needed to maintain a steady glow through the event.
Tissue paper pom pom clouds hovering over dessert tables
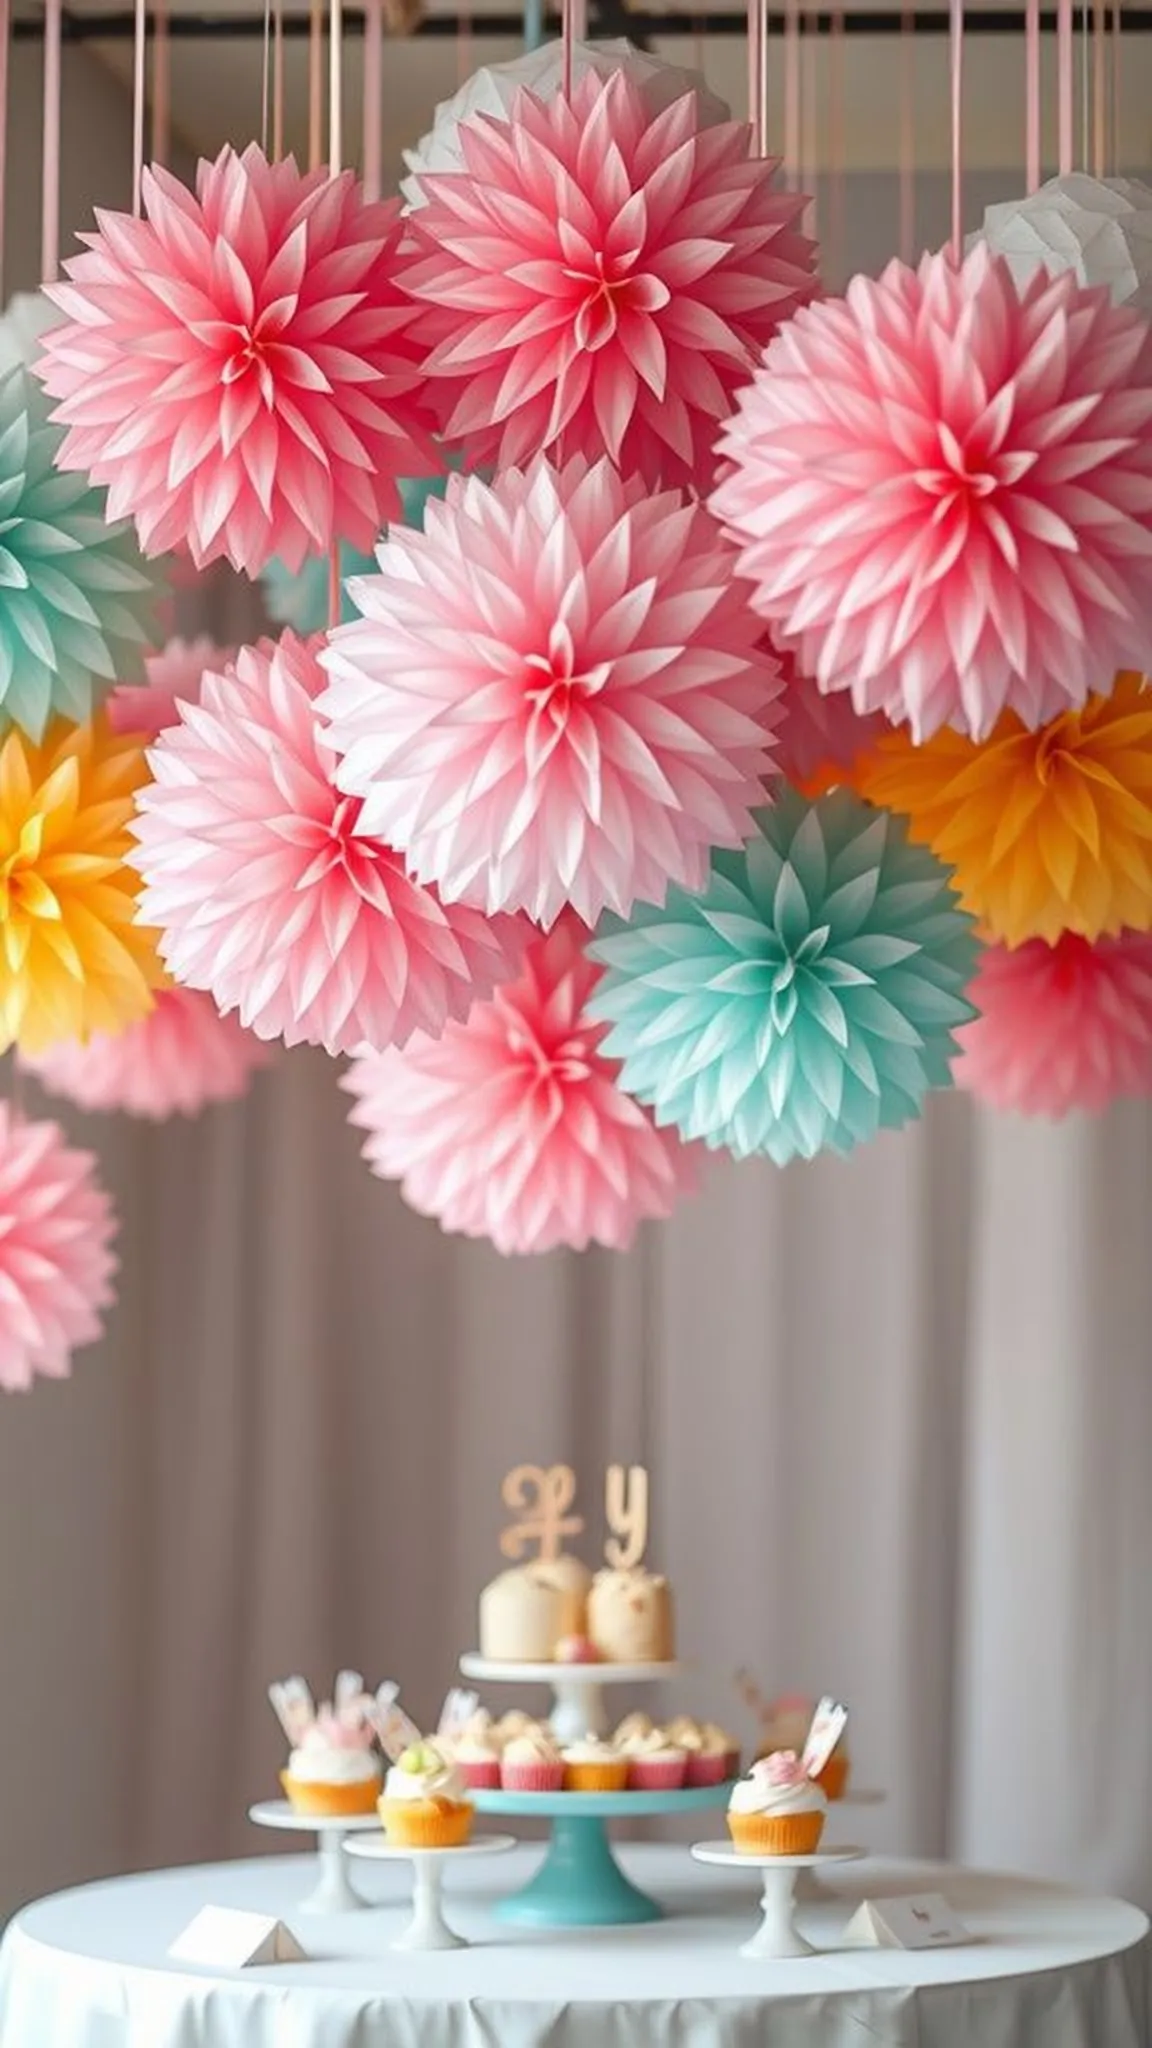
Pom pom clusters float above a dessert spread like confectionery clouds. The tissue layers offer a feather-soft texture and the edges catch light in subtle waves. Suspended at staggered heights, they create depth and whimsy without overwhelming the eye.
When guests glance up from their plates, the pom poms frame the sweets in a playful, aerial way that enhances the sense of celebration. The overall effect feels lighthearted and buoyant, a gentle visual exclamation that makes the dessert table feel like a spotlighted moment.
Steps
- Fluff layered tissue paper rounds into full, cloudlike pom poms and trim any uneven edges for a neat silhouette.
- Attach fine string to the center of each pom pom and suspend them at staggered heights above the dessert area.
- Combine different sizes and a few complementary colors to add visual depth and movement.
- Ensure strings are anchored securely and test that pom poms hang freely without collision.
- Re-fluff pom poms as needed to maintain soft shapes throughout the event.
Graduation year marquee letters with warm bulb glow
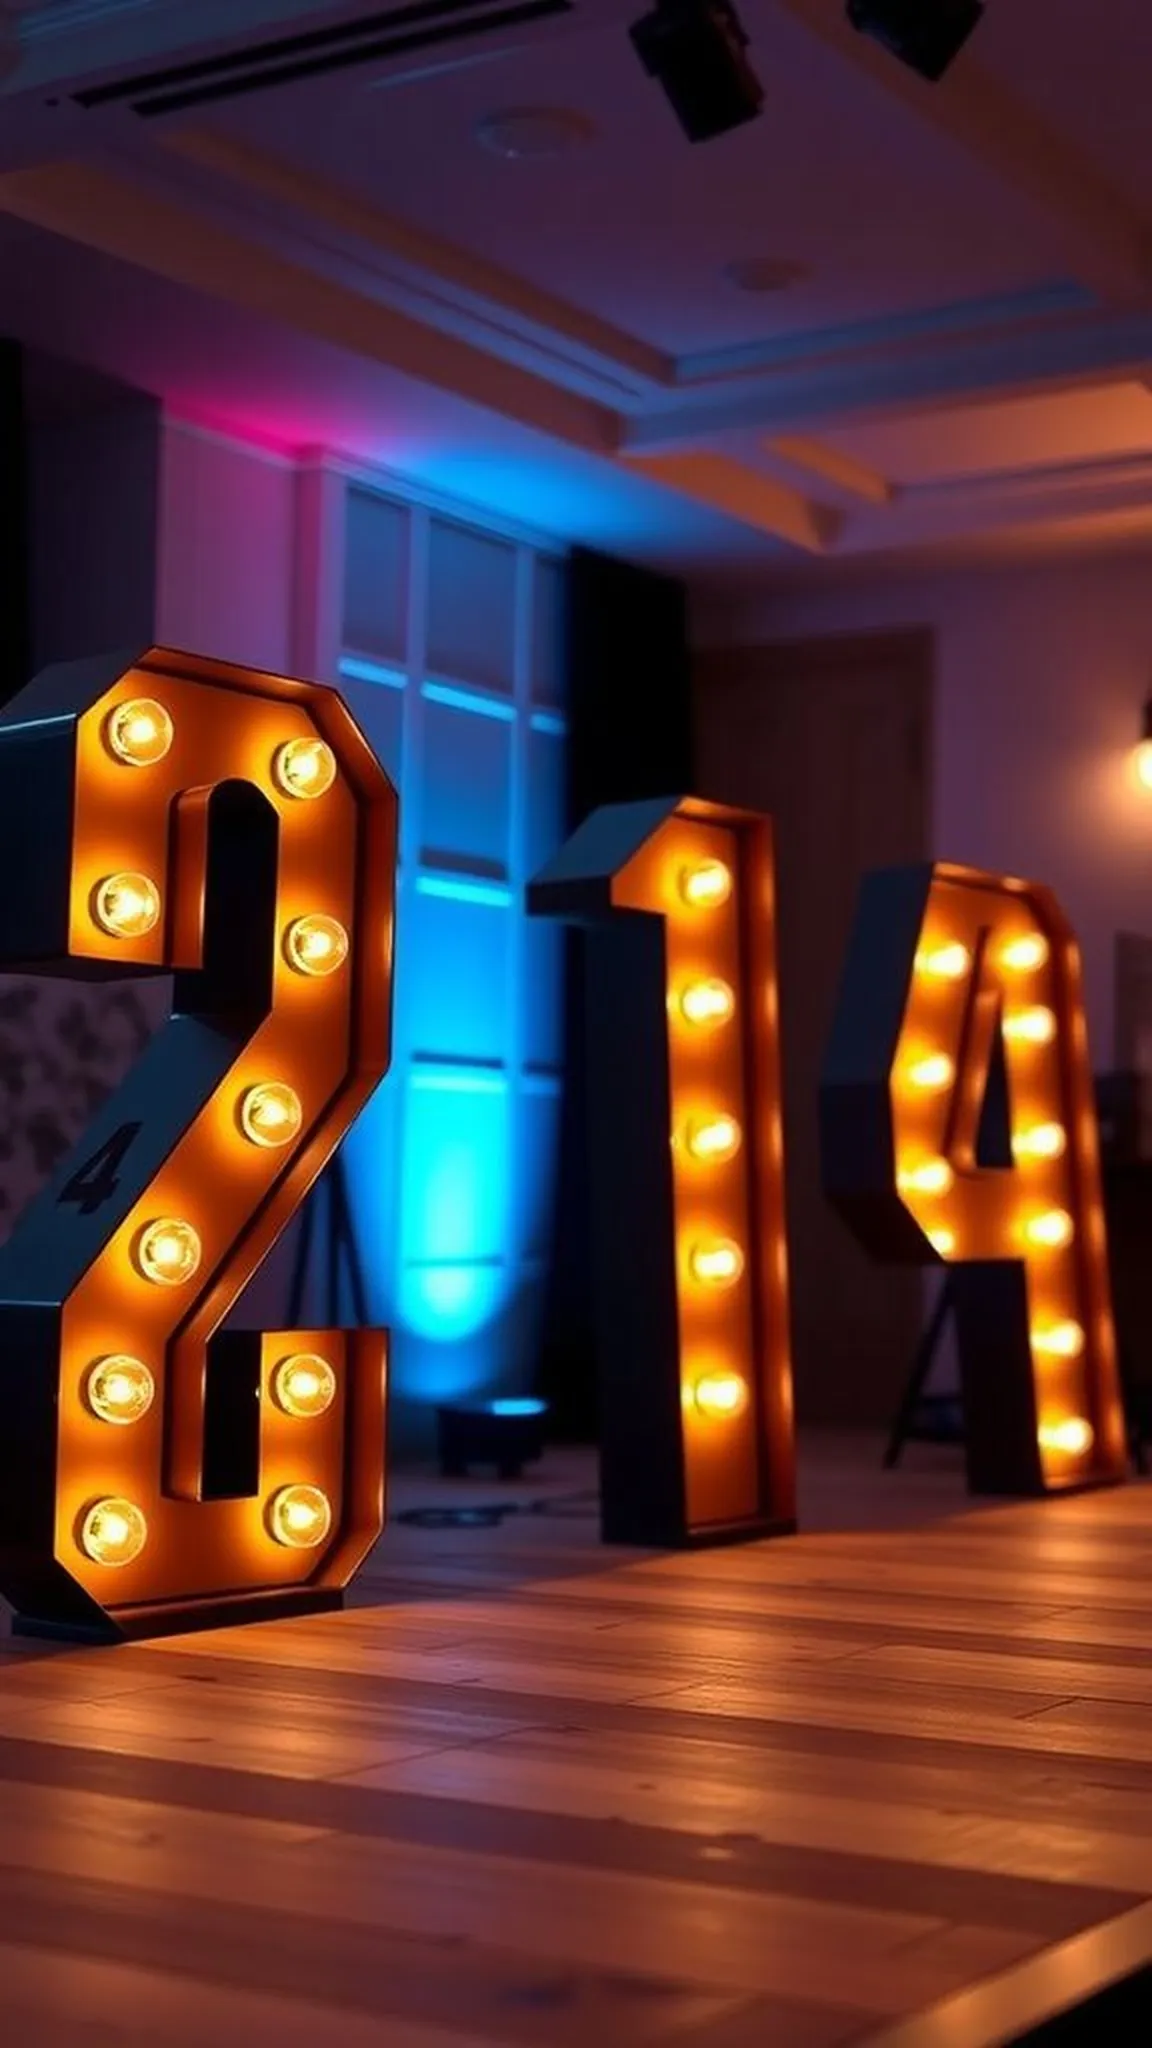
Marquee letters carrying the year bring a sense of occasion without being overbearing. The metal faces have a gentle industrial feel, and the bulbs nestle into their sockets with tidy warmth. When lit, the bulbs cast a halo that softens edges and draws attention to the numerals.
The letters sit comfortably on a porch ledge or stage edge and balance ceremony with a friendly, almost theatrical vibe. Guests instinctively gather near the lighted numbers, and the glow makes photographs feel cinematic without stealing the scene from smiling faces.
Steps
- Choose freestanding marquee letters representing the graduation year and ensure they are stable on flat surfaces.
- Install warm bulb lights into the sockets and check each bulb for consistent brightness.
- Position the letters on a focal surface with a neutral backdrop to maximize visibility.
- Connect the power source discreetly and test the overall illumination before guests arrive.
- Dim or brighten surrounding lighting to allow the marquee glow to create a gentle focal point.
Memory scrapbook guestbook station with textured papers
A guestbook station set up with textured papers invites slow, thoughtful messages that feel like small gifts. The tactile quality of heavyweight pages and patterned inserts makes each written line feel more deliberate. Pens with smooth inkness pool gently on the page and different handwriting styles create a layered visual patchwork.
Nearby mementos like ticket stubs or dried petals add depth and context to the notes. The table becomes an intimate pause point where conversations slow and people leave traces of warmth and humor that age well into the future.
Steps
- Arrange a variety of heavyweight papers, patterned inserts, and a selection of quality pens on a dedicated table.
- Add a stack of prompts or creative stickers for guests who enjoy an artistic touch.
- Place a small tray for collected mementos like photos or ticket stubs beside the book.
- Provide gentle lighting so guests can write comfortably and keep the area tidy with a small waste receptacle.
- Close or store the scrapbook securely after the event to preserve the messages.
Class color table runner with layered fabrics and trim
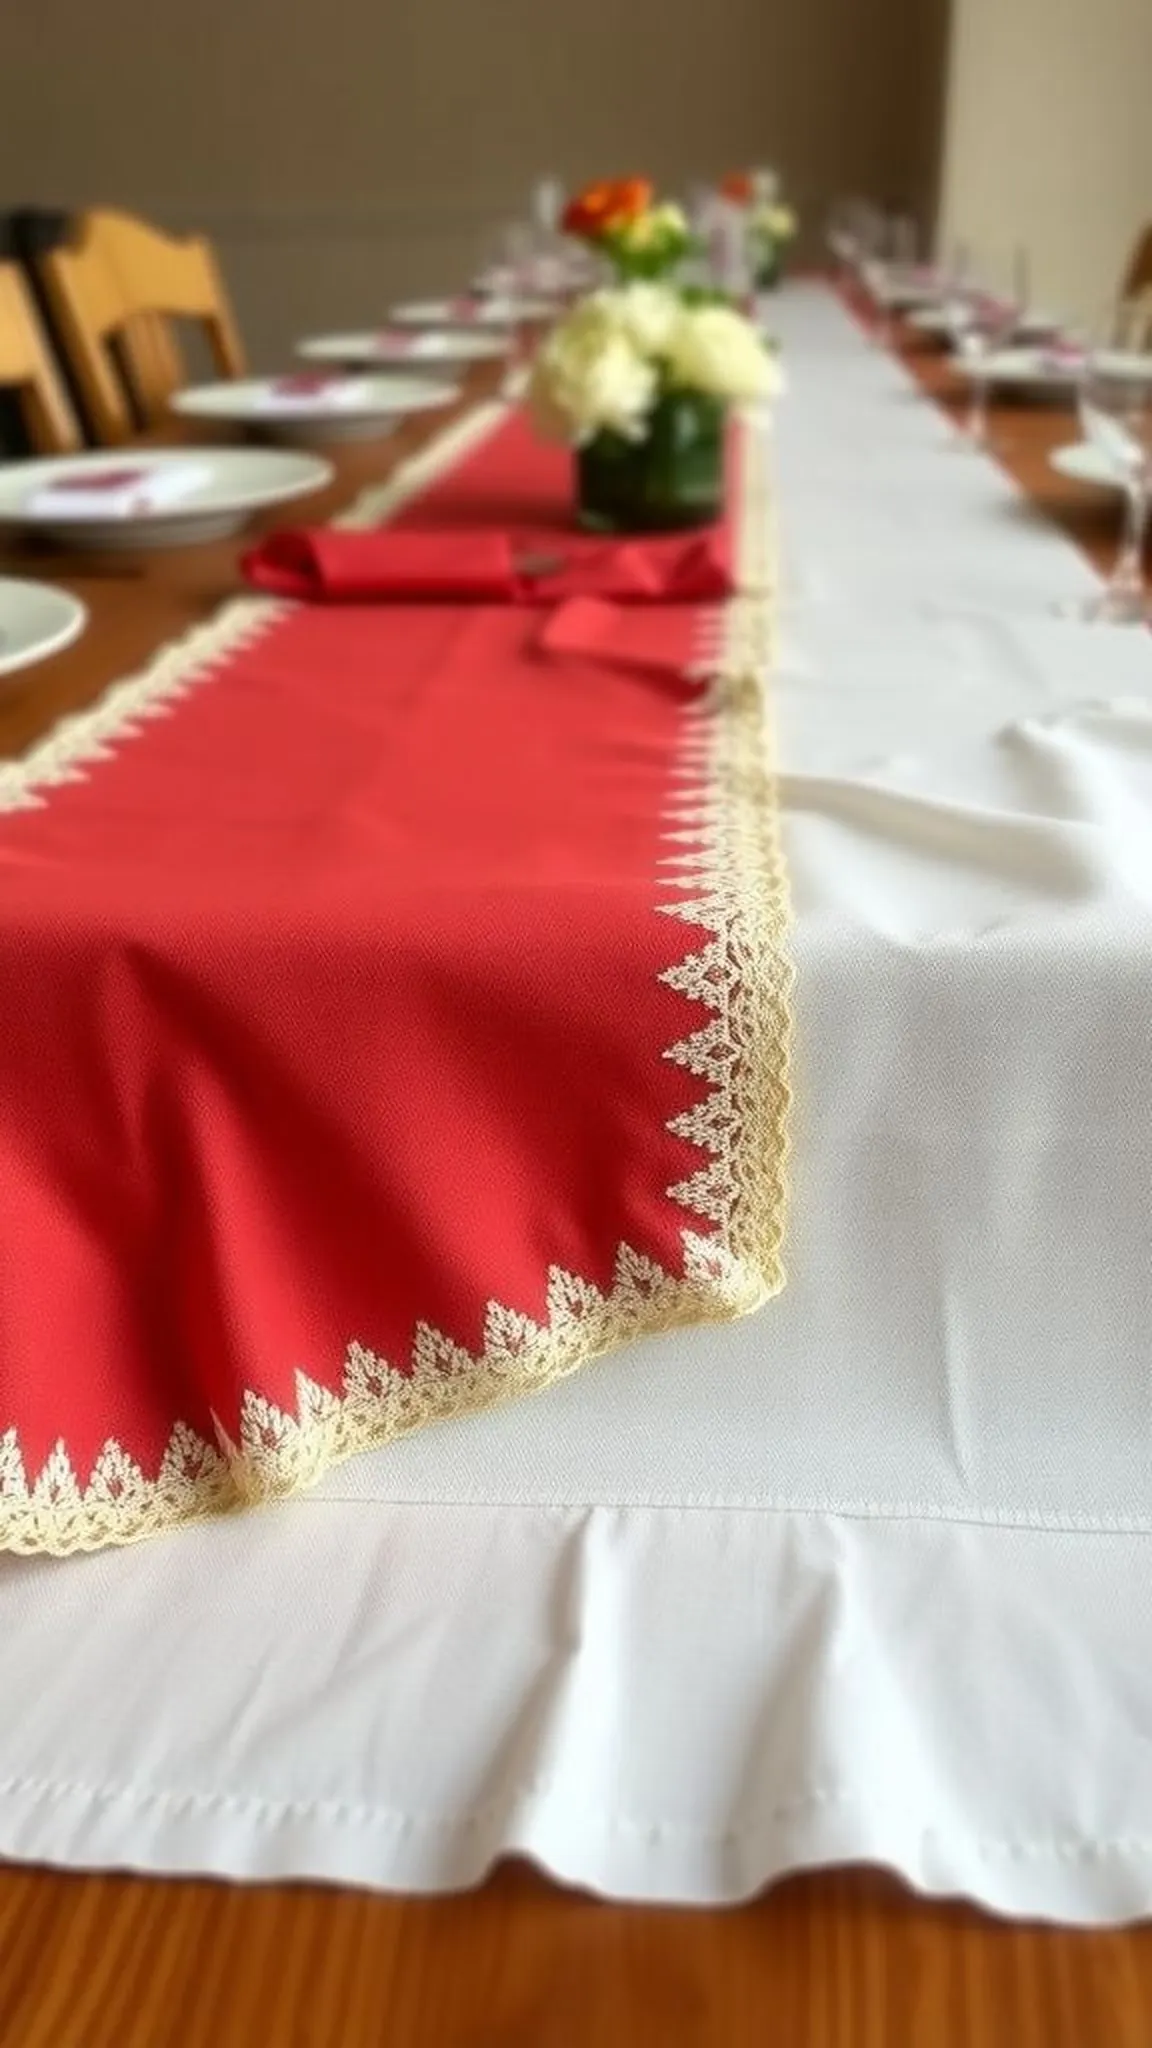
A layered table runner in class colors stretches along the table like a ribbon of celebration. Different fabric textures—matte linen against a glossy satin strip—create a tactile dialogue that is pleasing to the hand. Trim edges catch gentle light and small embroidered details add an artisanal accent that feels carefully chosen.
The runner frames place settings with a sense of cohesion and ties disparate centerpieces into a unified look. The surface invites a closer look and encourages guests to comment on the thoughtful color pairing and the soft, tactile contrasts.
Steps
- Select complementary fabrics in class colors and layer them lengthwise to create visual interest.
- Add a narrower third layer with decorative trim or embroidered accents for a refined focal stripe.
- Press the fabrics flat and secure the layers together at the underside so they drape evenly along the table.
- Center the runner along the table and align place settings to the runner’s edges for cohesion.
- Smooth the runner periodically during the event to maintain a neat presentation.
Balloon number columns framing the entrance photo spot
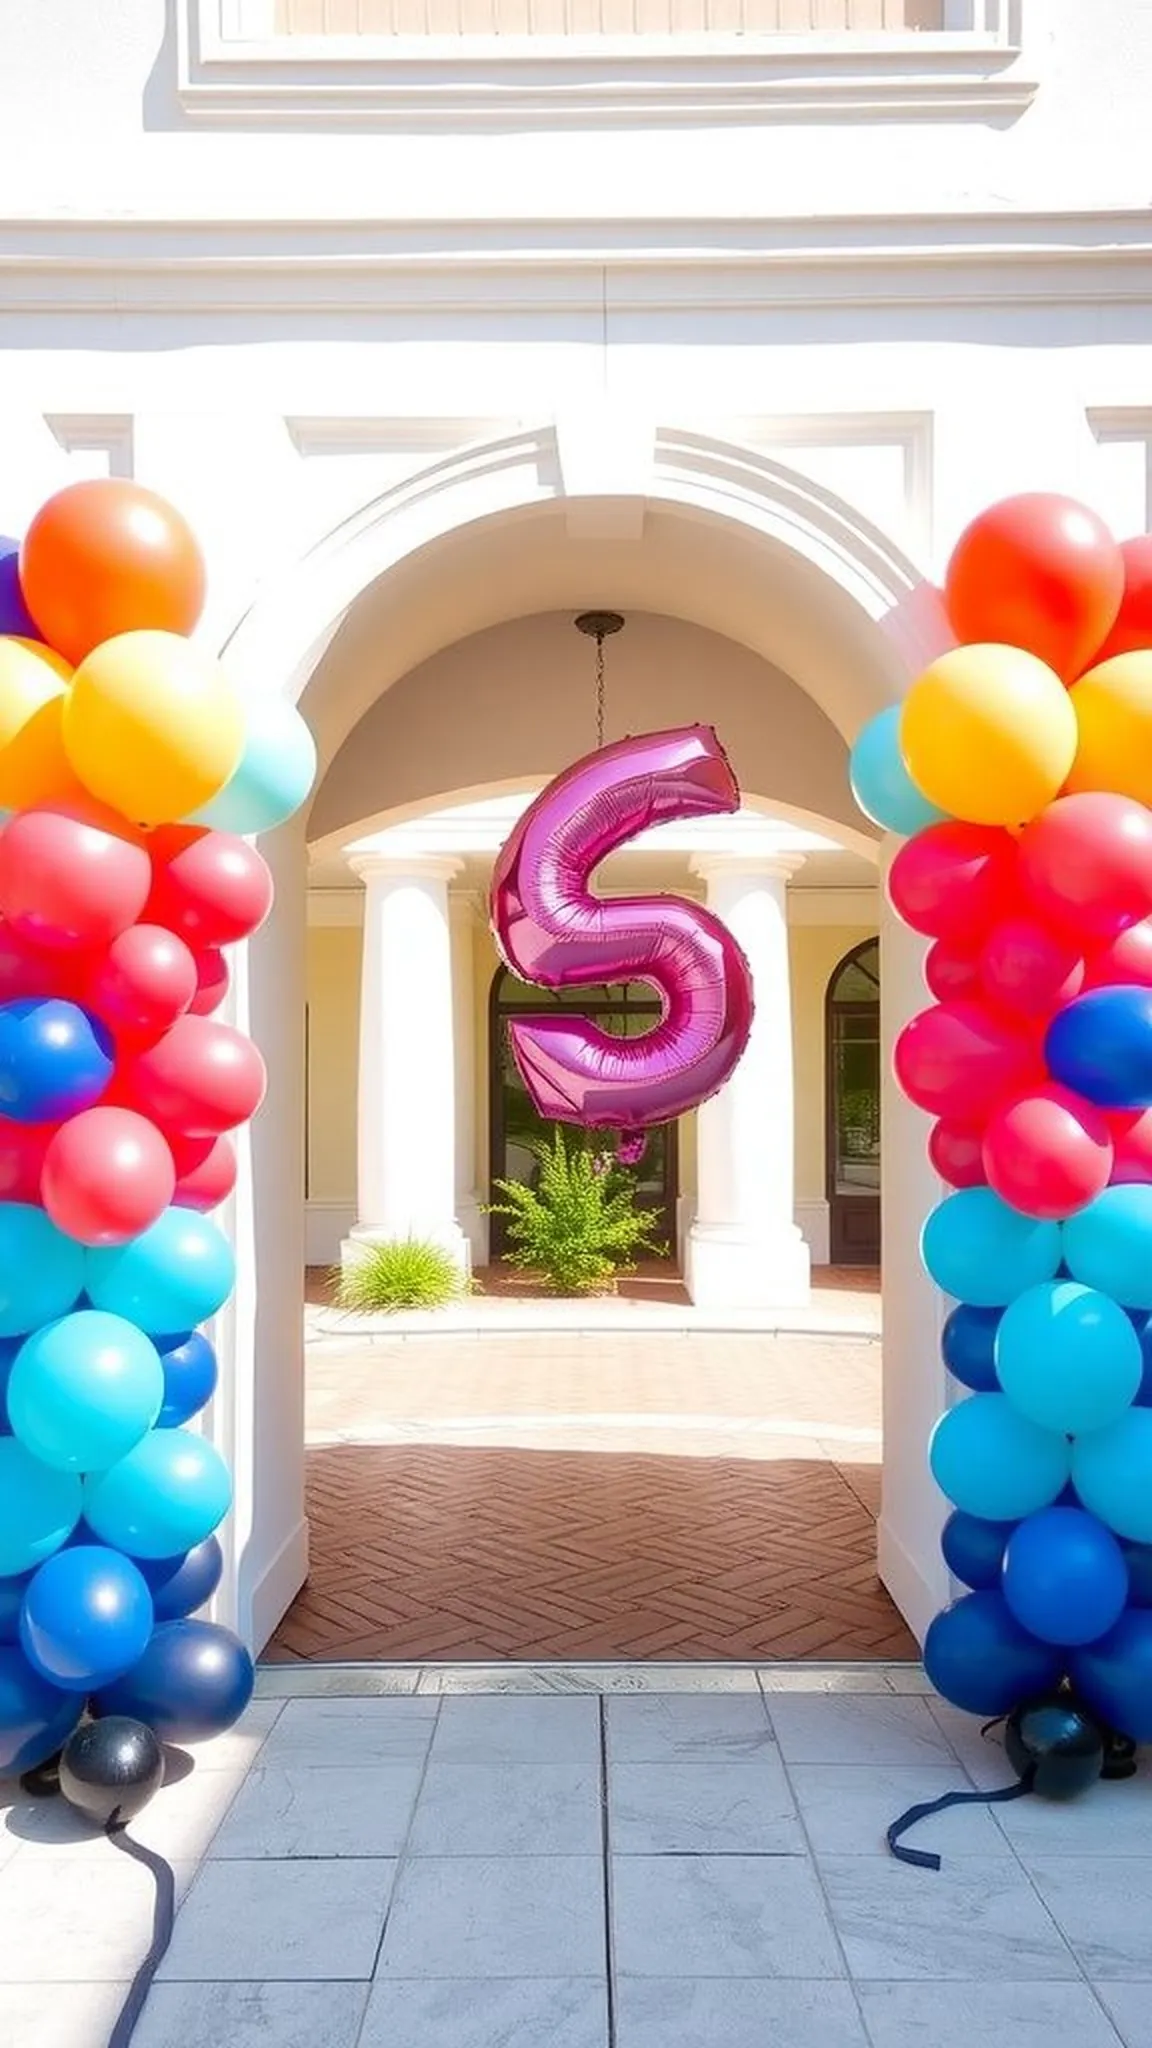
Number columns give a formal entrance a playful, celebratory edge. The stacked spheres create a pleasing vertical rhythm and the silhouette of the numbers sits clearly against the sky. Glossy surfaces catch daylight and the columns provide a visual cue that something special is happening inside.
When guests step through the column pair, there is a small, ceremonial moment where photos seem to happen naturally. The presence of the numbers feels friendly, like a doorway into the next chapter, and tends to prompt smiles even from those passing by quickly.
Steps
- Inflate balloons in matching sizes and create vertical columns by tying clusters around a stable pole or frame.
- Form the numeral shapes by curving the columns and securing them at strategic points for definition.
- Place a pair of columns at the entrance or photo spot for an immediate visual anchor.
- Add a few metallic or clear balloons at the base to balance the silhouette and provide extra support.
- Check the columns periodically to ensure even inflation and make minor adjustments for shape retention.
Graduation photo mobile with ribbons and printed memories
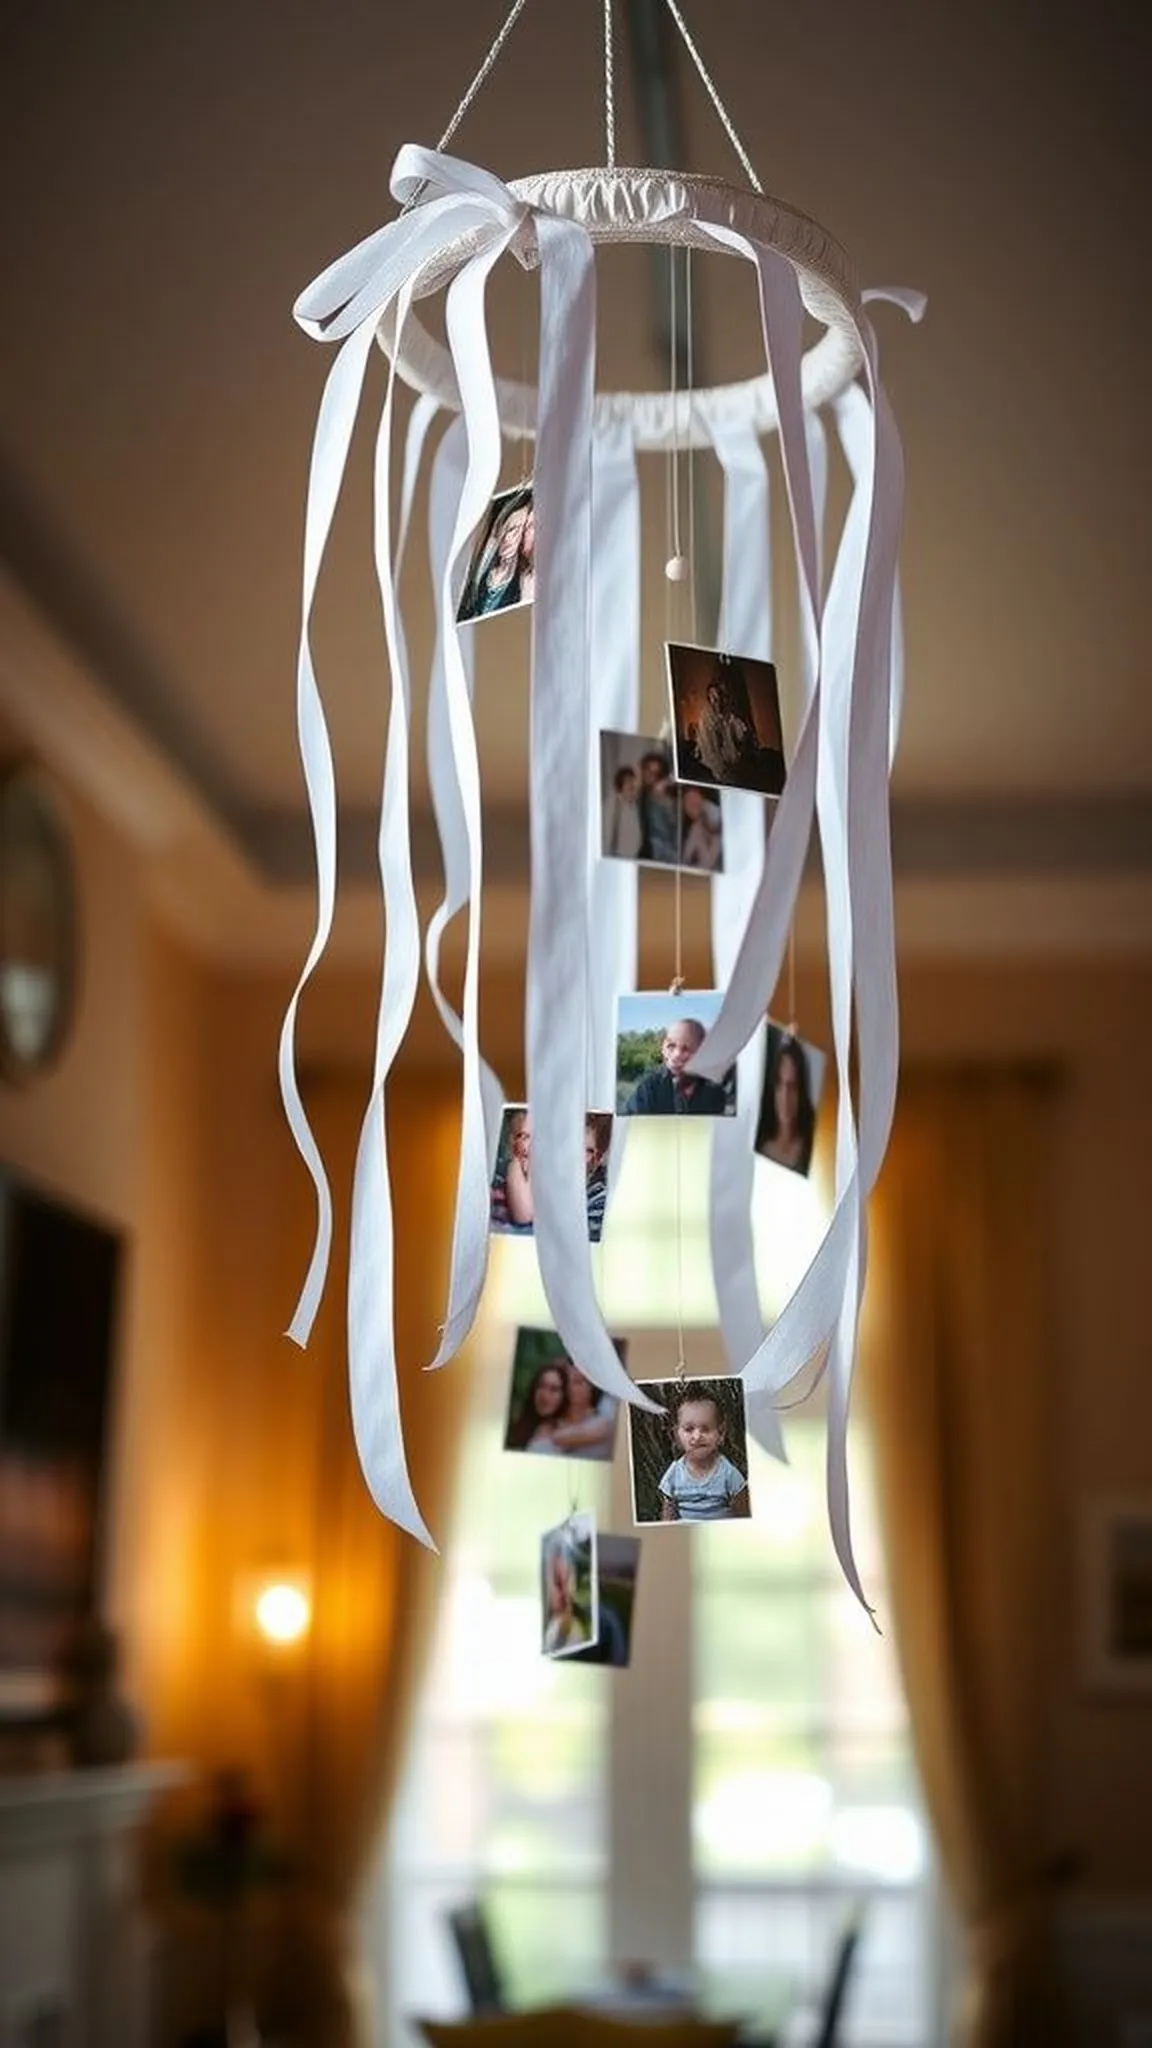
A hanging photo mobile spins slowly above a lounge area and captures light in moving snapshots. Ribbons trail like soft streams and printed photos float at varying depths, creating a layered narrative that can be seen from multiple angles. The faint flutter of ribbons produces a gentle, rhythmic sound when air moves and the arrangement feels dynamic without being fussy.
Guests find themselves looking up and tracing the string of faces and moments, discovering a sequence of memories that seem to orbit the room in a quiet, continuous celebration.
Steps
- Select a circular frame to suspend from the ceiling and attach ribbons of varied lengths around its circumference.
- Print photos to a lightweight stock and attach them to the ends of the ribbons using small clips or adhesive tabs.
- Balance the mobile by spacing photos evenly and adjusting ribbon lengths until the frame hangs level.
- Suspend the mobile over a seating area or refreshment station where it can turn freely in soft drafts.
- Rotate or swap photos during the event to keep the display lively and engaging.
Cupcake toppers styled as miniature mortarboards and bows

Mini mortarboard toppers perched on cupcakes bring a wink of celebration that pairs well with casual conversation. The crisp edges of fondant caps contrast with the soft frosting peaks beneath, creating a satisfying visual texture. Tiny tassels brush the frosting and catch a glint of light when someone lifts a cupcake.
The sound of light dish clinks and the aroma of baked sugar nearby make the moment feel indulgent and small-scale ceremonial. Guests often reach for these playful toppings with an approving nod, as though the cap itself is an edible badge of honor.
Steps
- Shape small mortarboard caps from fondant or stiffened chocolate and add a tiny tassel for authenticity.
- Place each topper gently on frosted cupcakes, positioning the tassel to one side for a classic look.
- Arrange the cupcakes on a tiered stand for visual impact and easy serving.
- Keep an extra set of toppers nearby in case of movement during transport to the display.
- Store the cupcakes in a cool place until ready to serve to maintain topper shape.
DIY gift table signage with handcrafted lettering
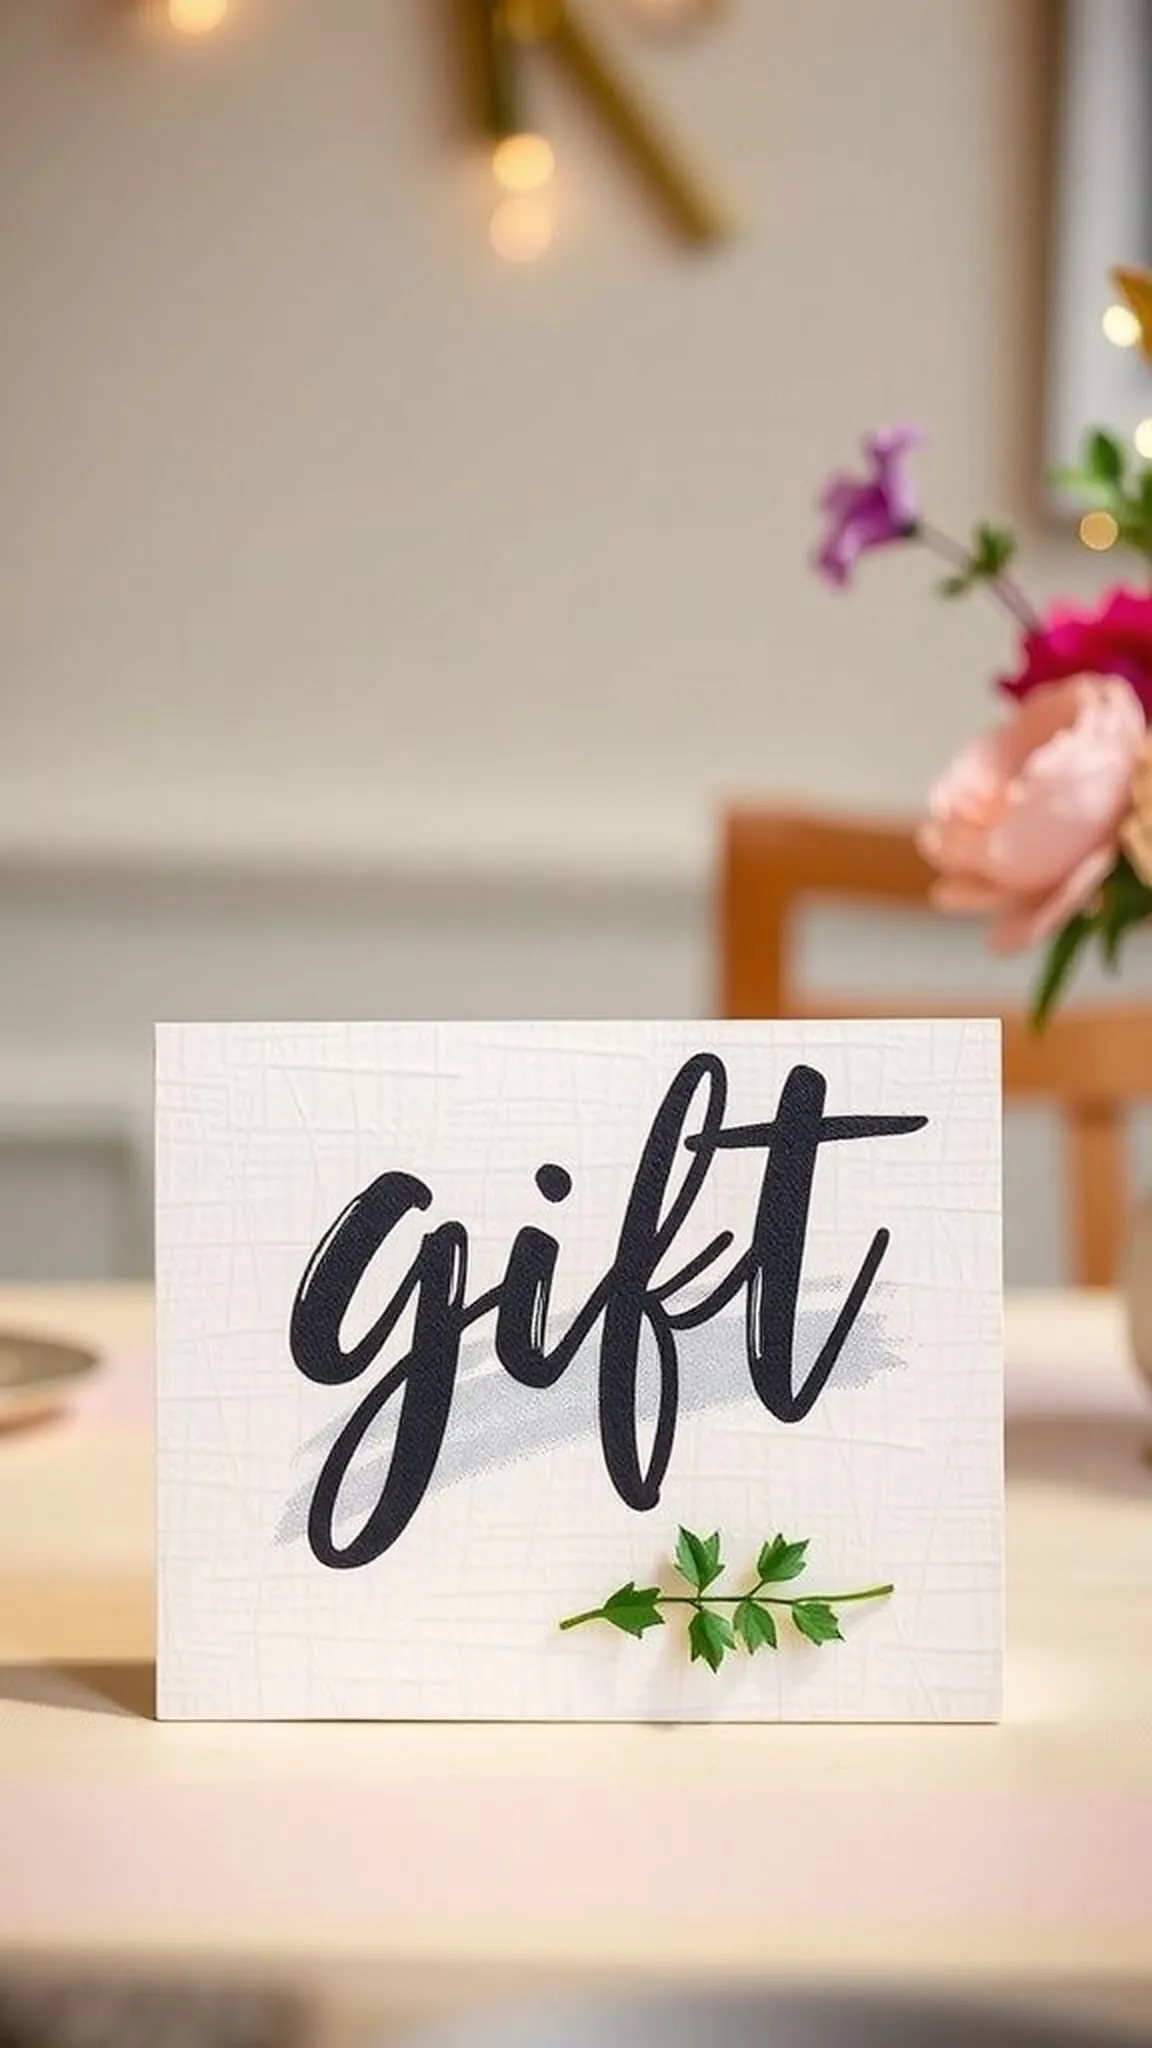
A handcrafted sign on the gift table sets a warm, intentional tone that feels thoughtful rather than formal. The texture of brushstrokes or marker lines offers a human rhythm that printed fonts rarely match. Cardstock edges reveal the grain of paper and small ink variations add personality, like handwriting translated into decor.
When guests approach the table, the sign reads like an invitation to participate in a shared moment rather than a directive. That gentle tone makes people pause a bit longer, leaving notes or gifts with a sense of quiet pride.
Steps
- Choose a sturdy signboard and plan the hand-lettered layout with light pencil guidelines.
- Trace over the guidelines with a brush pen or marker to achieve bold, confident strokes.
- Add small decorative accents such as a metallic border or a tiny cluster of faux foliage.
- Place the sign prominently on the gift table and angle it for clear visibility upon approach.
- Refresh ink or accents if smudging occurs during handling to keep the sign neat throughout the event.
Reusable canvas banner for future photo moments
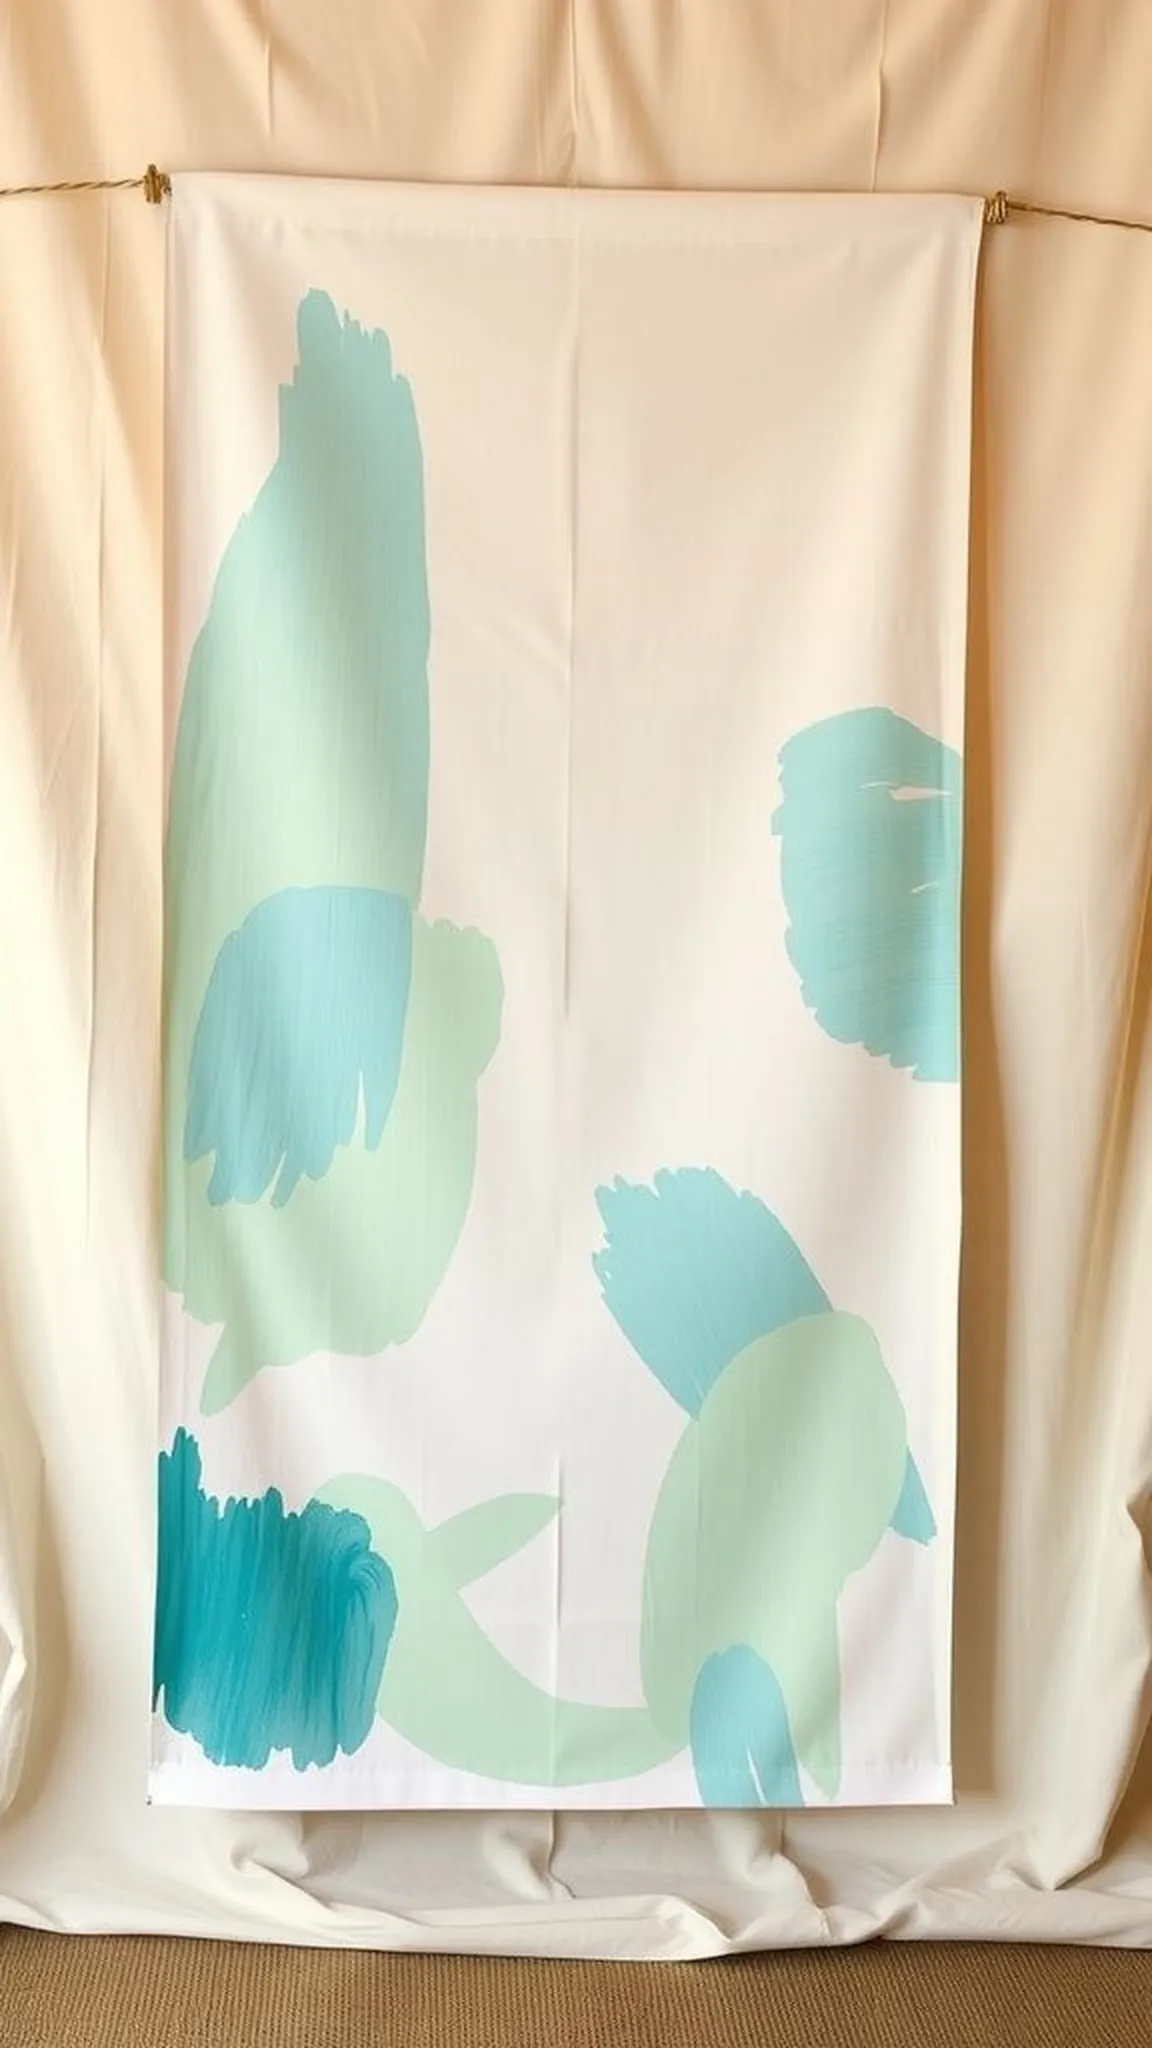
A canvas banner feels sturdy and timeless, with a tactile weave that catches light in a soft, diffuse way. Hand-applied lettering has a slight irregularity that reads as approachable and friendly, and the banner drapes with a measured weight that suggests longevity. When rolled up and stored after the party, it carries residues of the event—faint creases, a whisper of ribbon—that make it feel like a kept object.
Later, it returns to service for photos or small celebrations, offering continuity and a gentle reminder of the milestone it first announced.
Steps
- Select a durable canvas drop and sketch the desired message lightly with pencil for placement.
- Paint or stencil the lettering using fabric paints for a long-lasting finish and allow to dry fully.
- Hem the edges or add a simple dowel pocket for easy hanging and reuse.
- Display the banner behind a photo area for a clear backdrop and roll it carefully for storage afterward.
- Store in a dry place to preserve the fabric and painted lettering for future events.