
Teacher Appreciation Gift Crafts bring small classroom moments to life and make Teacher Appreciation Gift Crafts feel personal and thoughtful. Teacher Appreciation Gift Crafts that double as desk keepsakes and Teacher Appreciation Gift Crafts that tuck quiet notes inside a jar show up as simple teacher appreciation craft ideas or teacher appreciation gifts for a favorite teacher. Cozy teacher appreciation crafts and tiny handcrafted tokens are the kind of Teacher Appreciation Gift Crafts that linger on a desk.
Personalized Mason Jar Desk Caddy with Chalk Label
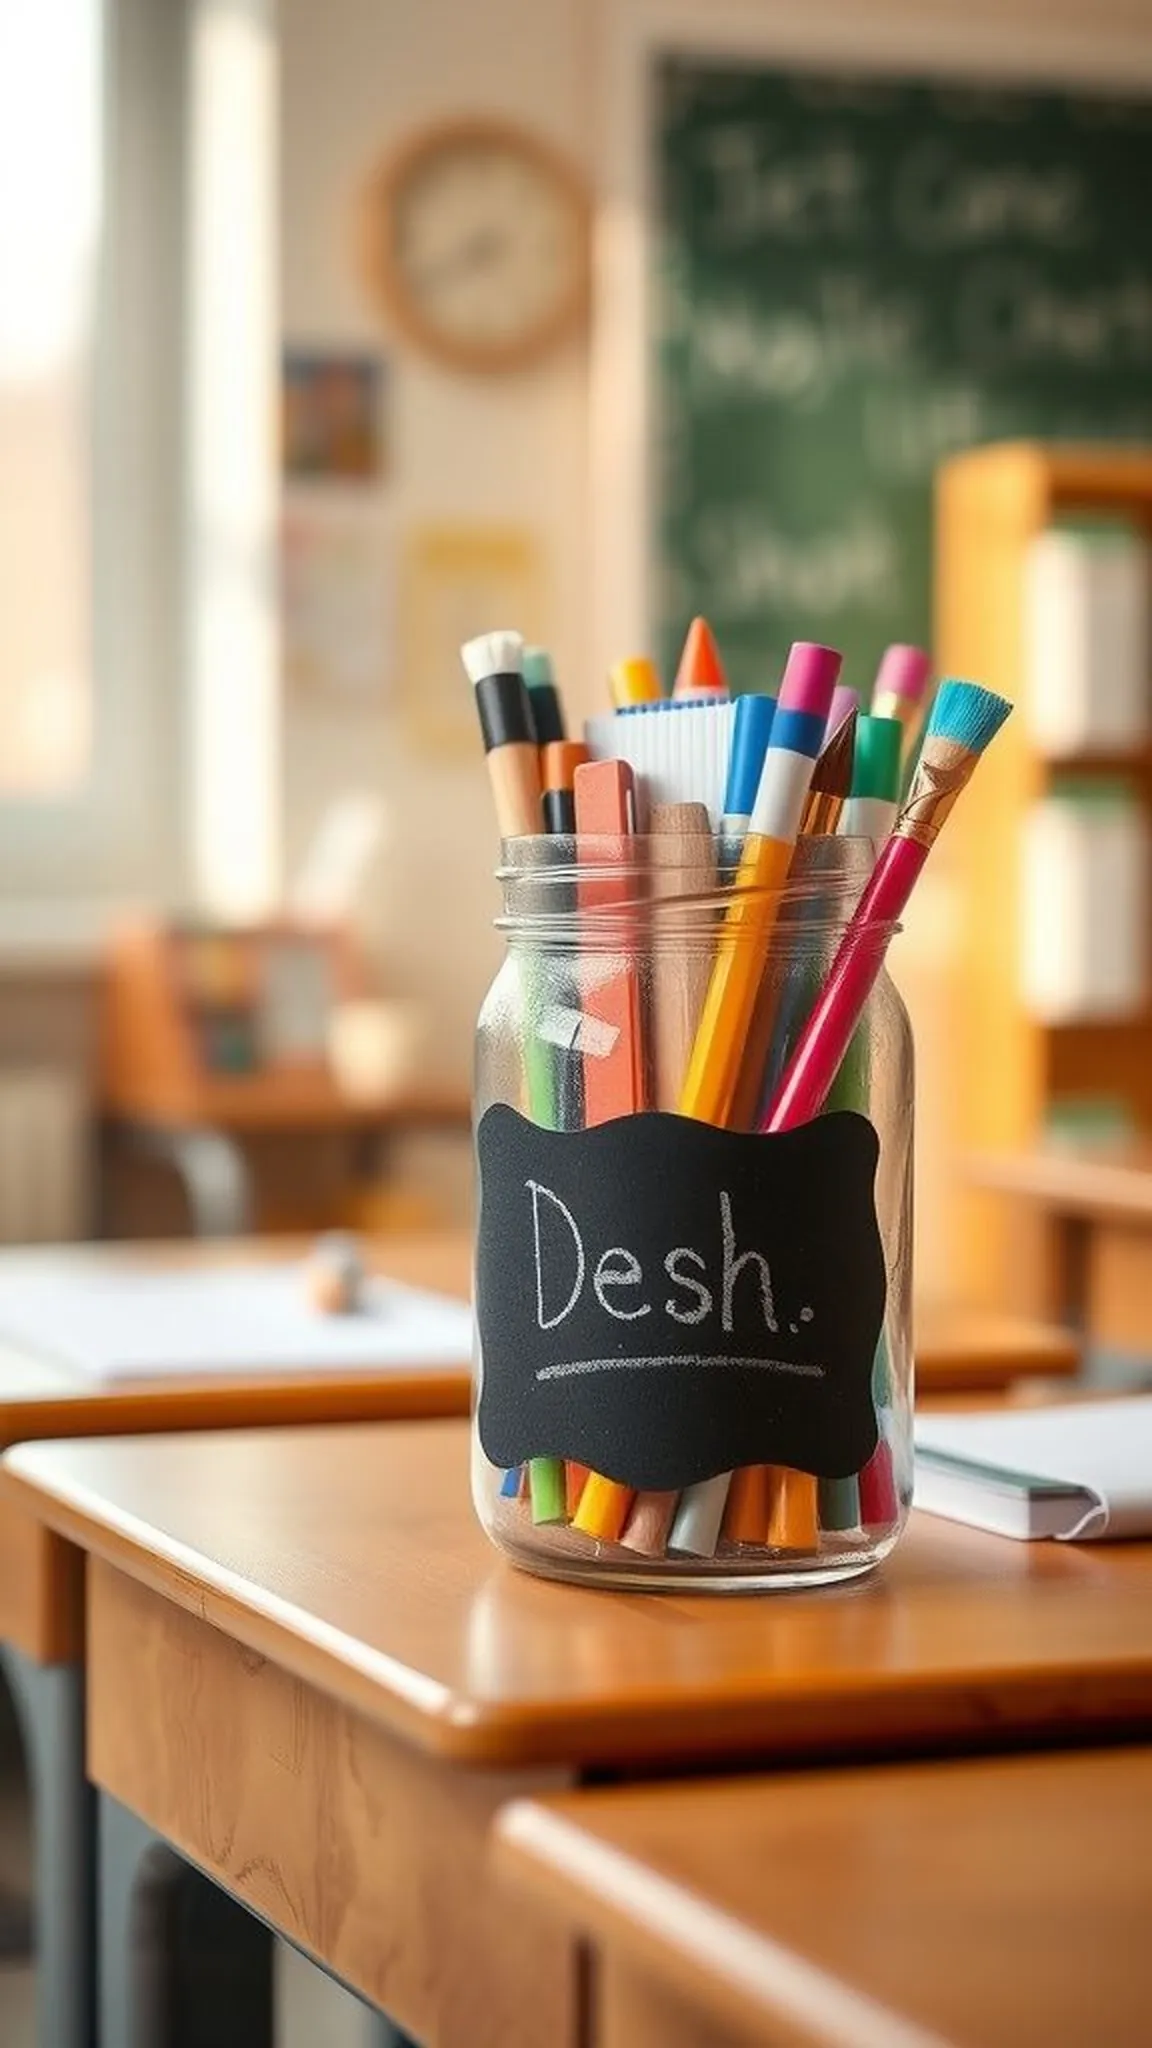
A weighty mason jar with worn glass and a chalk label felt like a tiny ceremony when placed on a teacher’s desk. The smooth coolness of the glass, the soft scribble of chalk on a matte tag, and the little cluster of pens and brushes inside created a lived-in look. There was a quiet pride in watching an ordinary jar become an organized nook, a hint of sunlight catching the rim and a faint smell of wax from labels that had been rubbed by curious fingers.
Steps
- Clean and dry a mason jar, then paint or distress the lid for contrast.
- Attach a chalkboard label to the jar and write the teacher’s name or a short phrase.
- Fill the jar with pens, pencils, and small desk tools arranged for visual balance.
- Add a ribbon or twine bow around the neck for a soft finishing touch.
Gratitude Jar of Handwritten Notes and Memories
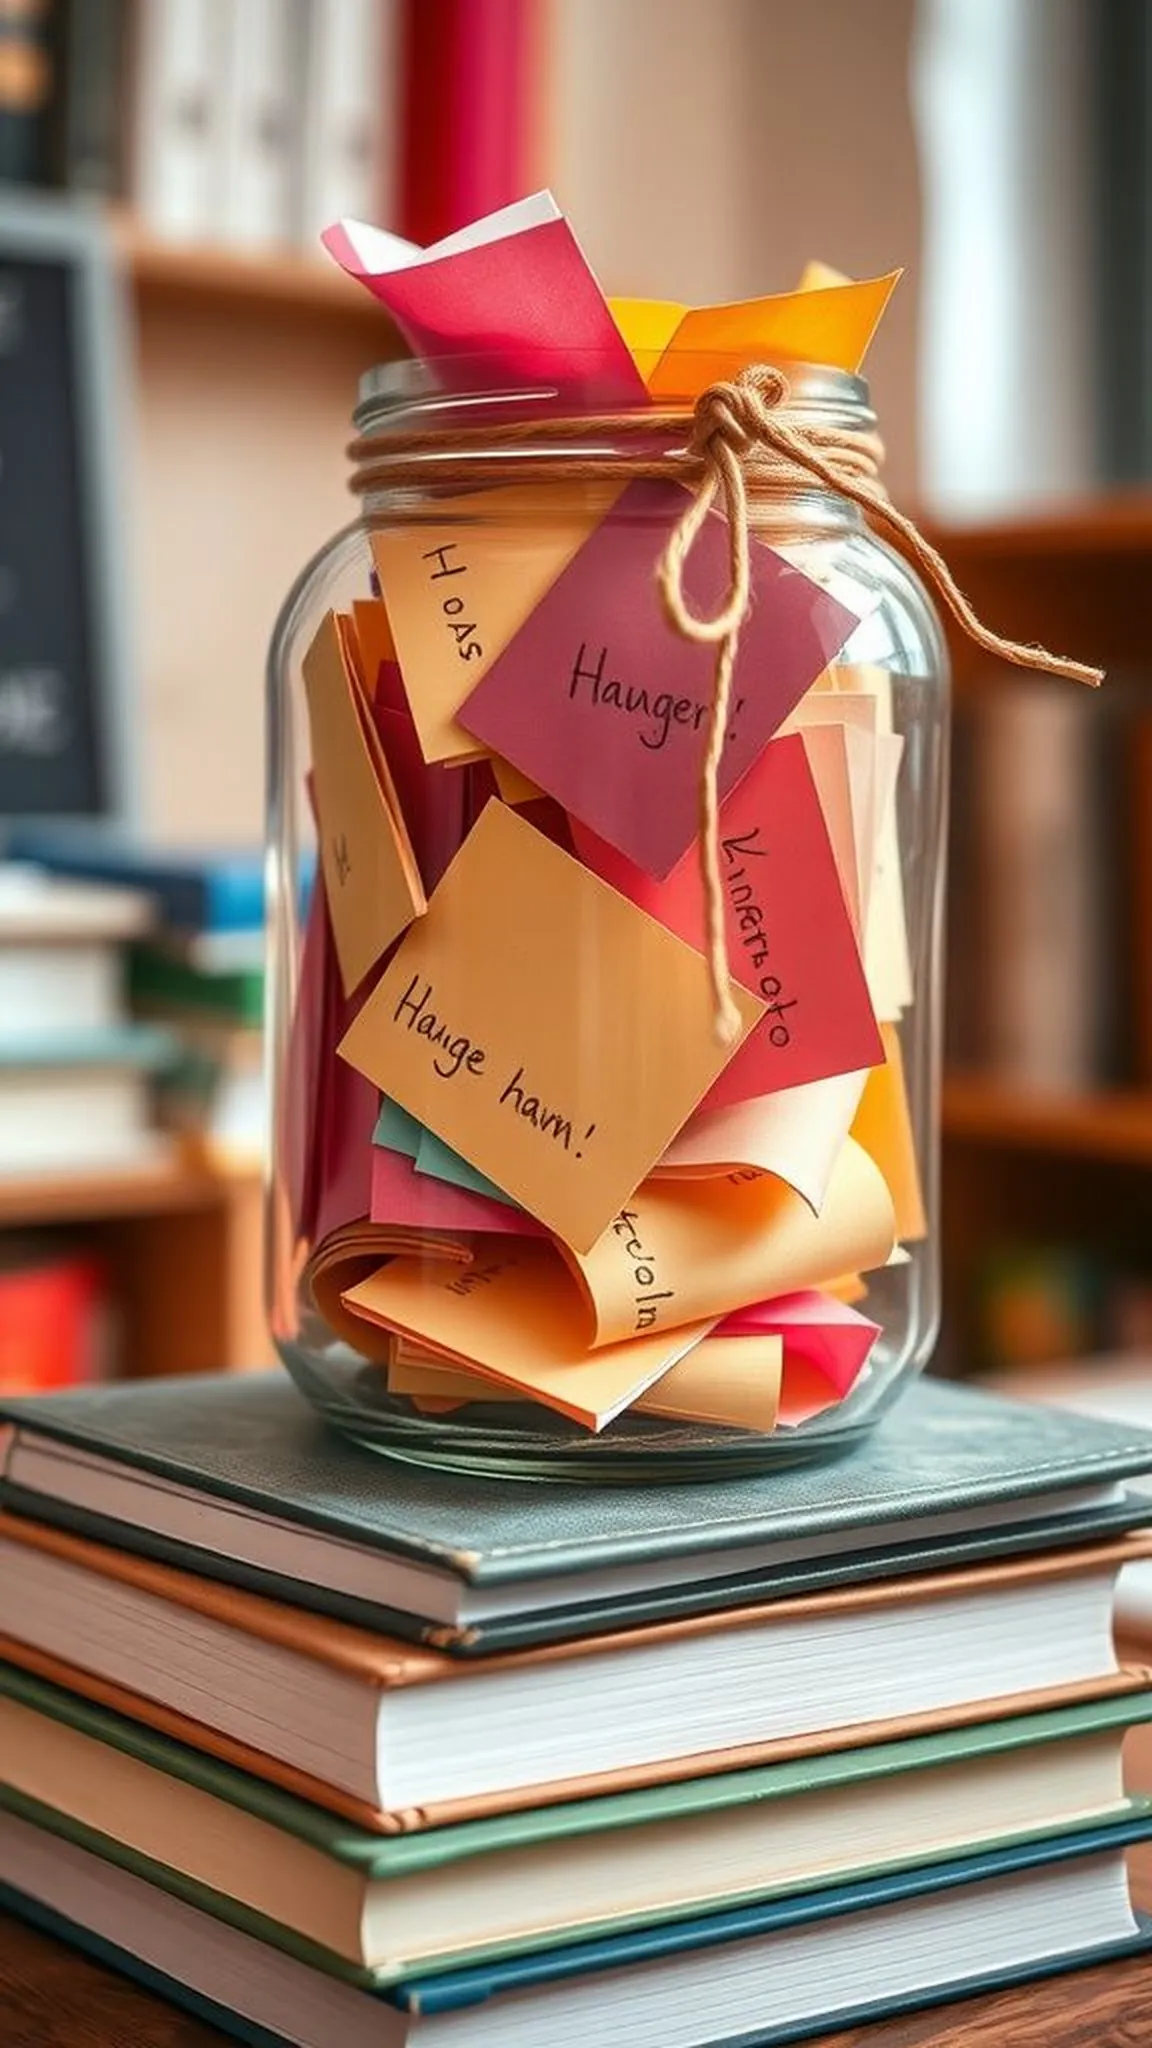
A jar filled with folded notes felt like compressed sunshine. Each slip of paper carried a small voice, the freckles of crayon on a second-grader’s handwriting and the neat loops of an older student’s cursive. The rustle of the paper when the jar was shaken made a soft, hopeful sound.
On a rainy afternoon it seemed that the jar radiated warmth, and someone would lift a note and smile as ink and memory met. The jar sat heavy and uplifted at once, catching glimmers from the overhead lights.
Steps
- Gather small slips of paper and ask students or colleagues to write short notes or memories.
- Place the folded notes into a clean glass jar and cap it with a decorative lid.
- Add a handmade label describing the jar’s purpose and tie a ribbon around the neck.
Scented Candle in Recycled Teacup with Tag
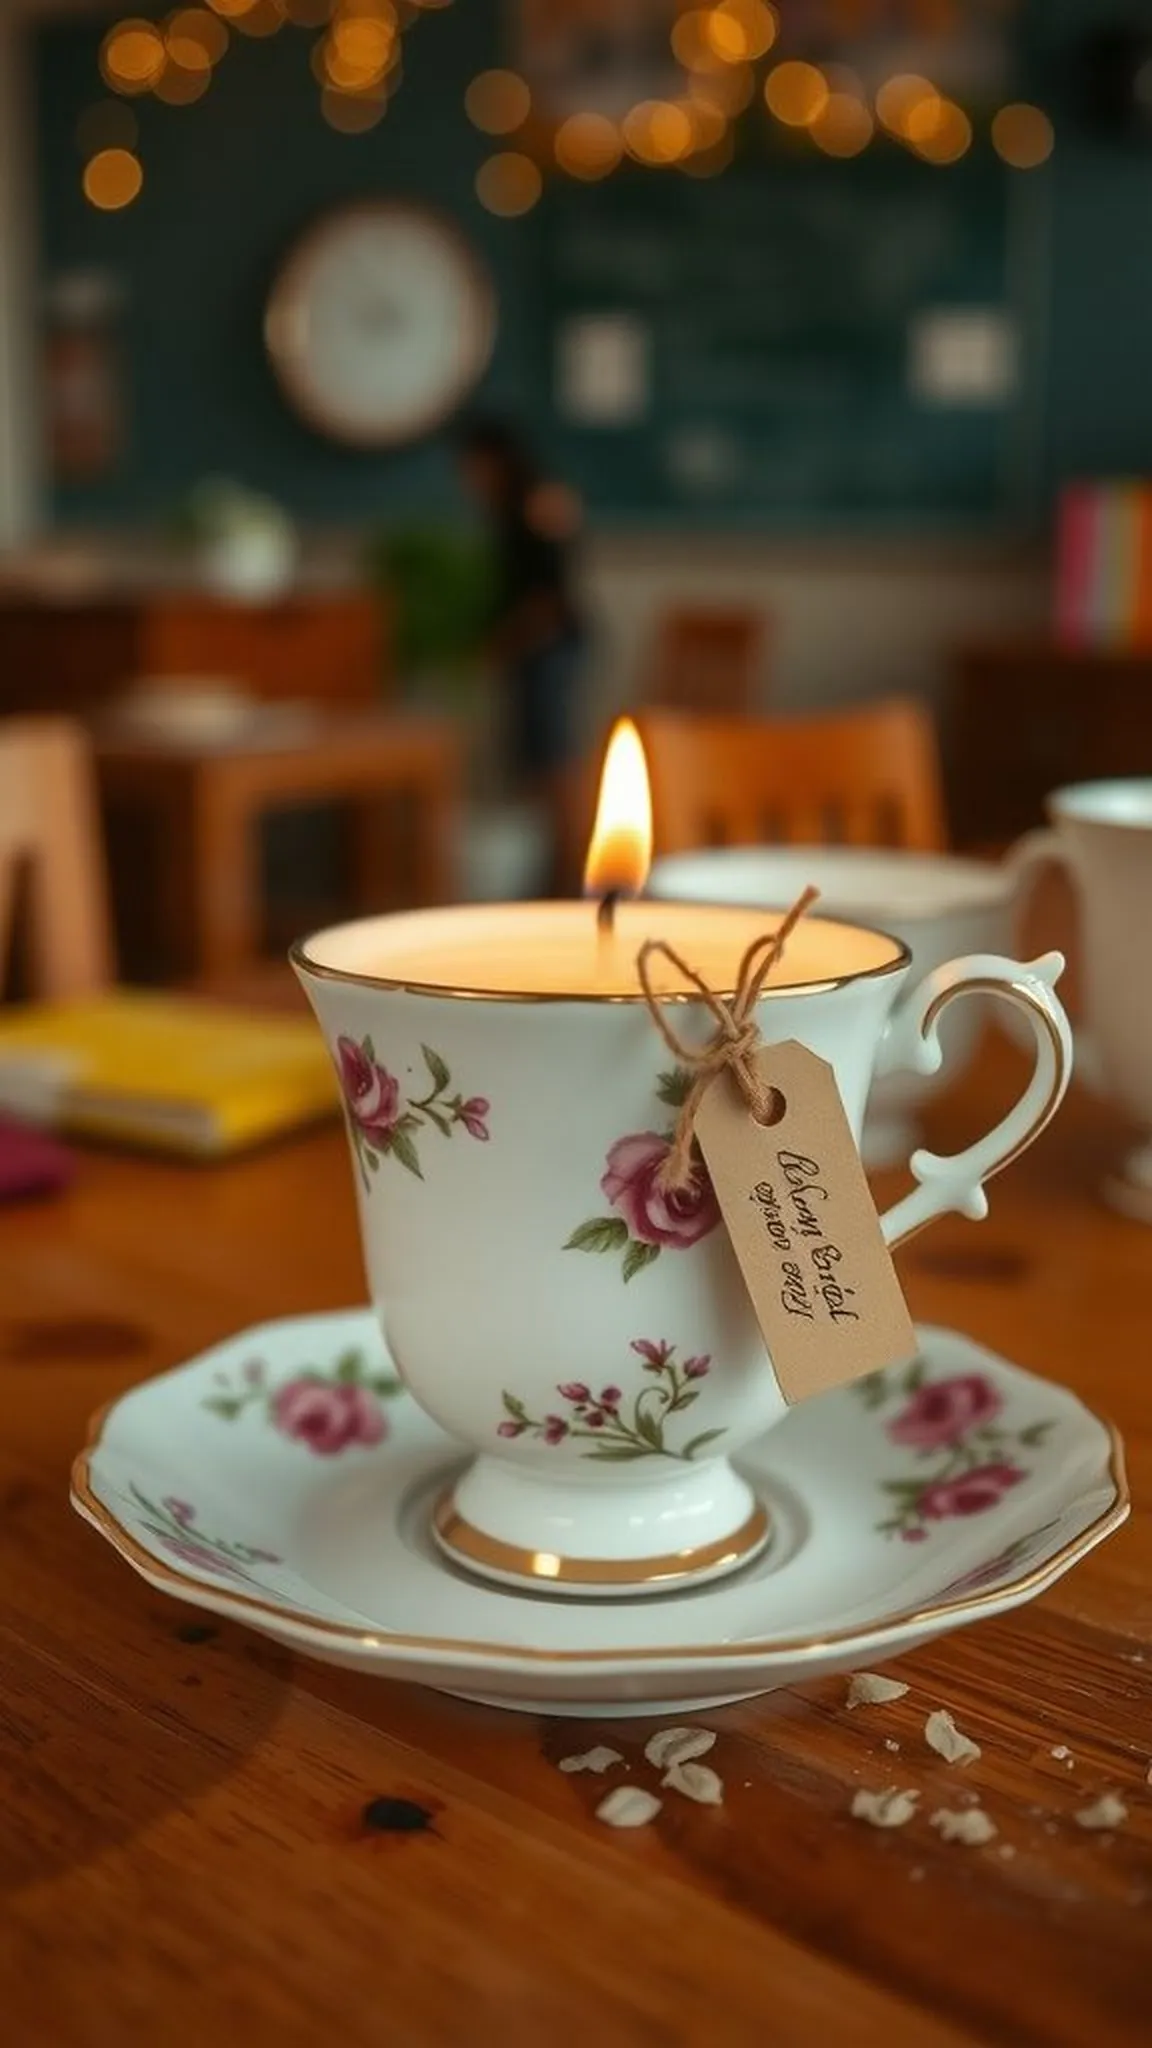
A tiny teacup candle felt like a little domestic miracle that belonged in a teacher’s calm corner. The porcelain had a cool gloss and a faint pattern that peeked through melted wax as it set. When lit later, it exhaled a gentle scent of vanilla and citrus that softened the edges of a long afternoon.
There was a companionable hush to the piece, the way light shimmered on the cup’s rim and the ribboned tag swung slightly when carried. It read as both useful and quietly indulgent.
Steps
- Melt soy or beeswax and stir in a few drops of chosen essential oil or fragrance.
- Center a wick in a vintage teacup and pour the warm wax carefully around it.
- Let the candle cool fully, trim the wick, and add a small handwritten tag.
Custom Pencil Holder from Painted Tin Can
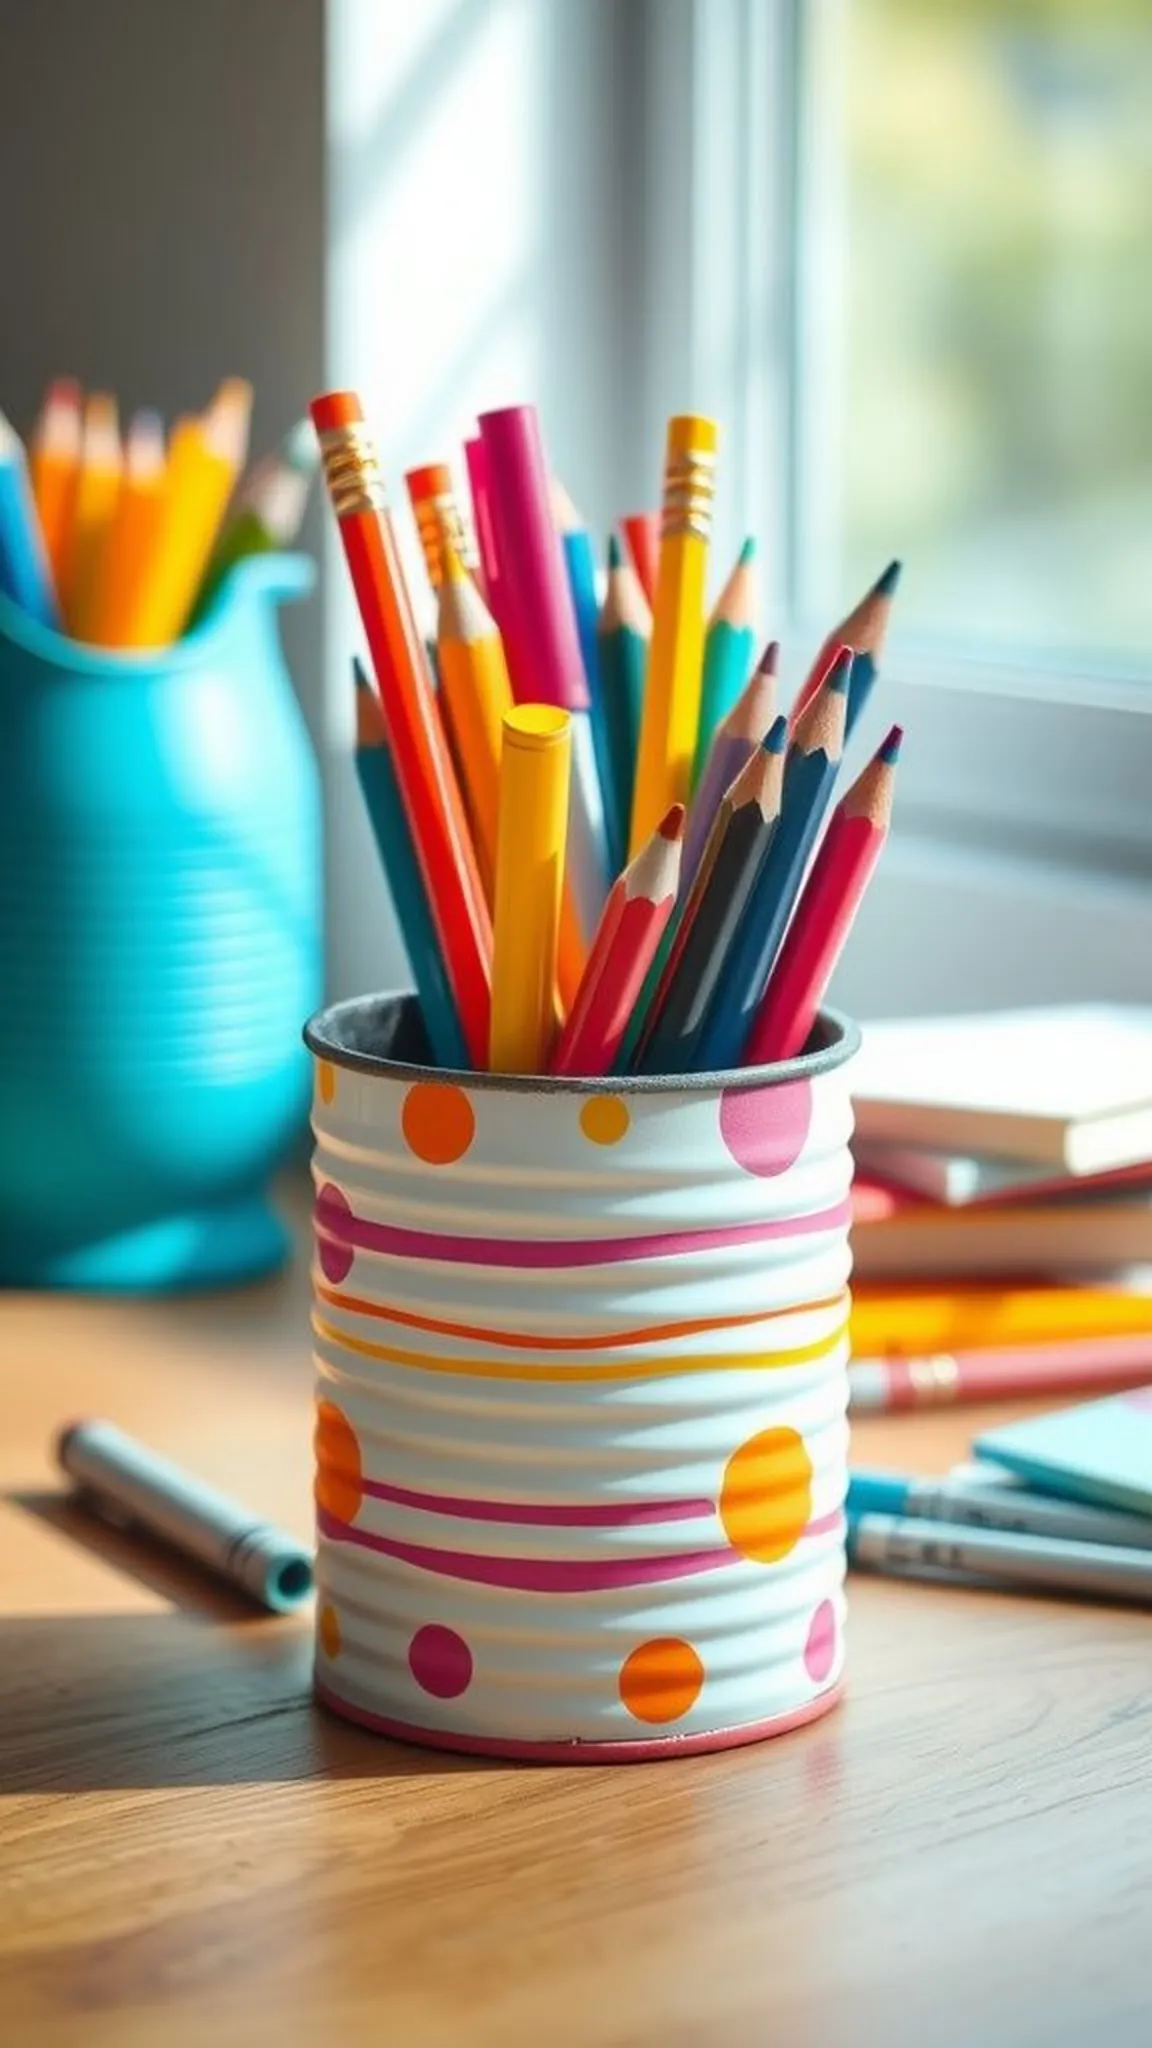
A painted tin can felt unexpectedly cheerful sitting on a teacher’s shelf. The metal had a cool edge under layers of color and a faint echo of its former label that gave it character. Patterns of stripes or playful dots created movement while the matte paint softened the metal’s original shine.
When sunlight hit it, the painted surface gleamed in parts and the rim reflected a thin highlight. The holder suggested everyday usefulness with a wink, the kind of item that could be nudged around a desk as priorities shifted.
Steps
- Clean an empty tin can and apply a base coat of acrylic paint for coverage.
- Add decorative patterns or stenciled shapes with contrasting paint colors.
- Seal the painted surface with a matte varnish and place pencils, markers, or rulers inside.
Hand-stamped Watercolor Paper Bookmarks with Tassel
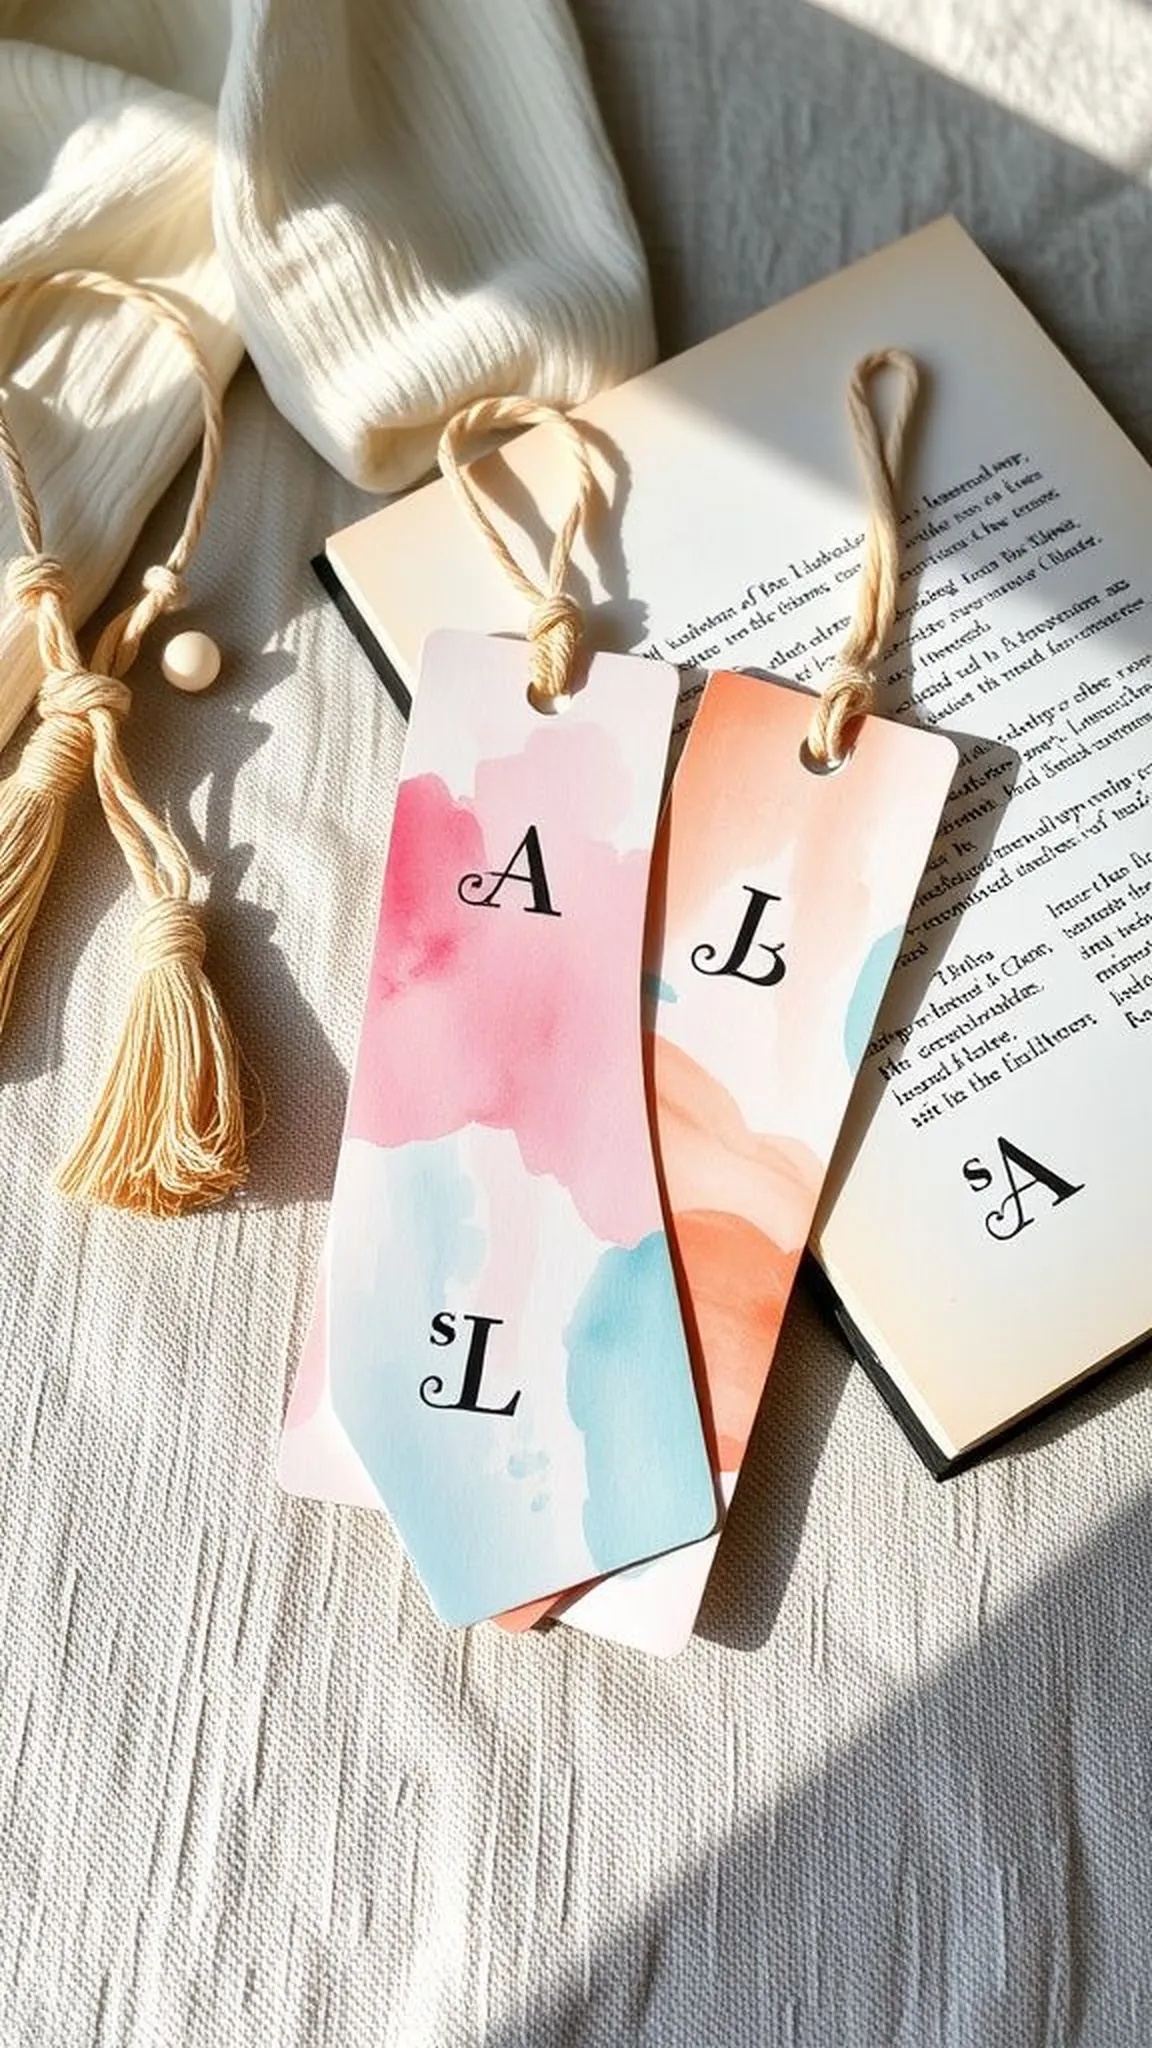
Bookmarks made from watercolors had a velvety softness and a wet-edge texture that invited a slow thumb. The stamped letters carried slight imperfections that felt charming, each imprint a small fingerprint of intention. The paper’s fibers caught blushes of pigment and the tassel added a playful swing at the top, a tiny flag for favorite pages.
When slid into a well-loved book the bookmark added a quiet flourish, its pastel wash peeking out and promising a return to story and calm amid a busy desk day.
Steps
- Paint strips of thick watercolor paper with light washes and let them dry completely.
- Use alphabet stamps and ink to add short messages or names onto each strip.
- Punch a hole at the top and attach a small tassel or ribbon.
Mini Succulent Garden in Painted Terracotta Pots
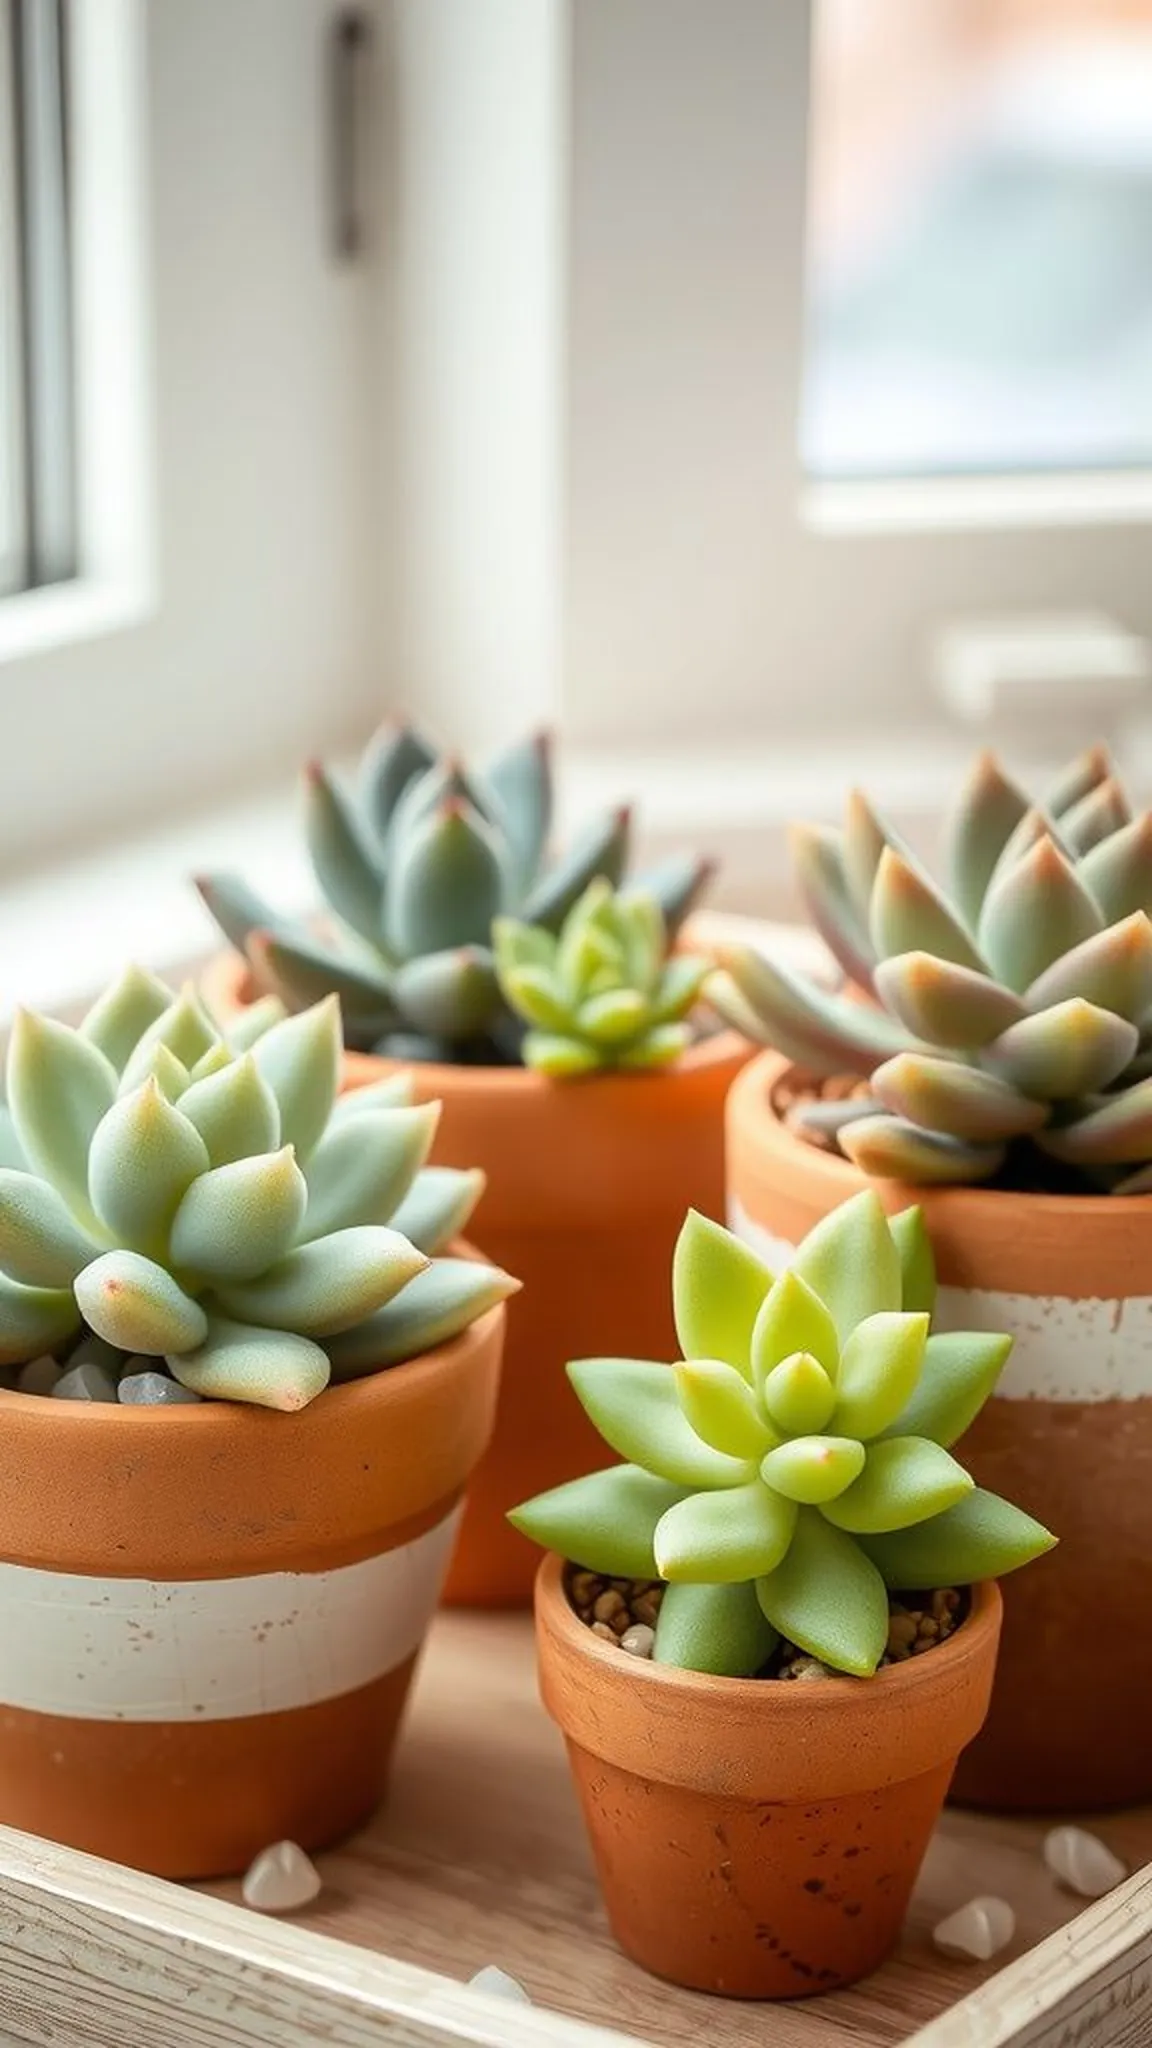
A cluster of tiny succulents in painted terracotta felt like a little green neighborhood. The porous pots wore layers of paint that still showed flecks of clay beneath, giving a lived-in warmth. Succulent leaves offered a cool, waxy texture and a palette of greens and silvers that calmed the eye.
The soil smelled faintly of earth and the plants sat low, steady, patient. When arranged together they created a small tableau that breathed life into a windowsill, a soft contrast to the angular shapes of textbooks and sticky notes.
Steps
- Paint small terracotta pots with acrylics and let them dry thoroughly.
- Place a layer of small stones for drainage, add soil, and nestle in tiny succulent plants.
- Arrange the pots in a shallow tray and add a decorative label or tag.
Tote Bag Decorated with Student Handprints
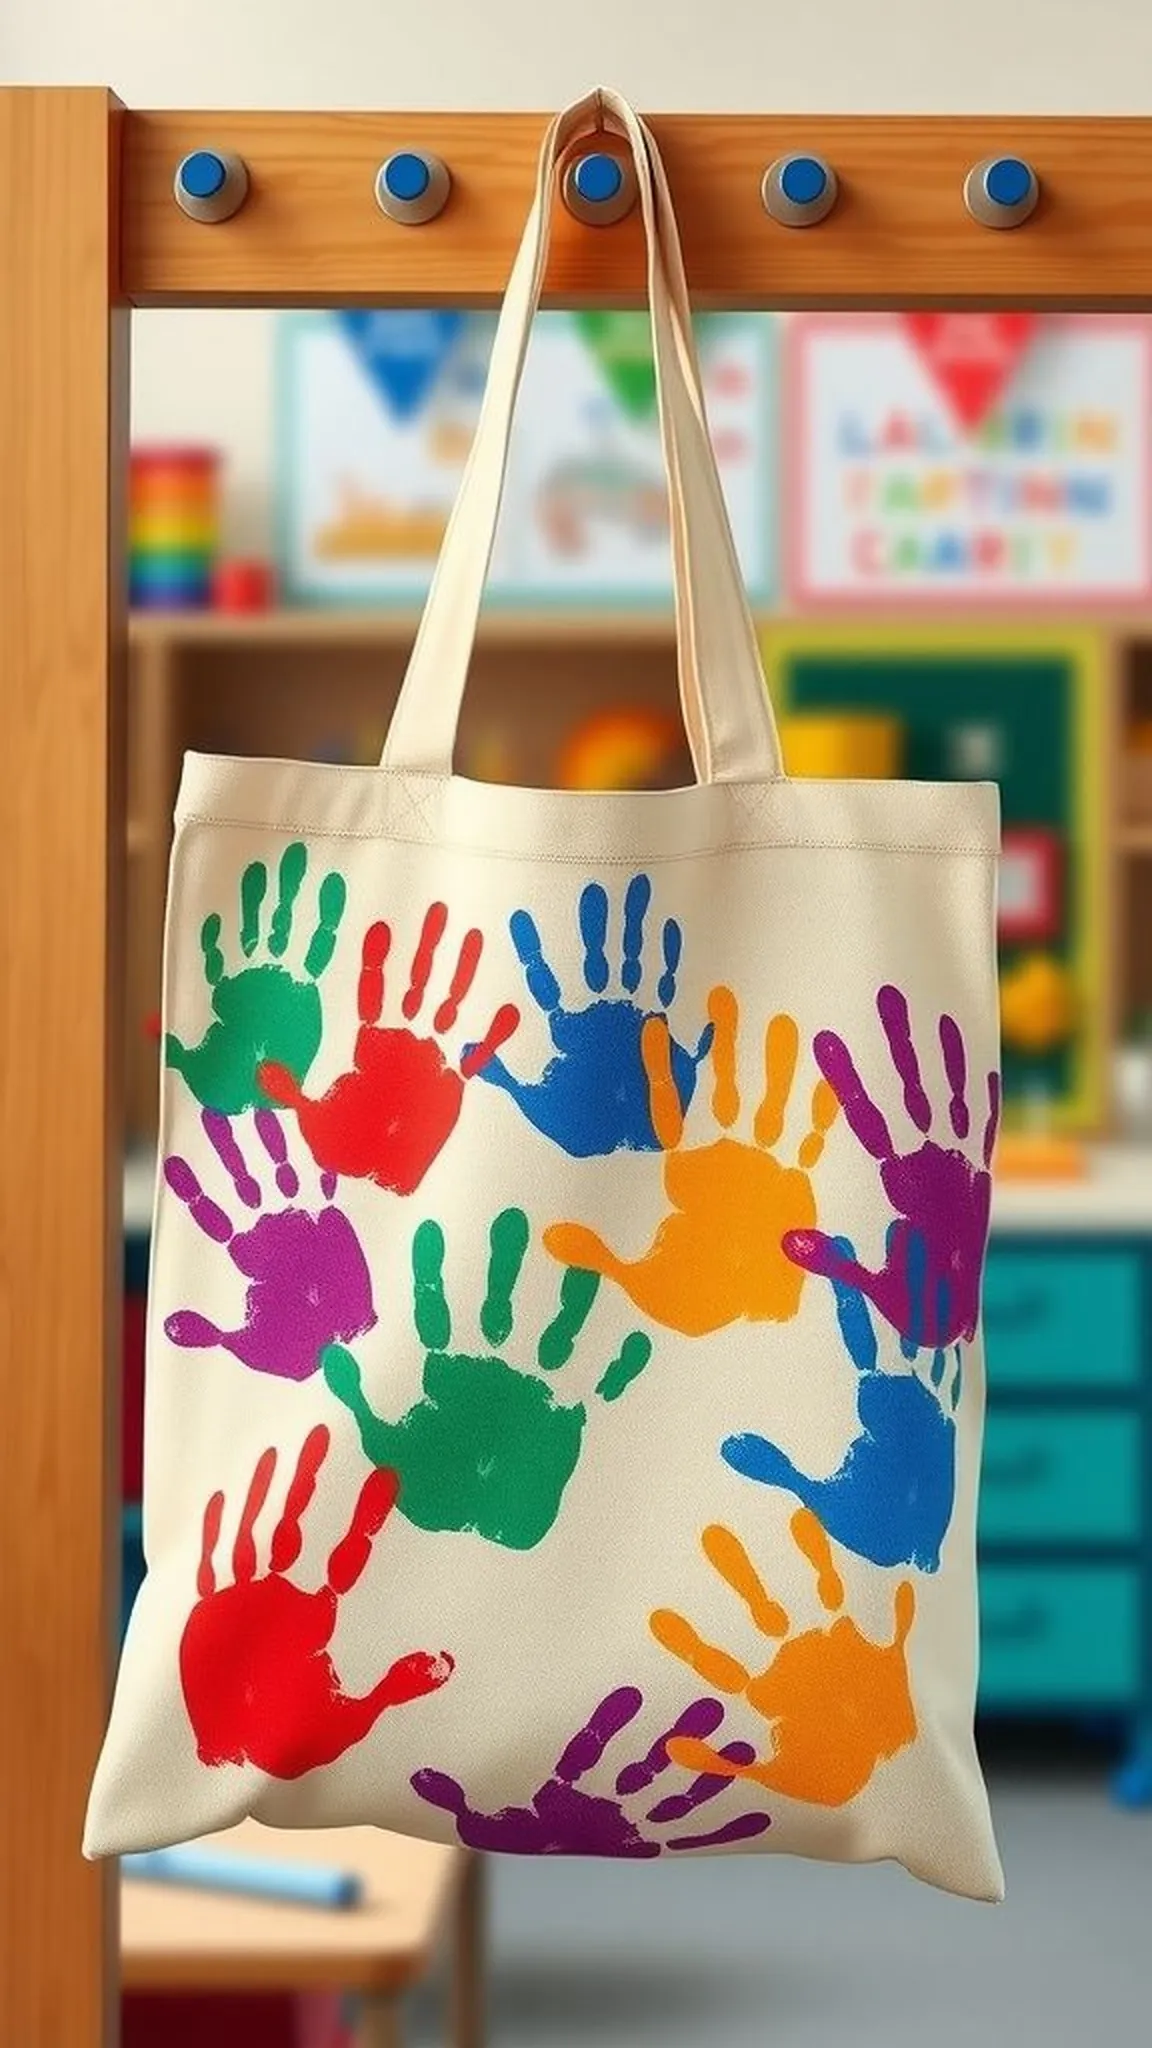
A canvas tote worked as a quiet roll call when dotted with little handprints. The fabric smelled faintly of paint and held the imprint shapes like a map of a year. Each hand added a personal scale and the patchwork of colors suggested laughter and busy desks.
The tote had weight and purpose, its straps soft against the shoulder and the printed palms catching light at different angles. Seeing the bag hanging on a hook was like noticing a small constellation, familiar and warmly busy with memory.
Steps
- Lay a plain canvas tote flat and prepare washable fabric paints in a palette.
- Press students’ hands gently into paint and then onto the tote to create handprint designs.
- Allow the paint to dry fully and heat-set if required by the paint instructions.
Layered Hot Cocoa Mix in Clear Mason Jar
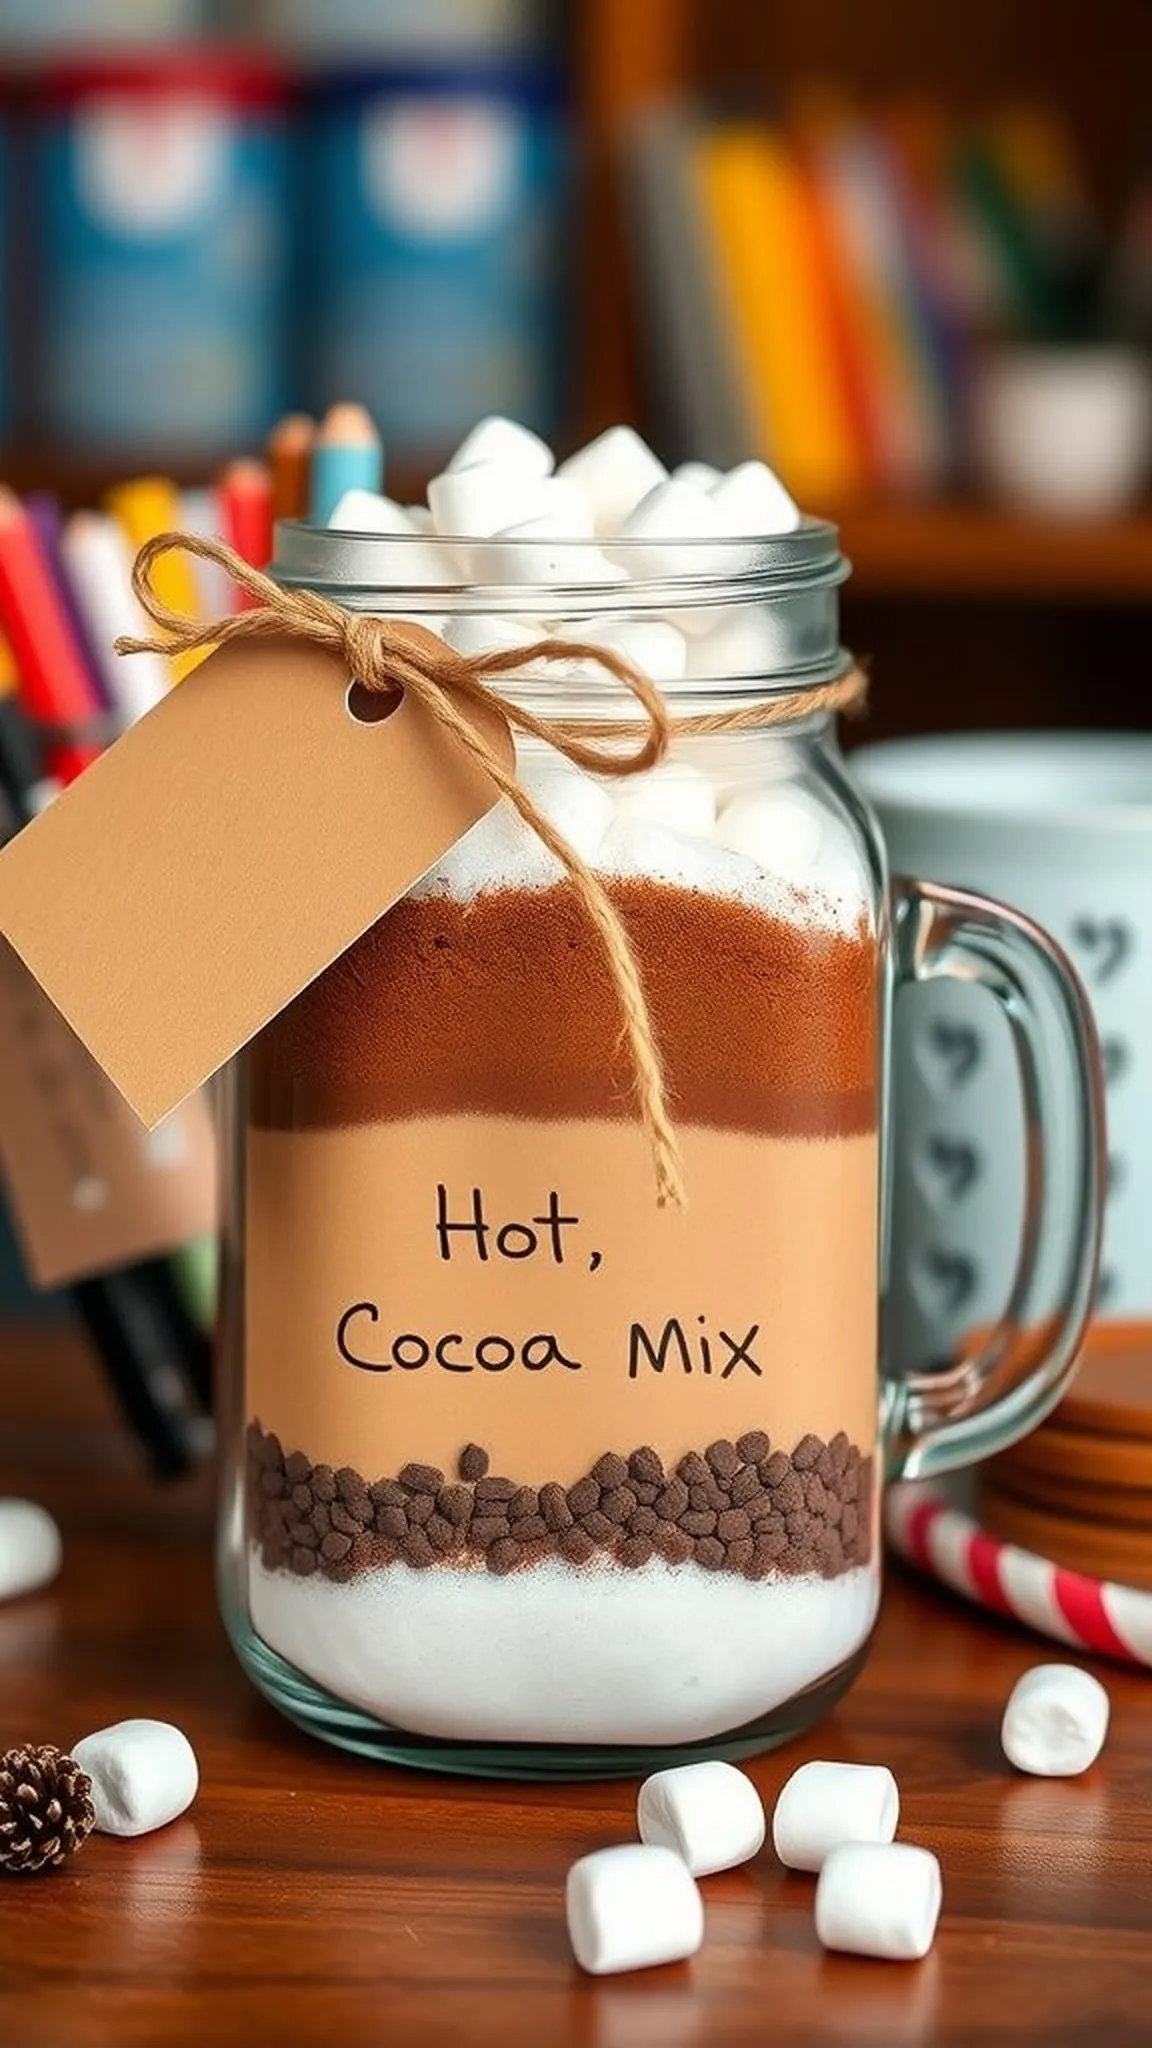
The layered cocoa jar had a simple, comforting presence, bands of cocoa, sugar, and little marshmallows stacked like a sweet geological slice. The glass showed off the contrasts and the neck of the jar bore a small label describing cozy moments. When shaken the powders whispered against the glass and the marshmallows looked like tiny clouds at the top.
The jar read as invitation and ritual at once, a brief pause for warmth that could be wrapped in a ribbon and carried to a chilly classroom desk.
Steps
- Layer hot cocoa mix, powdered milk, sugar, and mini marshmallows into a clean mason jar.
- Seal the jar tightly and add a decorative fabric circle under the lid if desired.
- Attach a tag with simple instructions for mixing with hot water or milk.
Framed Photo Collage with Playful Embellishments
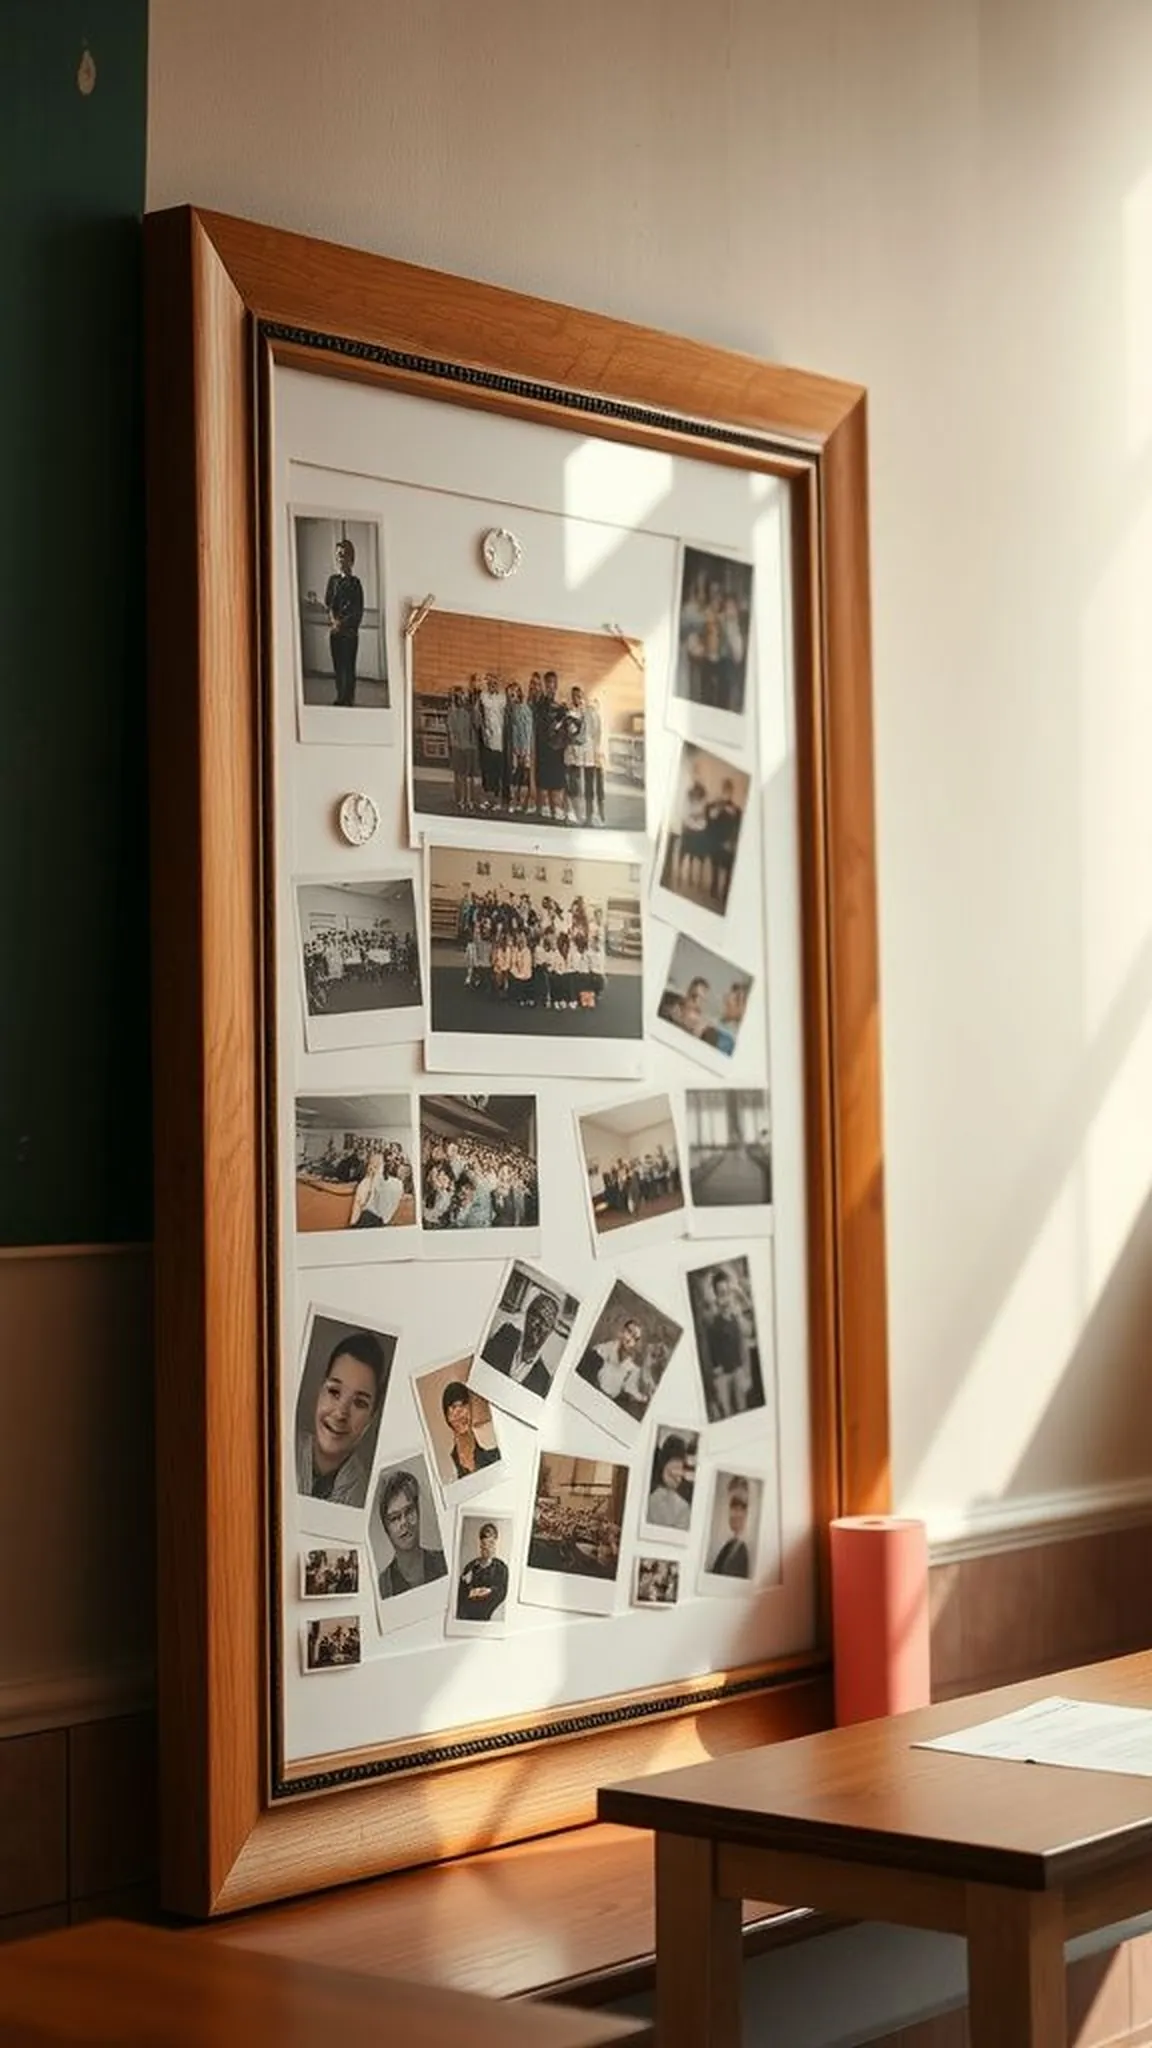
A framed collage felt like a small theatrical stage of a school year. Photographs of crowded art projects, candid smiles, and classroom windows were cropped into a lively arrangement. Textured papers and tiny die-cut shapes added playful punctuation around the images while a matte finish kept everything gentle on the eye.
The frame’s wood had a soft grain and the glass reflected a sliver of the room’s light. Hanging it on a wall made the everyday scenes feel curated and present, like a map of small victories.
Steps
- Select a group of photographs that capture classroom moments and trim them to fit a chosen frame layout.
- Mount photos on decorative cardstock, add small embellishments like paper shapes or stickers, and arrange them in a frame.
- Secure the backing and add a simple label or title on the mat if desired.
Chalkboard Clipboard with a Personalized Message
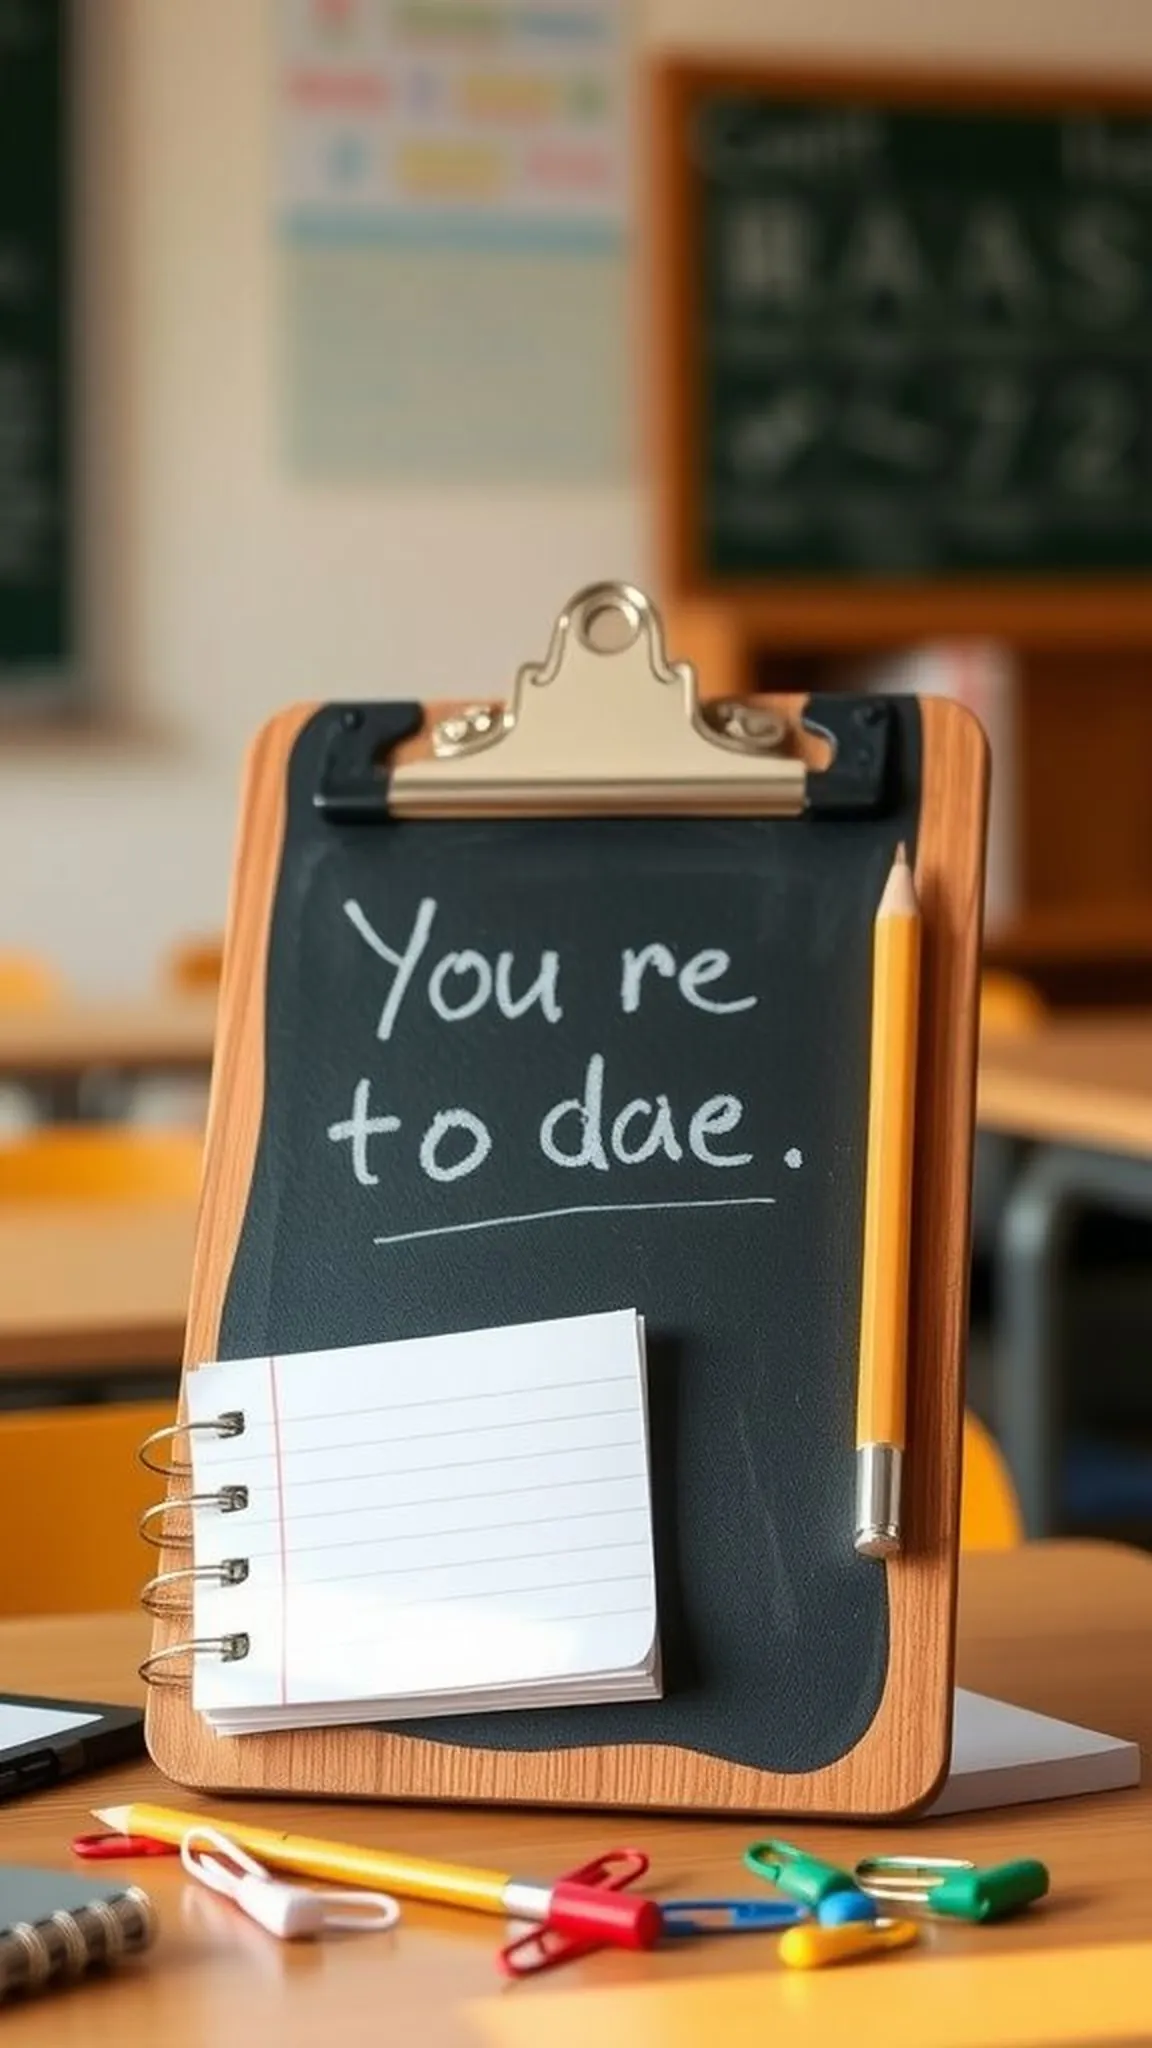
A clipboard reimagined with a chalkboard surface had a playful, practical feel, the matte black catching the chalk dust in soft contrast. When a short message was written on it, the words felt temporary in a comforting way, like a fleeting note left on a kitchen counter. The board’s edges were slightly scuffed and the clip held a few well-used forms.
The texture under the chalk had a yielding responsiveness and the whole piece suggested movement: quick reminders, little celebrations, and a place for a day’s small to-dos to rest visibly.
Steps
- Paint the front panel of a clipboard with chalkboard paint and let it cure completely.
- Write a short personalized message or the teacher’s name with chalk and wipe to create a softened background.
- Clip a small notepad to the board for quick notes and add a chalk stick tied on a string.
Button-covered Picture Frame with Bright Contrast

A frame studded with buttons felt playful and textured, each button a tiny island of color and shape. The mix of glossy and matte finishes caught the light differently, making the frame look lively from every angle. Some buttons were smooth and cool under a thumb, others had ridges or a carved face that added character.
The photo inside seemed to sit deeper because of the three-dimensional border, like a small treasure chest. When set on a shelf it winked, a tactile celebration that invited closer, quiet inspection.
Steps
- Gather a varied collection of buttons and arrange them around a plain picture frame to find a pleasing pattern.
- Attach the buttons securely to the frame surface, overlapping edges for a crowded, textured look.
- Insert a photo and display the frame on a desk or shelf.
DIY Desk Calendar with Rotating Date Cards
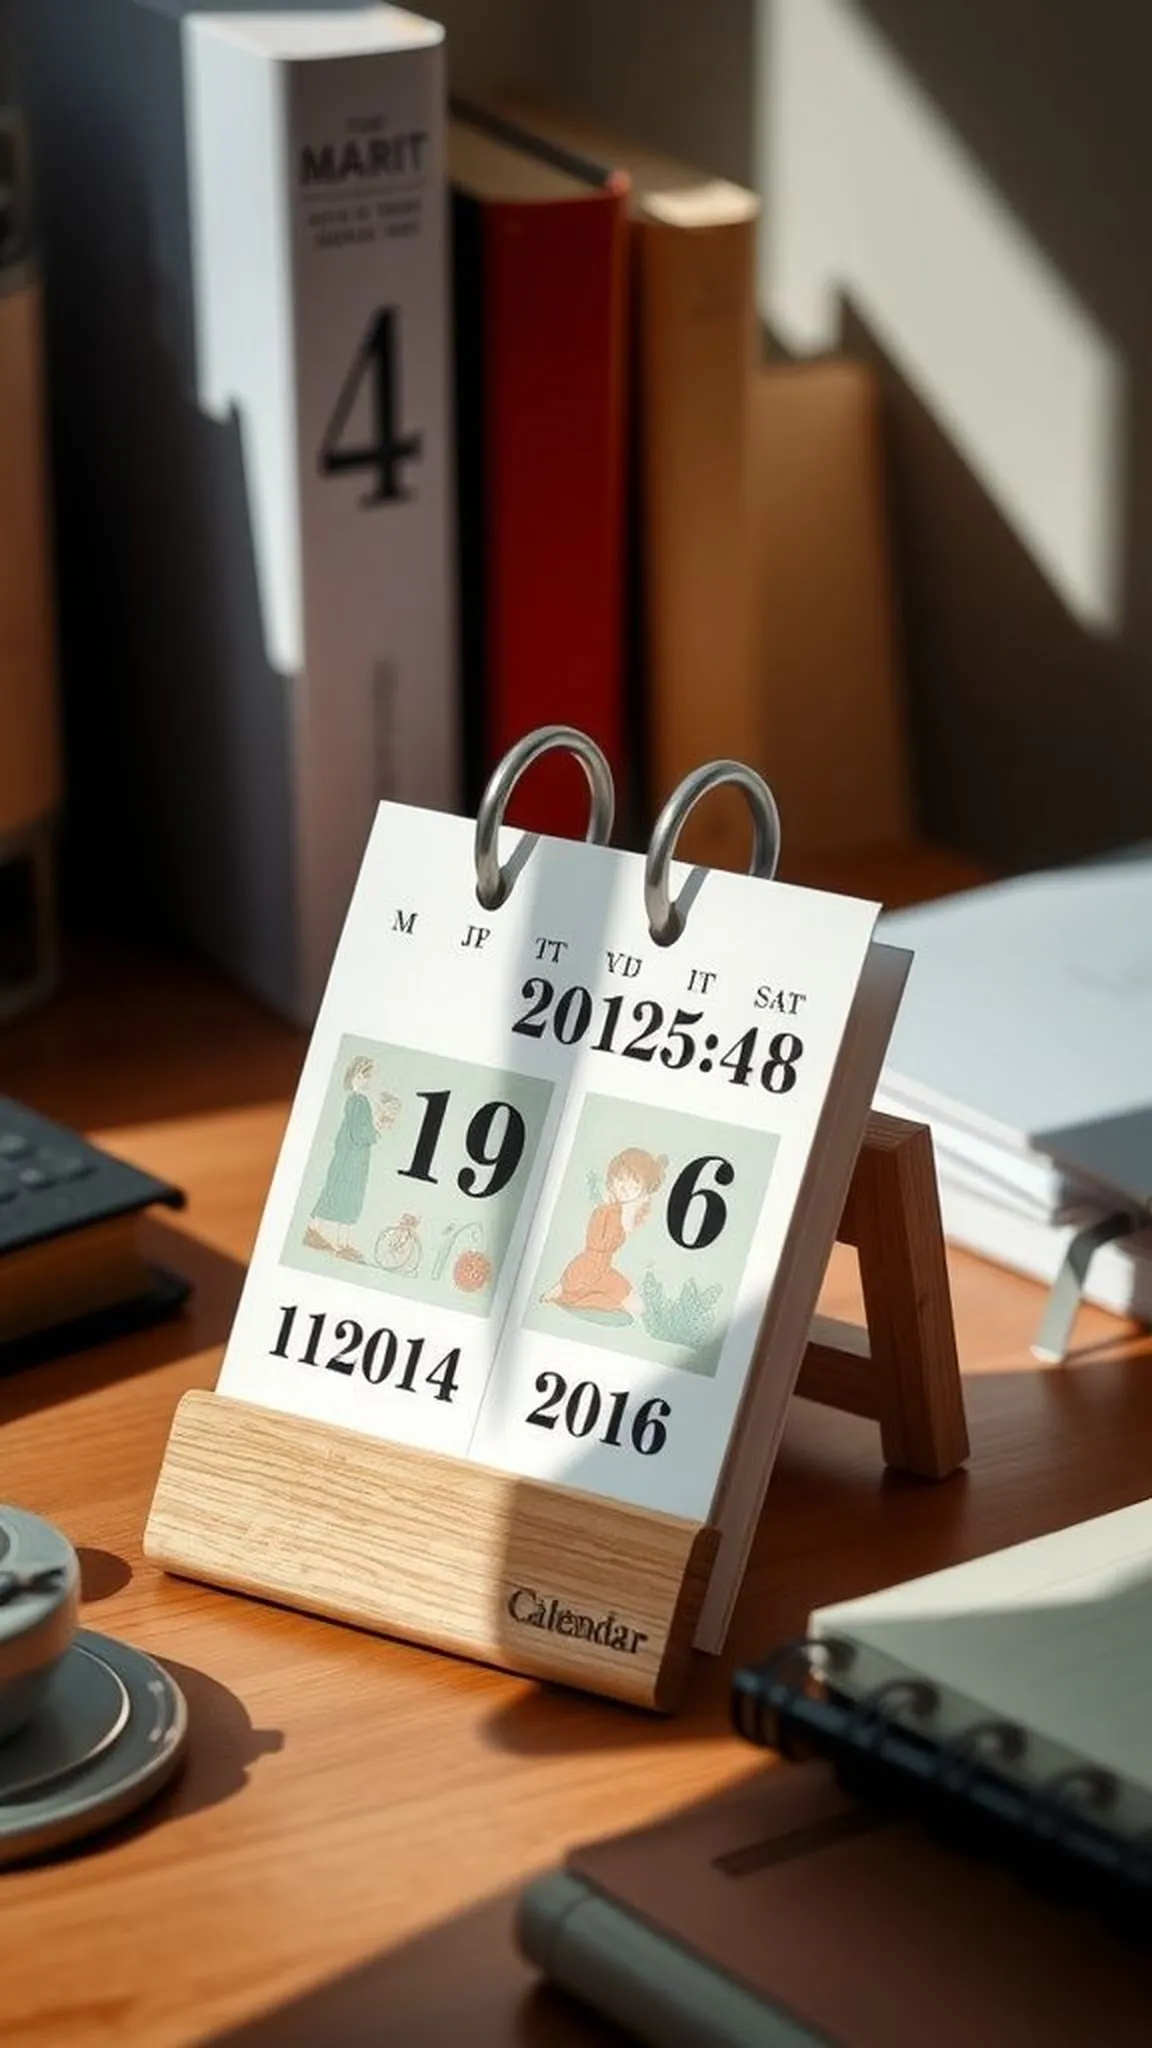
A small desk calendar with rotating cards felt like a little ritual each morning. The cards had soft edges and a mix of hand-lettered numbers, the paper slightly toothy under fingertips. Swapping the date produced a satisfying little clack from the holder and gave the desk a sense of ordered time.
The design balanced practicality with charm, a tiny object that punctuated the day. Colors coordinated with seasonal sketches and a faint ink smell lingered when the stack of cards was handled, offering a gentle invitation to begin the day’s work.
Steps
- Cut cardstock into uniform cards and hand-letter or stamp dates and months on each piece.
- Create a simple wooden or cardboard holder with slots for the cards to stand and rotate.
- Organize the cards in the holder and decorate the base to match classroom colors.
Washi Tape Covered Pen Cup with Playful Patterns
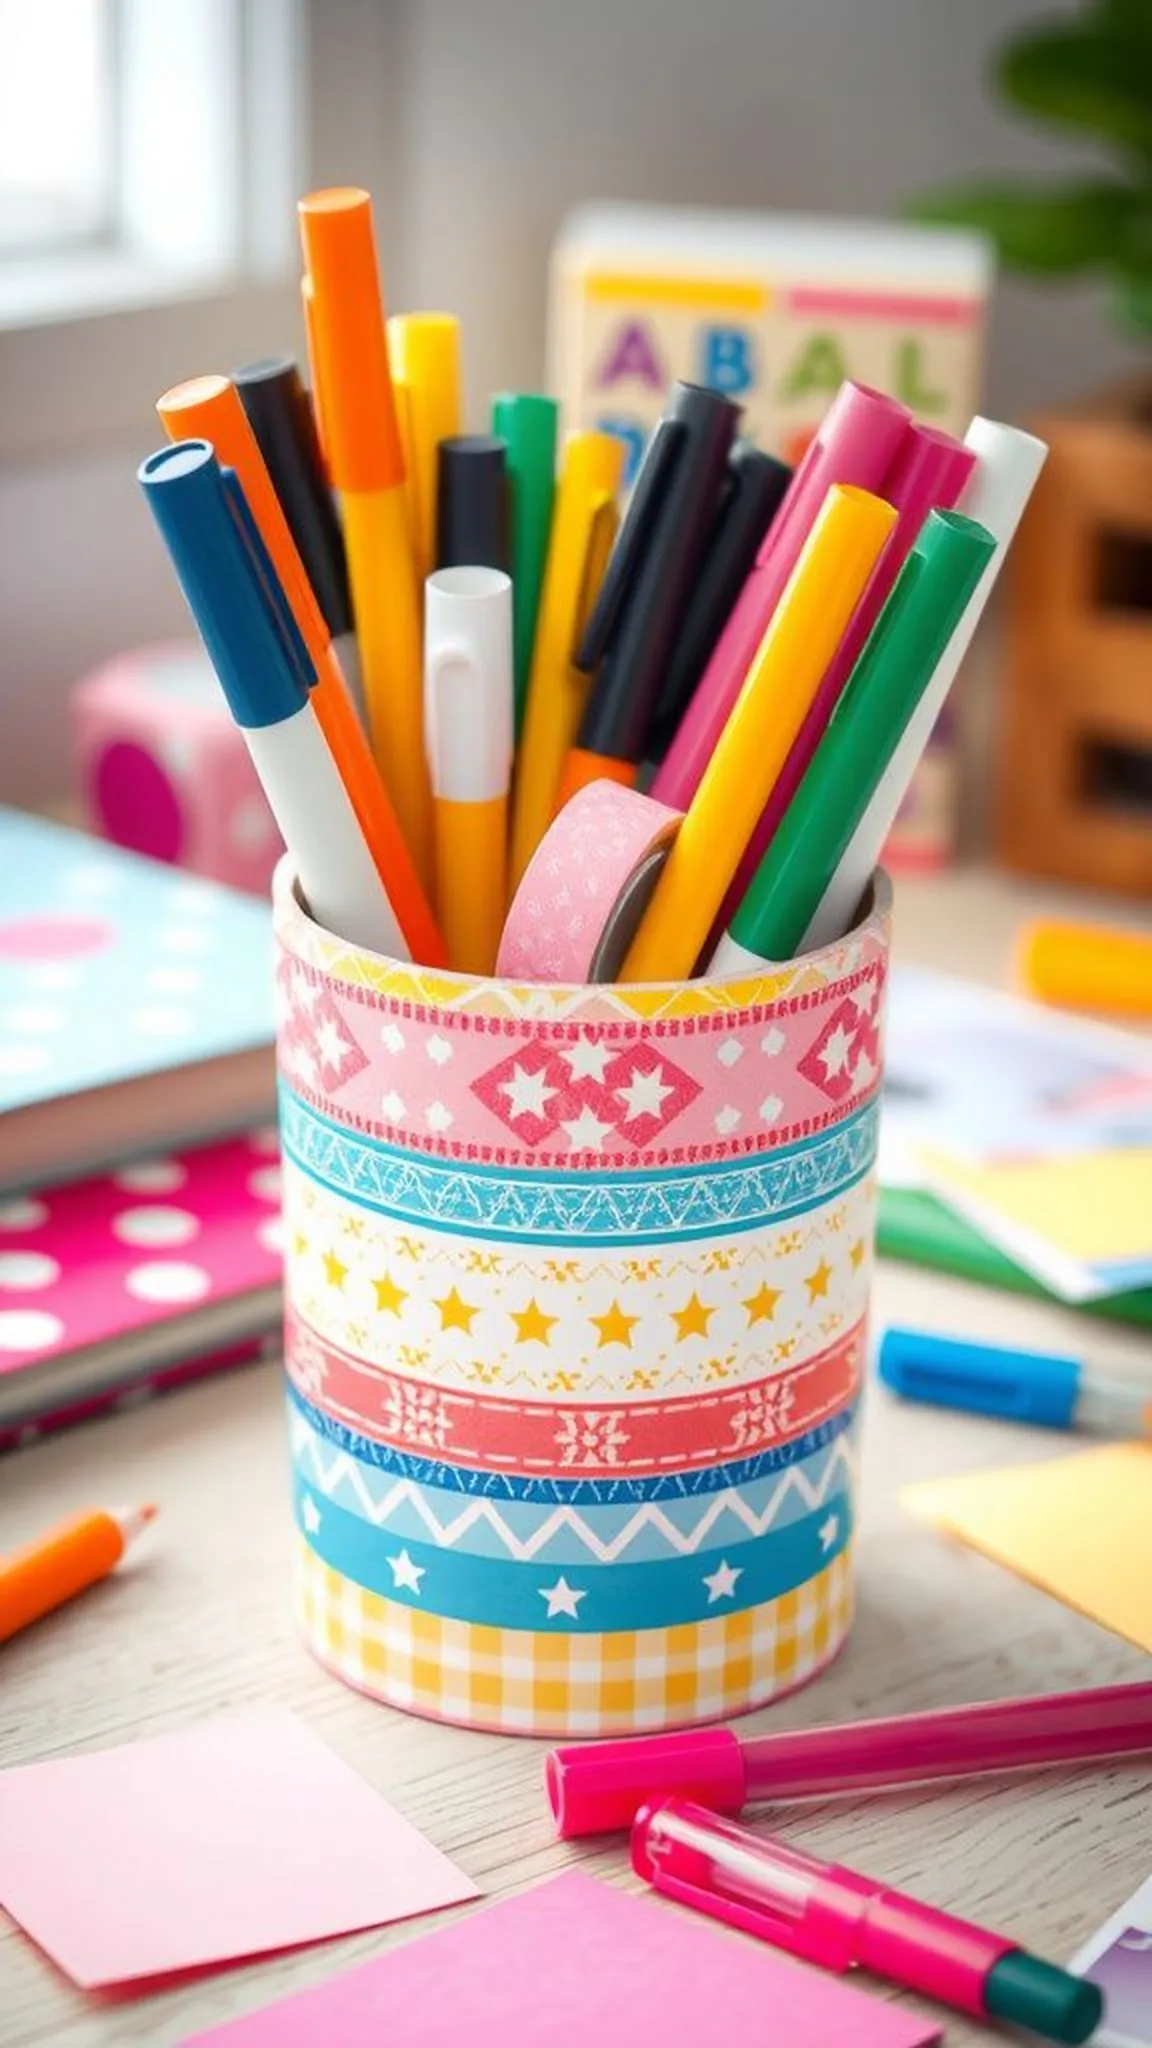
A pen cup wrapped in washi tape looked like a tiny festival of patterns. The thin paper ribbons layered into subtle overlaps, producing a collage of stripes, florals, and geometrics. The surface felt smooth with occasional raised edges where tapes met, and the color palette brought a gentle cheer to a work table.
It was light in the hand and easy to move from one corner to another, a small, decorative anchor among stacks of notes. The cup suggested ongoing playfulness and a readiness to gather scattered tools into a single place.
Steps
- Choose an empty cup or tin and select coordinating washi tapes in various patterns.
- Wrap the tapes around the cup, overlapping slightly to create a layered look.
- Smooth any edges and place pens and markers inside for display.
Bath Salt Jar with Dried Lavender and Label
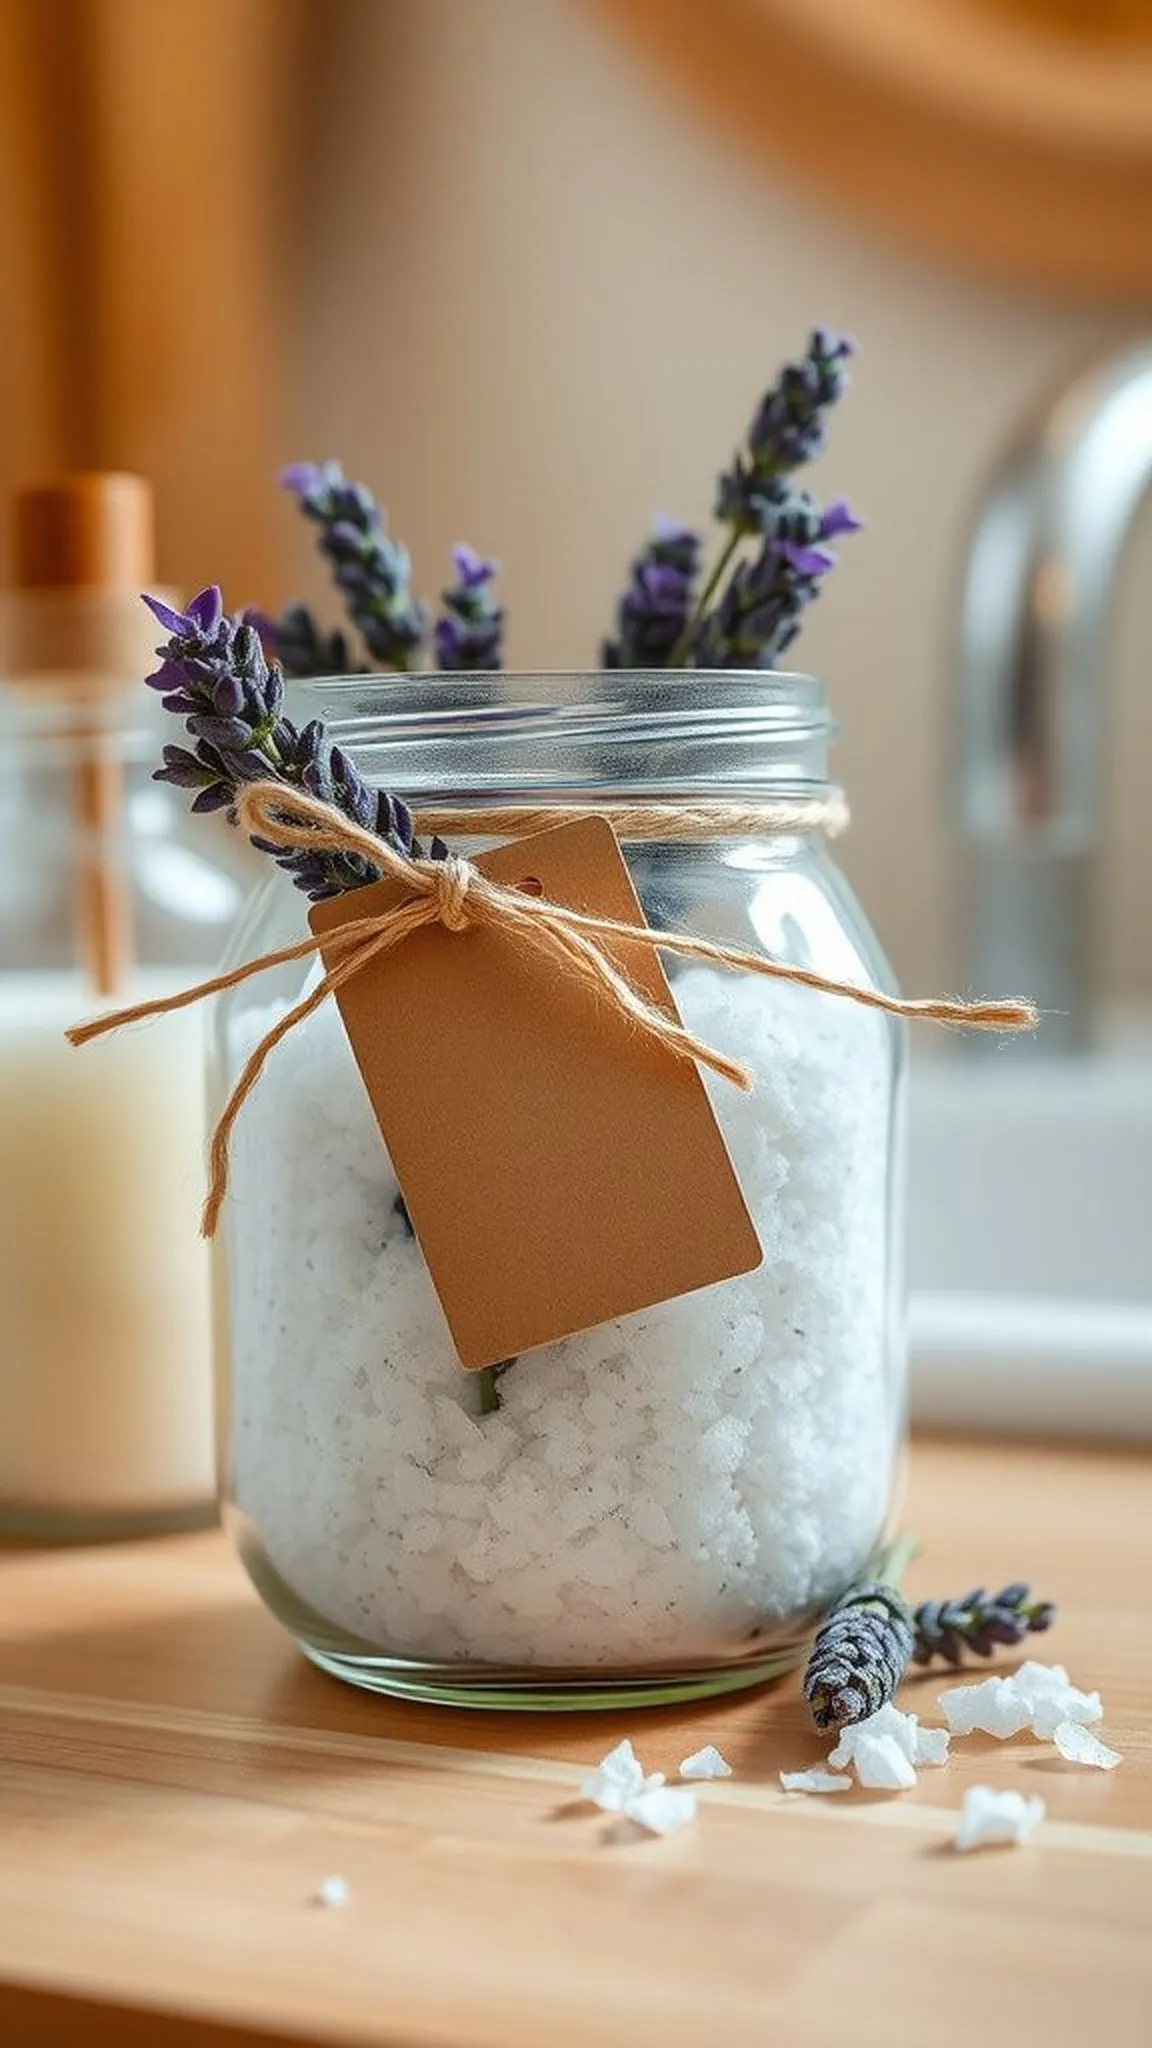
A jar of bath salts smelled like a gentle breath of calm, floral and slightly herbal, the crystals capturing the light like tiny facets. Dried lavender sprigs floated in the mixture and released a soft perfume that lingered in the room. The weight of the jar felt thoughtful and the grain of the salt offered a tactile promise of softness.
A small label tied with twine gave the package a rustic note and the whole thing read as a little invitation to rest after a busy school week, quiet and fragrant.
Steps
- Combine coarse Epsom salt with a few drops of essential oil and add dried lavender.
- Spoon the mixture into a clean jar and seal tightly to preserve fragrance.
- Attach a labeled tag describing the scent and suggested jar use.
Fabric-wrapped Notebook with Elastic Closure

A notebook wrapped in fabric had a soft, bookish hush to it. The textile added a gentle texture against the palms and the elastic closure made a low, satisfying snap when secured. The page edges smelled faintly of paper and glue, and the cover’s pattern peeped through at corners where hands often rested.
The binding felt solid and dependable, the sort of companion that would live beside a desk lamp through many small plans and lists. It suggested private notes and small sketches, a portable nook for an orderly mind.
Steps
- Choose a plain notebook and cut fabric to wrap around the cover, leaving allowance for folding over edges.
- Adhere the fabric to the cover and attach an elastic band around the book to hold it closed.
- Trim excess fabric and add a small label or stitched detail for decoration.
Apple-themed Soap Bars in a Kraft Presentation Box
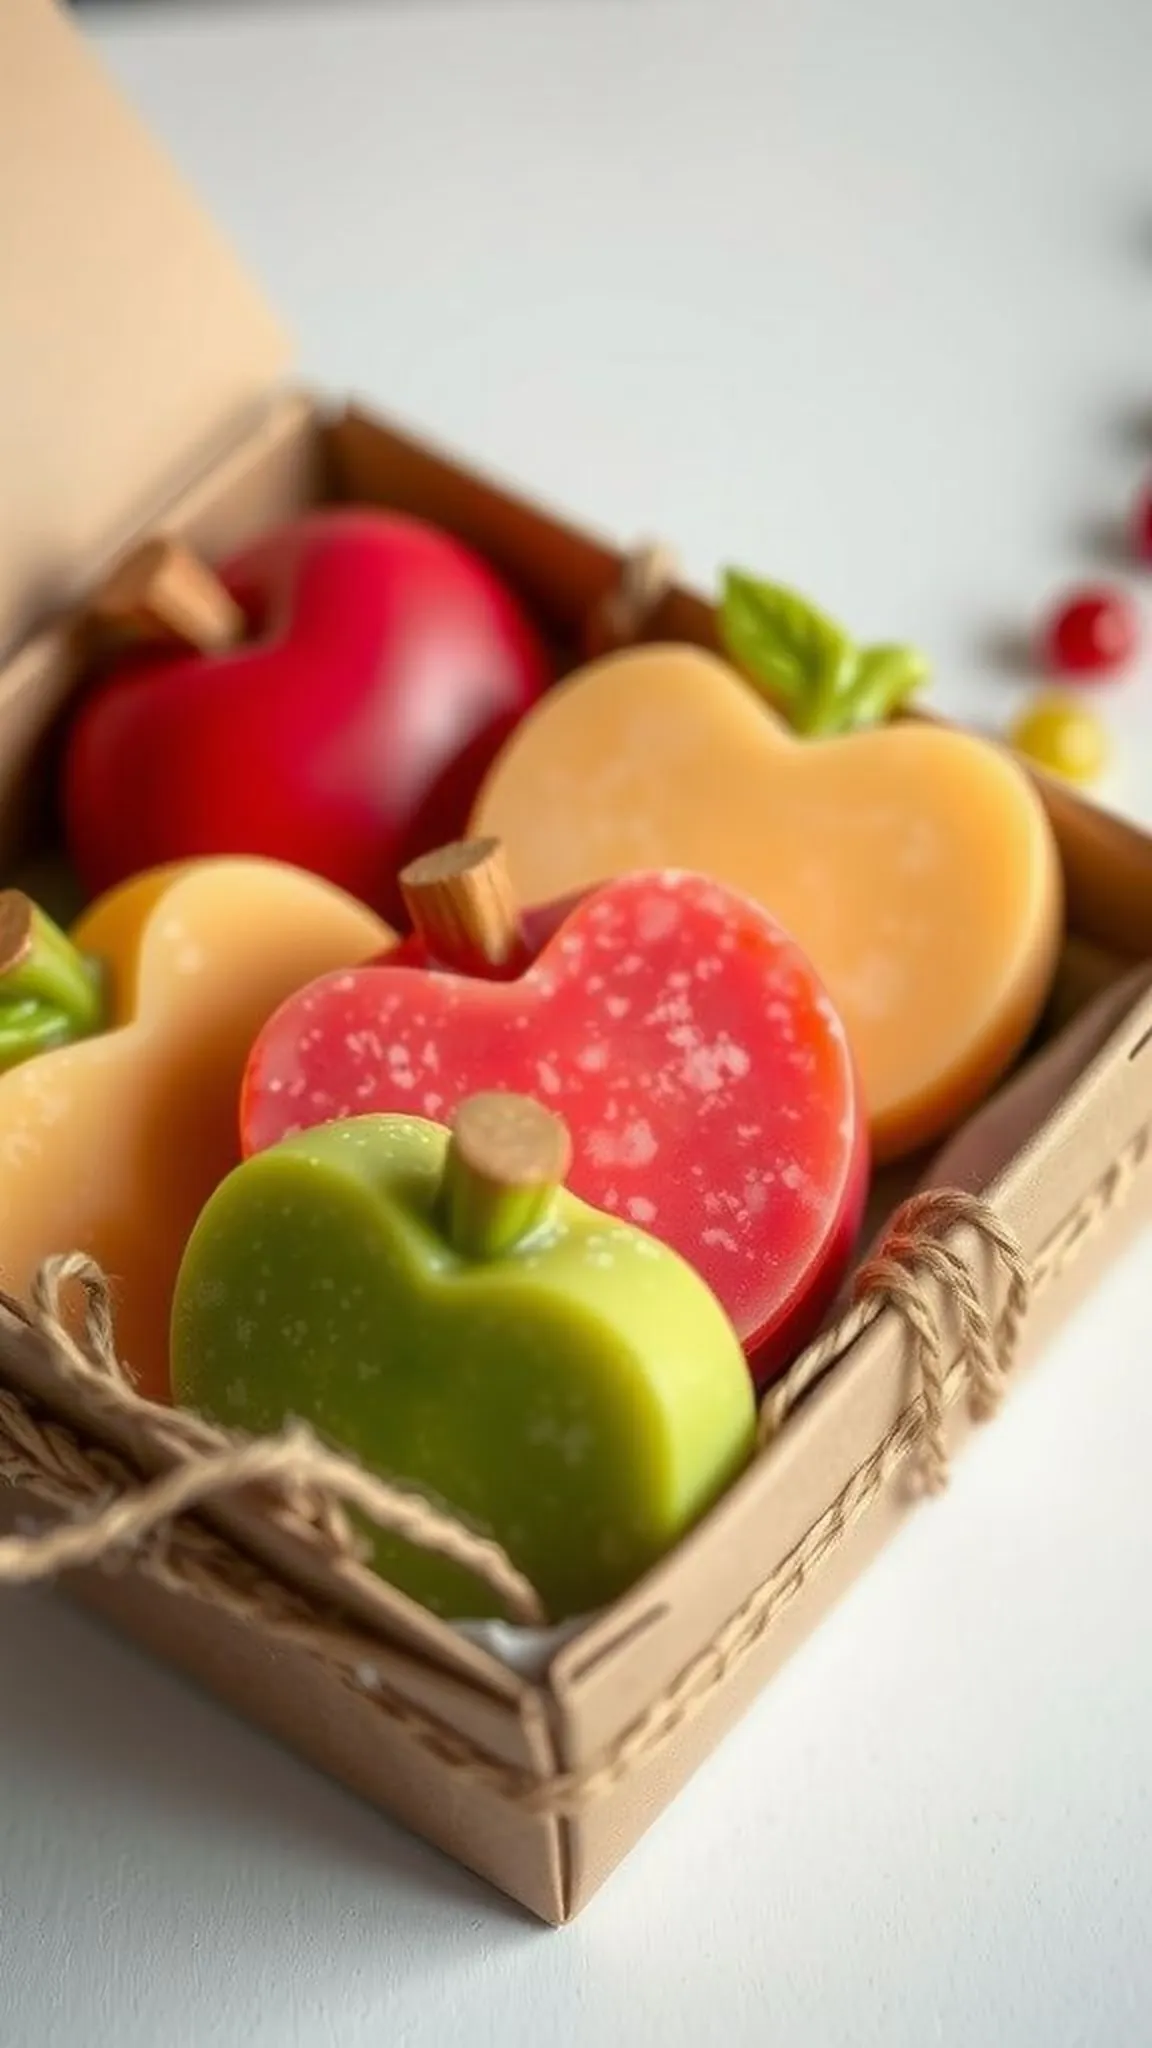
Handmade soap bars shaped like apples smelled bright and clean, a crisp fruit note with a hint of spice that suggested autumn afternoons. The soap’s surface had gentle ripples and a soft matte sheen from the cold process method. Nestled in a kraft box, the bars looked like a thoughtful offering, the cardboard’s earthiness complementing the soap’s red and green tones.
The weight and scent together made the package feel like a small seasonal ritual, a tiny pause that welcomed warm water and a quiet moment before or after a busy day.
Steps
- Melt soap base and stir in apple-scented fragrance along with a few drops of colorant.
- Pour the mixture into apple-shaped molds and allow to set completely.
- Unmold the bars and package them in a kraft box with a small label.
Hand-painted Wooden Spoon Set for Classroom Kitchen
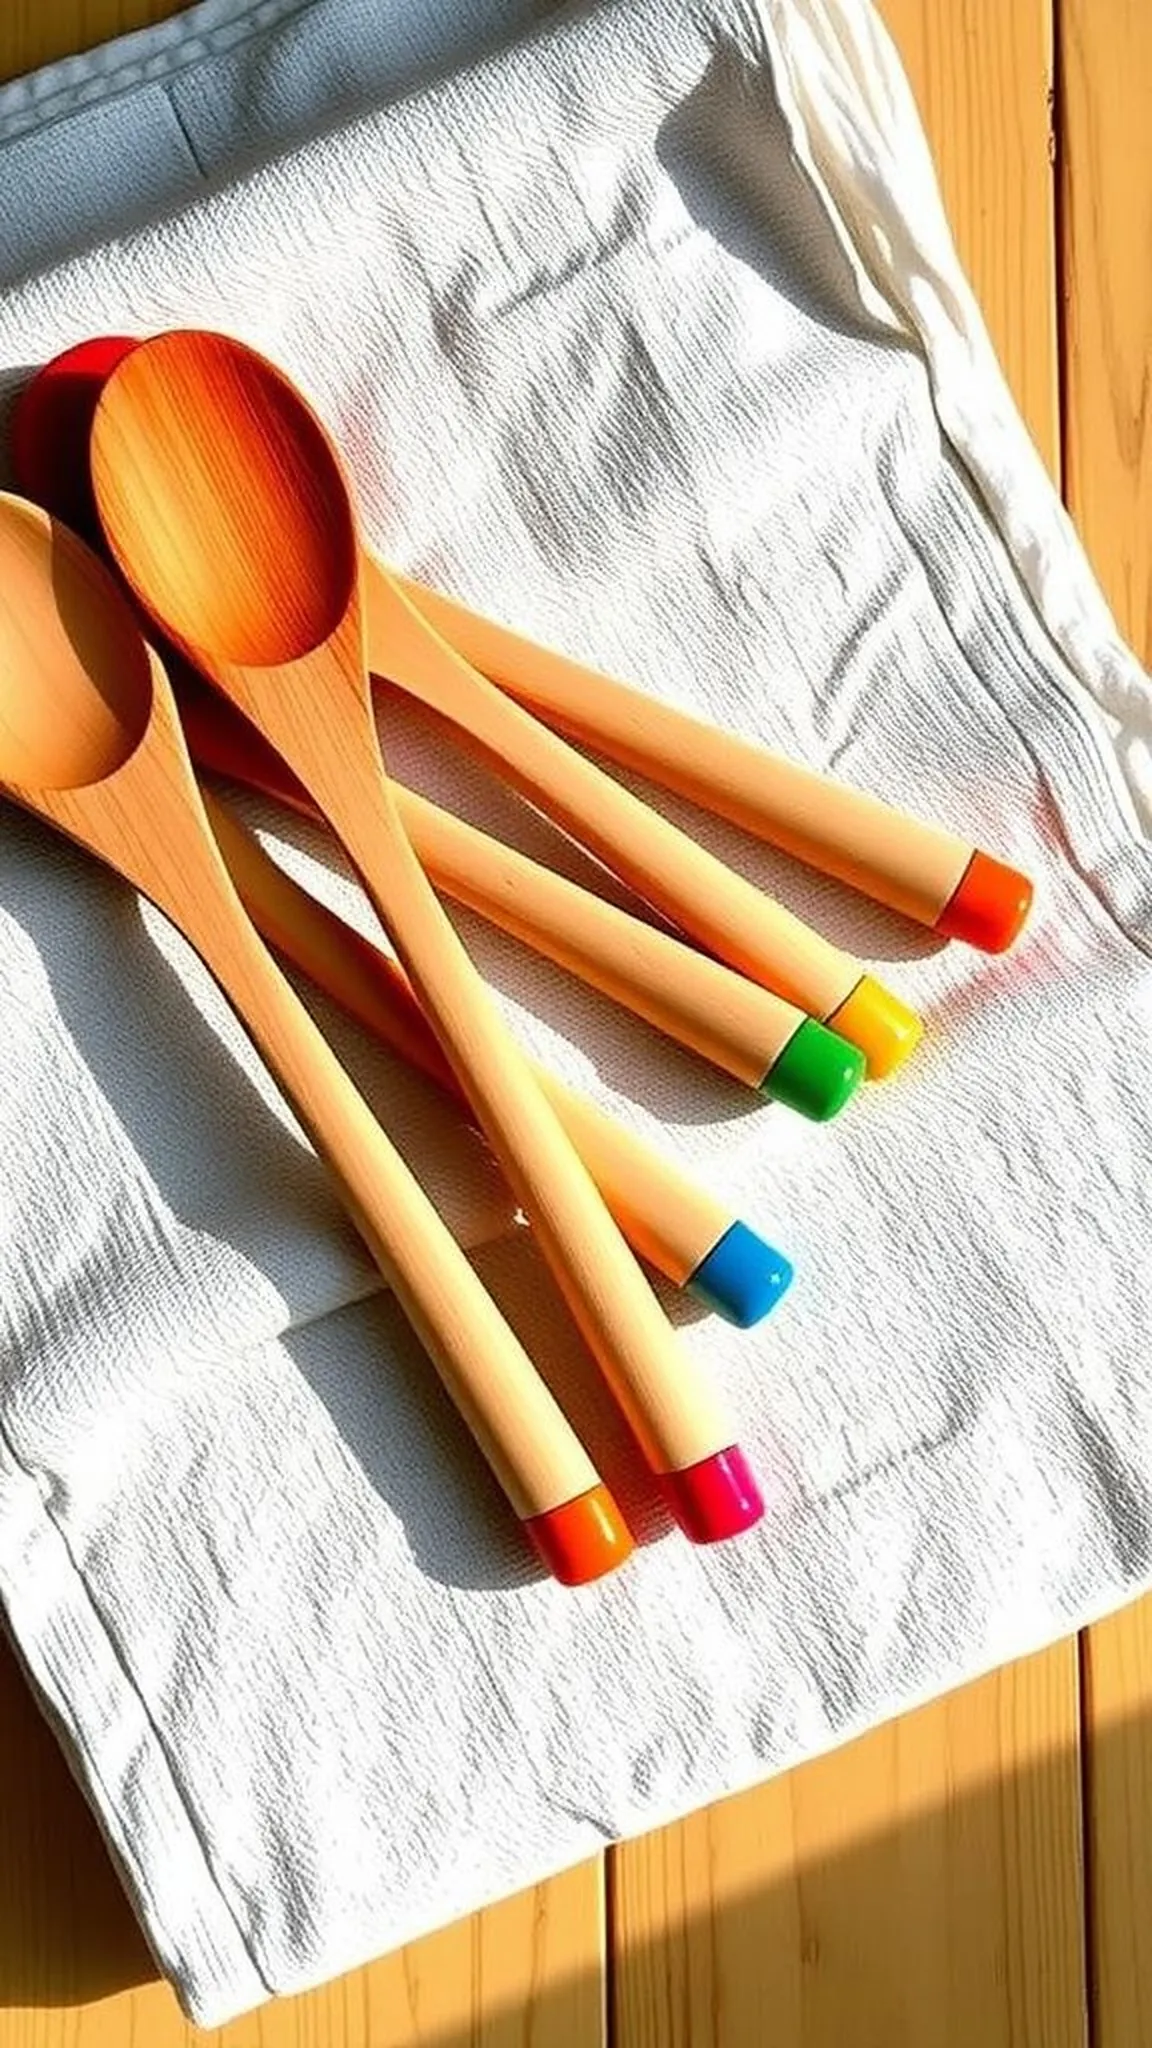
A set of wooden spoons painted with bright ends felt like a little summer fair frozen into kitchen tools. The wood had a warm grain and the painted handles offered a glossy contrast that caught light. Each spoon carried a slightly different brushstroke, evidence of a human hand and playful impatience.
When nested together they made a rhythmic pattern of color and curve, the smoothness of the bowls promising familiarity with warm bowls and shared recipes. The set suggested communal moments and the easy comfort of stirring something slow and fragrant.
Steps
- Sand wooden spoons lightly and paint the handles with food-safe paint or finish.
- Allow paint to cure fully and seal with a safe protective coat for durability.
- Arrange the spoons in a simple fabric wrap or box for presentation.
Personalized Beaded Keychain with Initial Charm
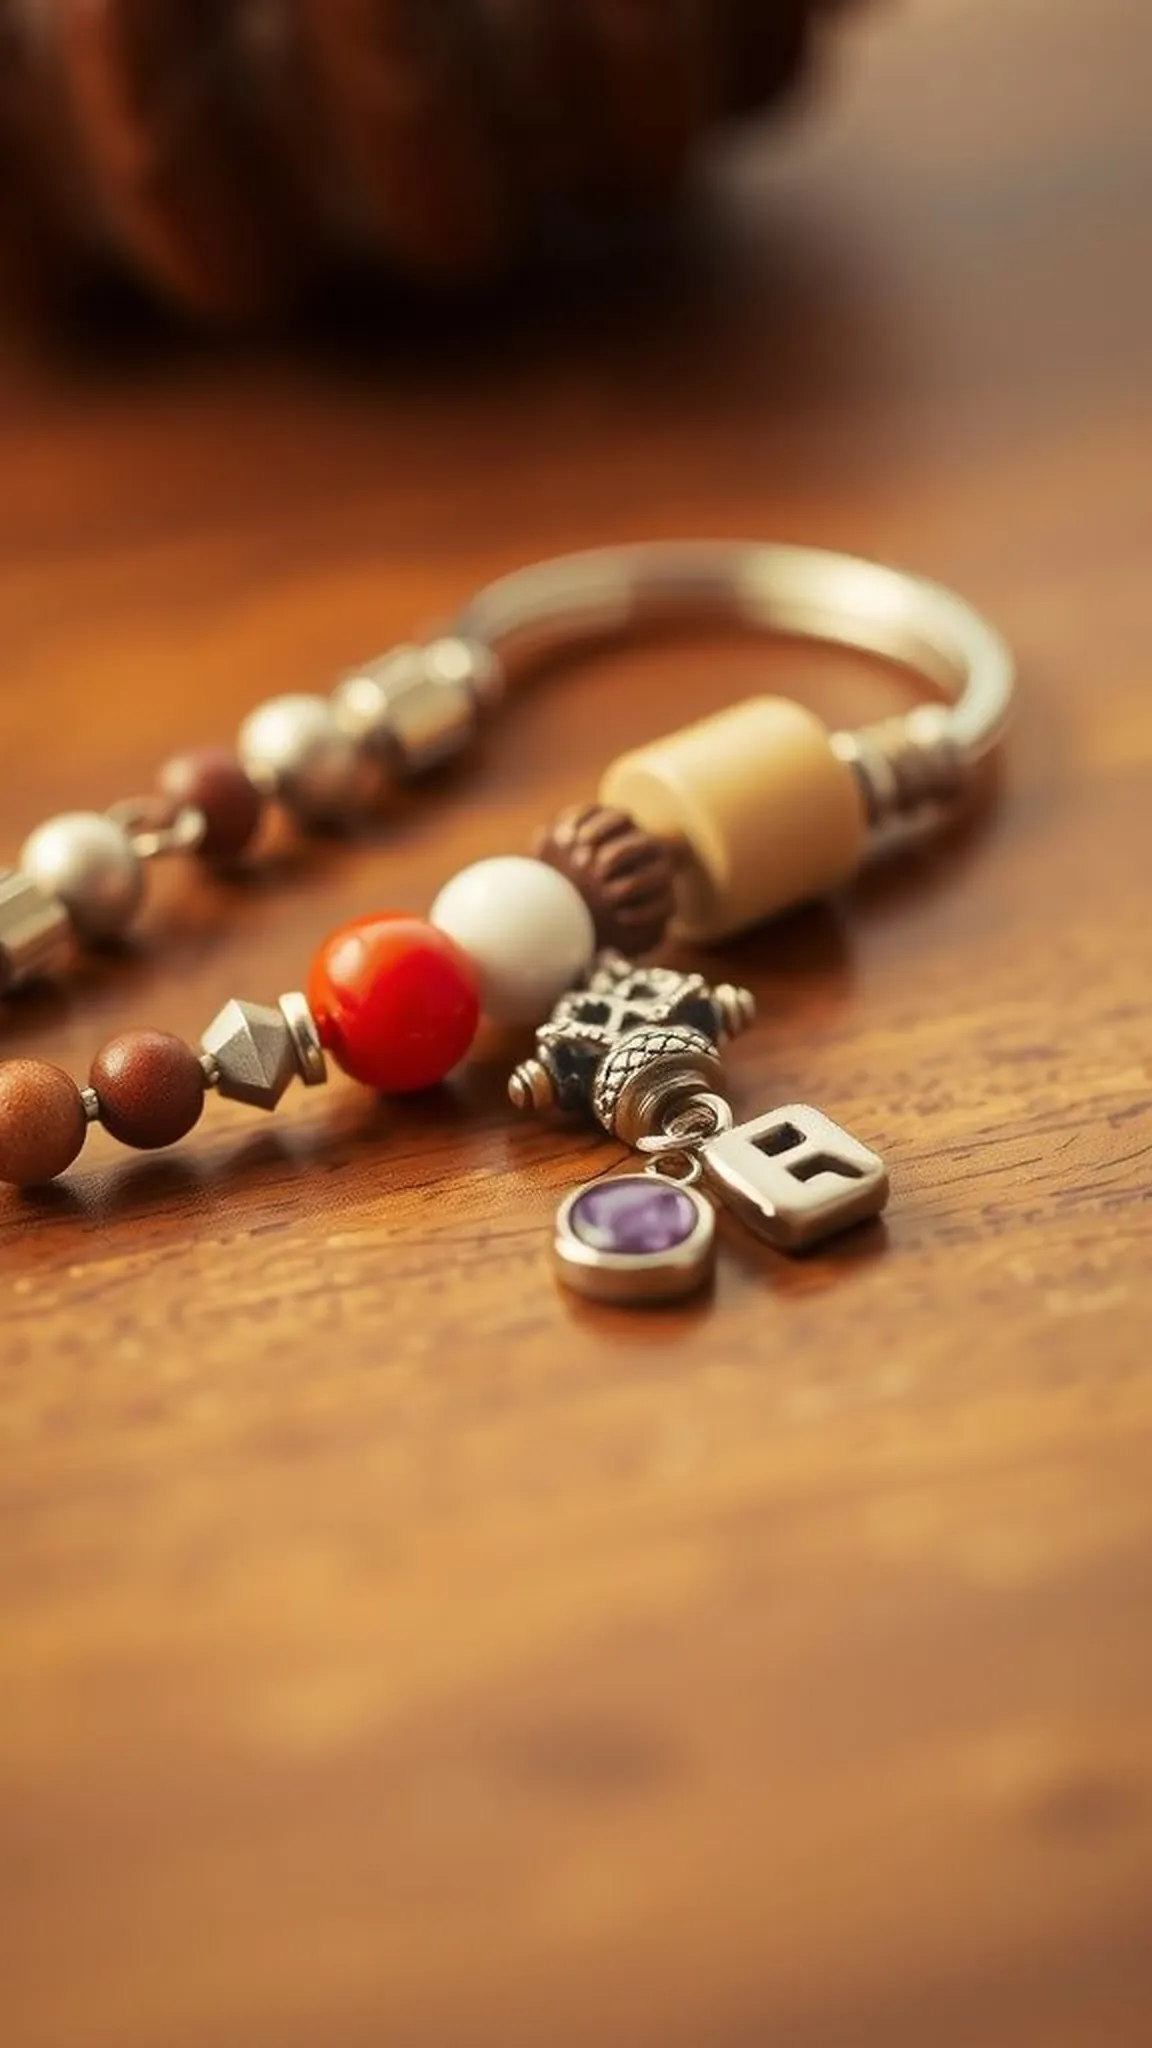
A beaded keychain with a tiny initial charm felt like a small personal talisman. The beads clicked softly when handled and the metal charm had a cool weight that balanced the piece. Colors were chosen to match a teacher’s favorite palette and the arrangement played between glossy beads and matte seed beads for a pleasing rhythm.
Hanging from a classroom key ring it added a little private punctuation, a quiet declaration of ownership and care. The piece was small enough to tuck into a pocket yet visible enough to spark a private smile.
Steps
- Select a sturdy key ring, pick a range of beads, and thread them onto a short length of wire or cord.
- Add an initial charm and secure the ends with a crimp or knot.
- Attach the beaded strand to the key ring and trim any excess cord.
Magnetic Poetry Set in a Vintage Tin Container
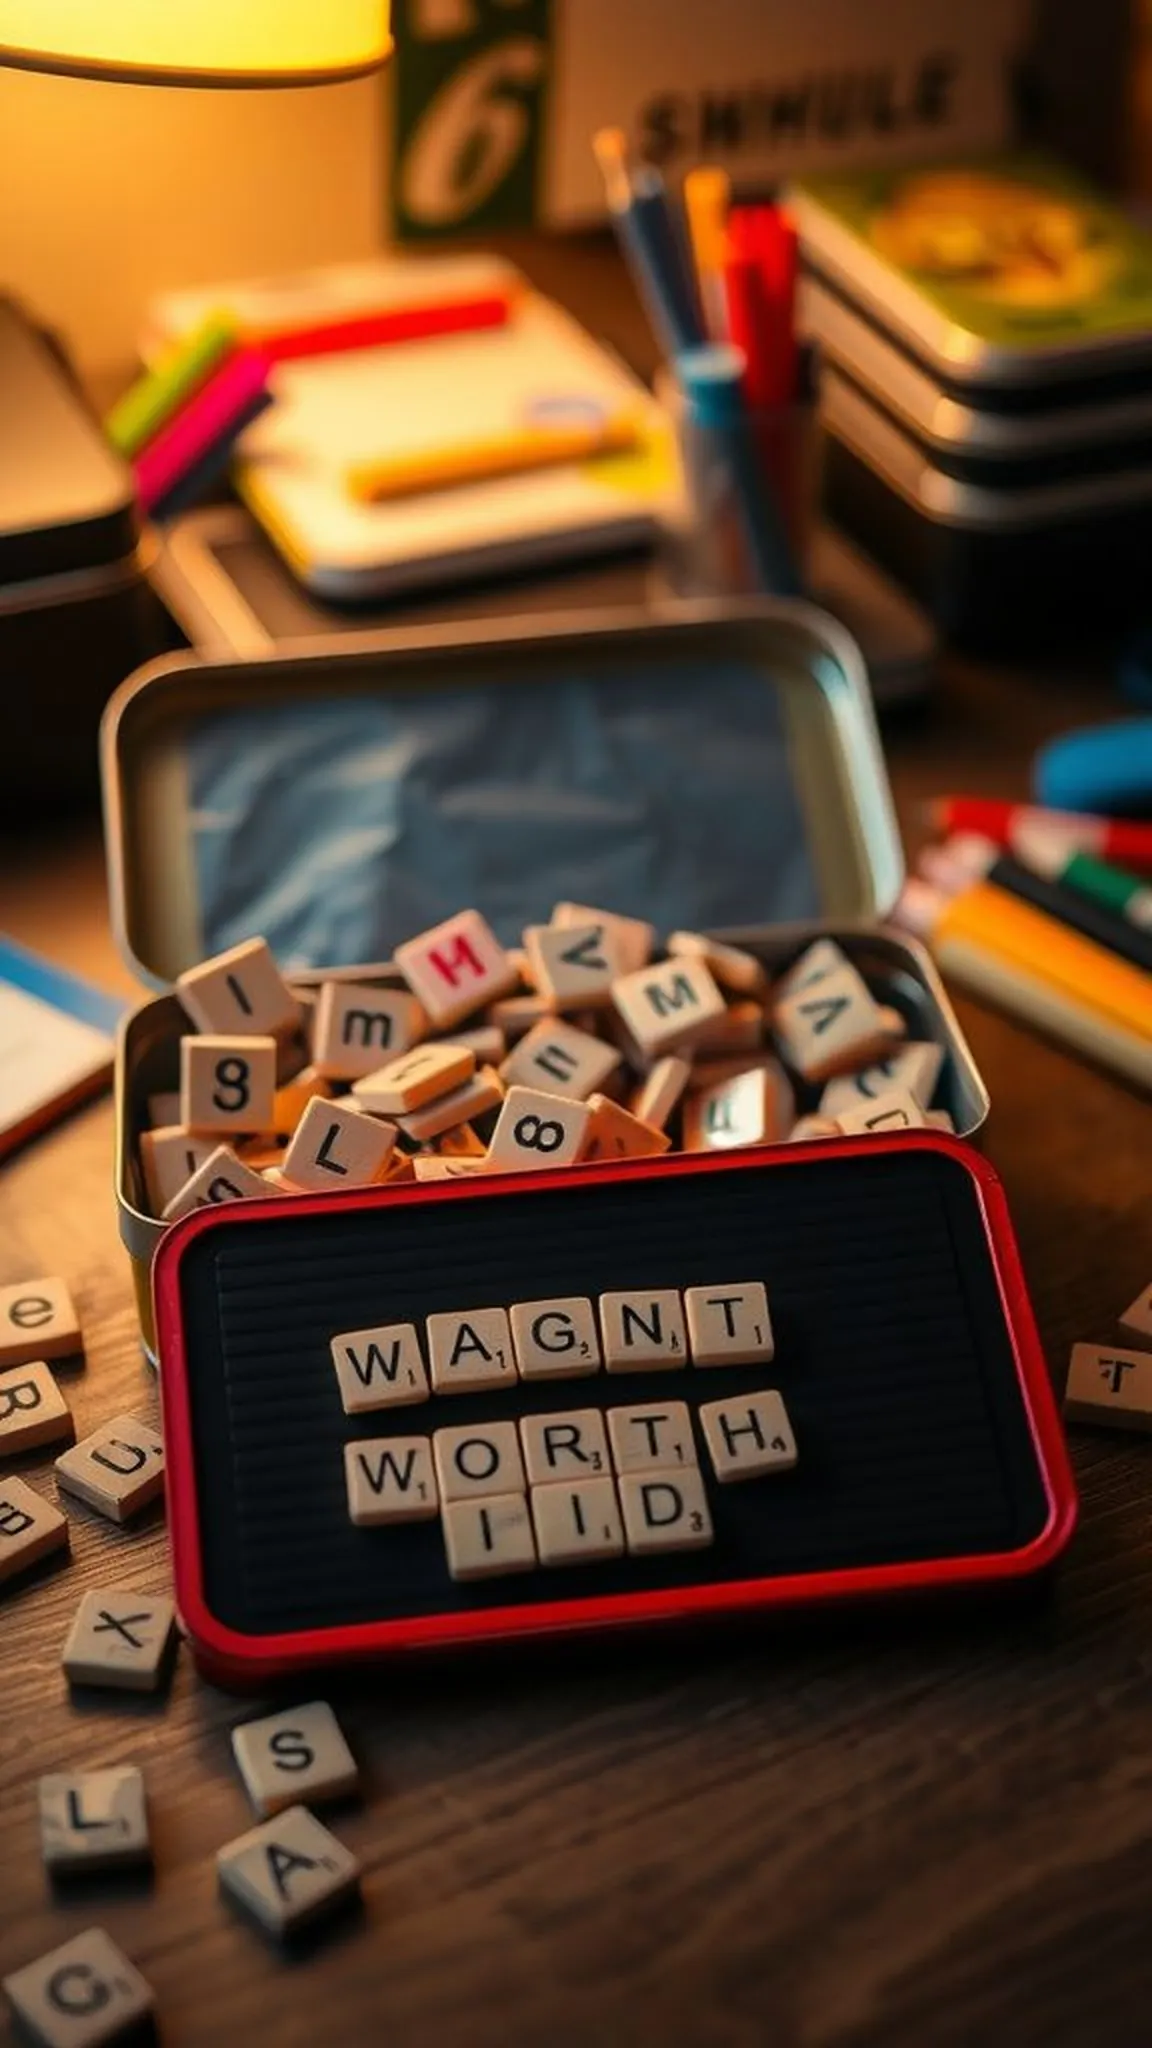
A vintage tin filled with magnetic words felt like a pocket of language ready to tumble into new arrangements. The tin’s edge had a faint patina and the magnets’ little blocks had inked letters that smelled faintly of paper. When scattered on a metal board they made quick poems and quiet jokes, a tactile way to play with phrasing between classes.
The set invited short pauses, little creative nudges that brightened a lunch break. Watching words rearrange across a surface felt like watching small pieces of thought clicking into place.
Steps
- Print or write a collection of short words on magnetic sheets and cut them into individual tiles.
- Place the tiles into a vintage-style tin for storage and include a small magnetic board for display.
- Optionally add a label with a playful prompt to encourage use.
Painted Thank-you Rocks as Desk Paperweights

Smooth river rocks painted with short thank-you phrases felt pleasantly solid in the palm. Their surfaces were cool and glossy where varnish sealed the paint, and the brushstrokes showed tiny ridges if held close. The contrast between painted color and natural stone pattern made each rock feel like a found object repurposed into a keepsake.
Placed on top of a stack of papers, the weight was reassuring and the message concise, a quiet nod that could be moved from desk to shelf as needed. Each rock carried a small, private brightness.
Steps
- Select smooth rocks and clean them thoroughly before painting.
- Paint a base color, add short thank-you words or simple designs, and allow to dry.
- Seal the painted surface with a clear varnish to protect it and present as a paperweight.
Teacher Survival Kit in a Mason Jar with Fun Labels
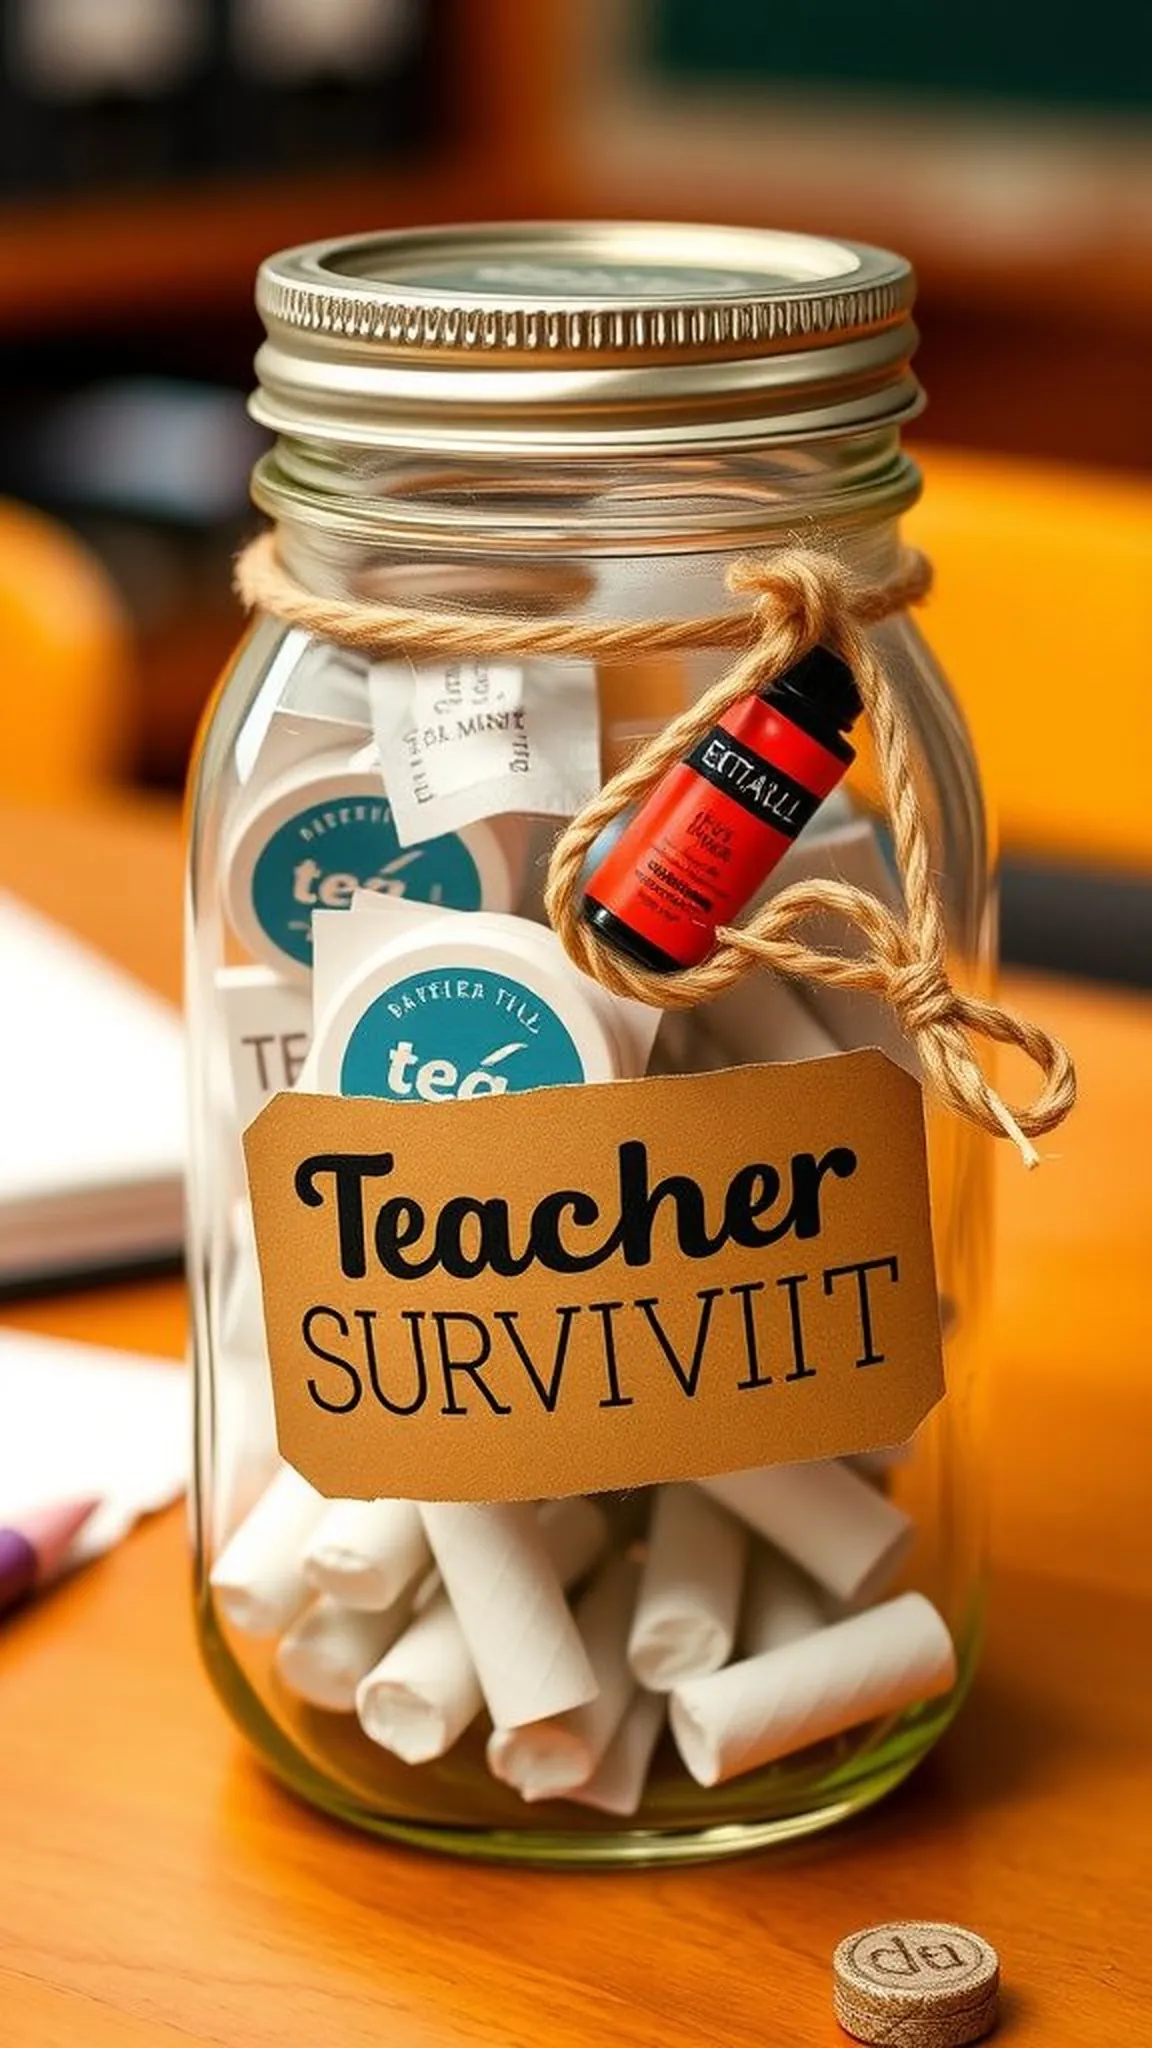
A mason jar labeled as a little survival kit felt playful and generous, crammed with tiny comforts and small laughs. The contents ranged from peppermint mints to a miniature hand cream wrapped snugly in tissue. Each item made a small tactile or taste-based promise, like a private helper for a long day.
The label had hand-drawn icons and a cheerful font that softened the jar’s edges. When opened, the kit offered a brief ritual of choice, a moment of self-care distilled into a handful of items ready to be discovered between lessons.
Steps
- Select a mason jar and gather small comfort items such as mints, tea bags, mini lotion, bandages, and a small note.
- Arrange the items neatly in the jar and top with a decorative lid and a fun label.
- Tie a ribbon and attach a small tag describing the kit’s theme.