
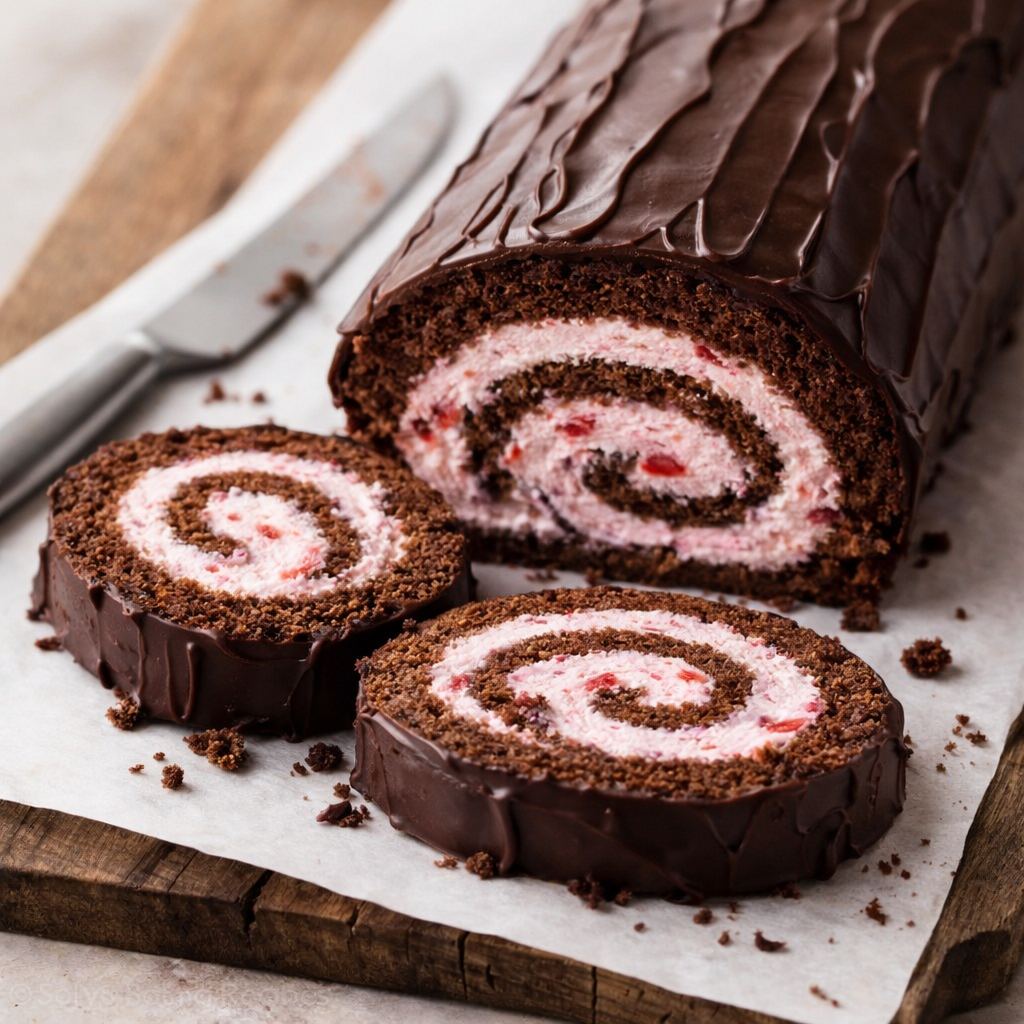
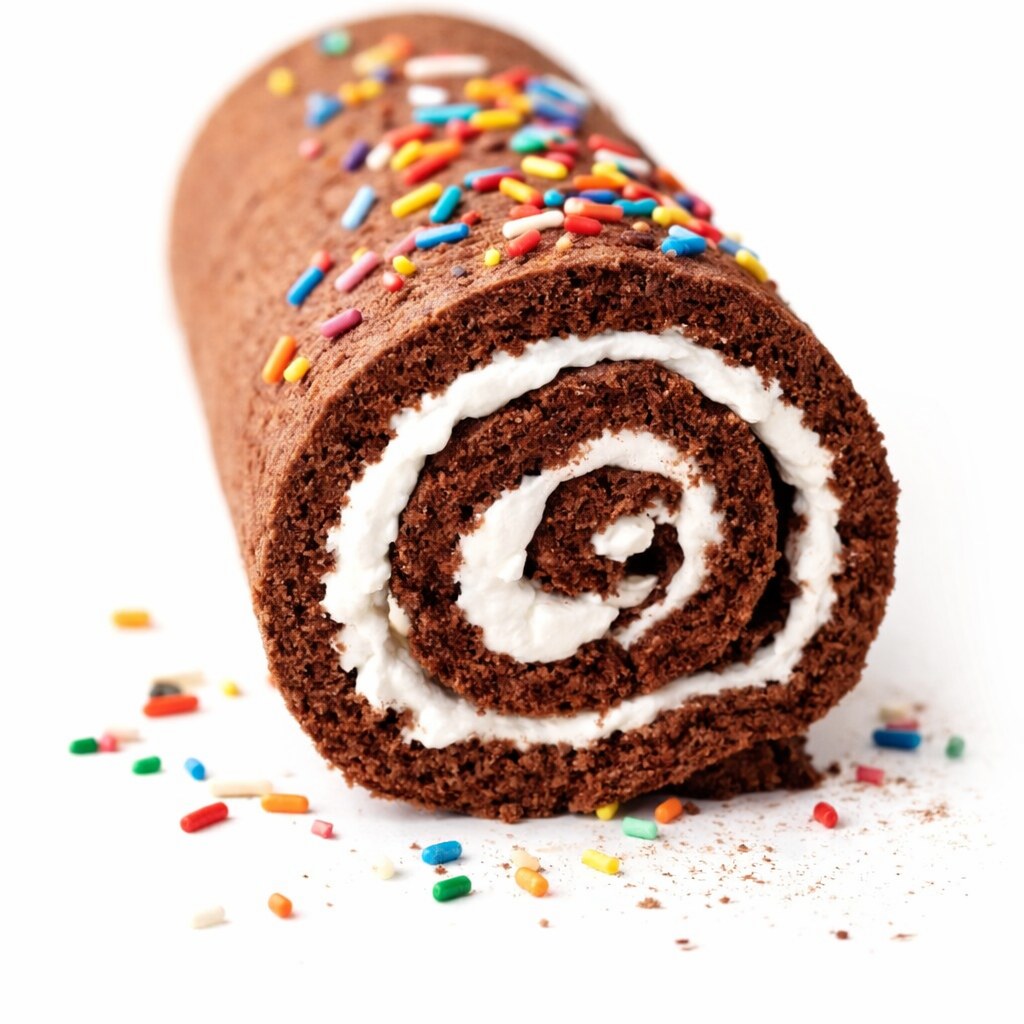
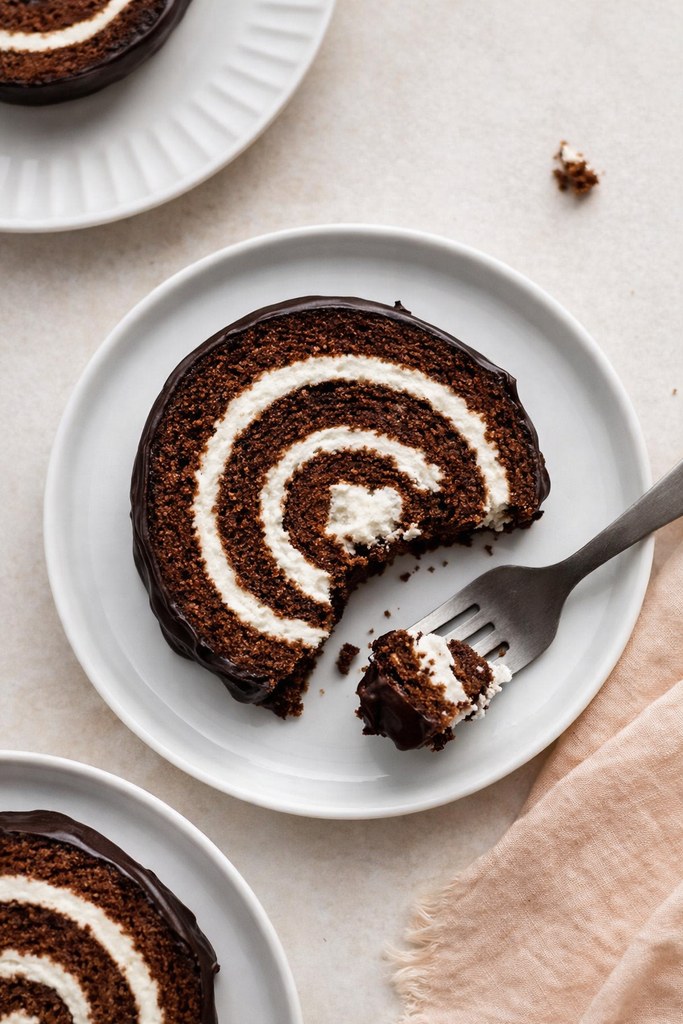
Motivated by a sentimental delight, this chocolate swirl roll combines light cocoa cake with whipped cream filling and a shiny fudge coating. Luxurious and enchanting, the refined twist may entice you to slice off yet another serving. Your appetite is beckoning… increasingly… increasingly…
I derive immense pleasure from reimagining nostalgic snacks from my childhood—the type that used to feel like a delightful treat hidden in a lunchbox. Creating homemade renditions of those beloved classics—such as spiced pastry treats, miniature frosted animal-shaped cookies, marshmallow-infused cereal bars, chocolate cupcakes filled with creamy goodness, and the cherished oatmeal cream pies—brings a special kind of joy.
These homemade delights not only evoke fond memories; their freshly made counterparts typically offer a taste that is richer, more vibrant, and far more enjoyable than anything pre-packaged. This rolled chocolate sponge cake—commonly referred to as a Swiss Roll, Ho Ho, or Yodel—serves as another nostalgic throwback.
In relation to this chocolate Swiss roll, several individuals have reported that their sponge was either dry, fell apart during the rolling process, or didn’t have a robust chocolate flavor. When I observe consistent comments highlighting these types of challenges, I return to the kitchen to experiment with modifications and enhance the technique until I feel confident that the issues have been addressed.
Below, you will see the updated recipe. It brings to mind a rolled cake treat I extensively tested last year, which I plan to feature in my forthcoming publication. The flavor combination is distinct in this case, although I faced similar challenges while developing it.
After numerous rounds of experimentation, I’m excited to announce that this chocolate Swiss roll has achieved its finest iteration! The updated recipe includes minor tweaks, like swapping melted butter for oil and adding buttermilk, both of which contribute to a softer, more delicate cake consistency.
Key Ingredients for a Cocoa Sponge Cake:
- Cake or Plain Flour Foundation: Both varieties are effective in this instance. After extensive testing, we verified that each produces identical results.
- Cocoa (Unsweetened): Opt for either natural cocoa or Dutch-process; both options are completely appropriate.
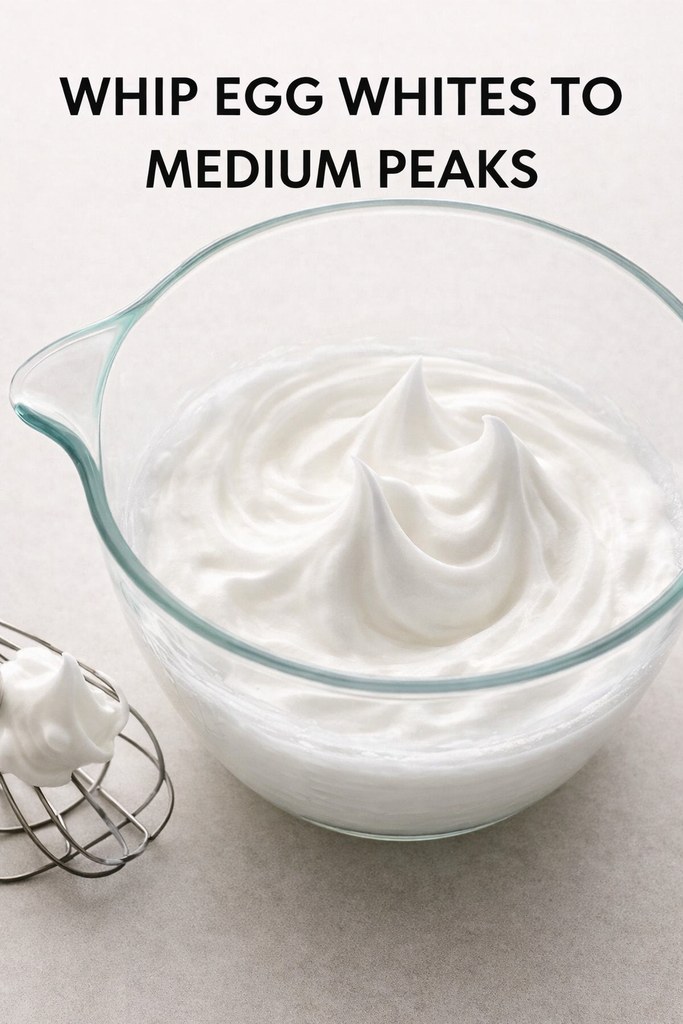
- Eggs (Separated): These serve as the foundation of the cake, providing structure and moisture. You will require four eggs, with the whites beaten to soft-medium peaks to incorporate lightness.
- Neutral Oil: This formula uses oil instead of butter to avoid dryness. It ensures the sponge remains soft and consistently moist, similar to ultra-soft chocolate cupcakes.
- Buttermilk (or Full-Fat Milk): Contributes to a creamy texture and maintains a tender crumb. If buttermilk is not on hand, standard full-fat milk can be used as a substitute.
- Espresso Powder (Optional): A small amount amplifies the richness of the chocolate, without adding any coffee flavor.
Step-by-Step
Collect multiple mixing bowls, a fine mesh sieve, and either a portable whisk or a stand mixer fitted with a whisk attachment.
Whip the egg whites together with a portion of the sugar until they achieve soft to medium peaks. This process should take approximately four to five minutes, although it might take longer in moist or humid conditions. If it feels sluggish, be patient and keep whisking until the desired consistency is reached.
In a different bowl, combine the egg yolks with the remaining sweetening agent, then incorporate vanilla essence, oil derived from plants, fermented milk, and instant coffee granules.
Subsequently, gently fold in the beaten egg whites in two batches, ensuring the fluffy texture is maintained. At this point, the mixture should look airy and frothy.
Separate the dry components: A crucial part of this recipe involves combining the dry components by sifting. Grab a sizable strainer. If you frequently engage in baking, it will prove useful!
Oxygenate the dry blend: An essential aspect of this process is to thoroughly sift the flour combination. Utilize a sizable mesh sieve—particularly beneficial if you bake often.
Sift the dry blend straight into the mixture of yolks and whites. Employ soft folding techniques to integrate the batter, then distribute it uniformly across a 12 × 17 inch rimmed baking sheet.
Bake for a short duration—around 13 to 14 minutes—because this results in a very delicate sponge.
Invert right away: Bypass cooling in the pan. While still warm, flip the sheet onto parchment paper or a lightly dusted tea towel with cocoa powder.
Mold when warm: Gently roll the sponge with the paper or fabric. Allow it to rest at room temperature until it cools down, so it “remembers” the curled shape and doesn’t crack later when filled.
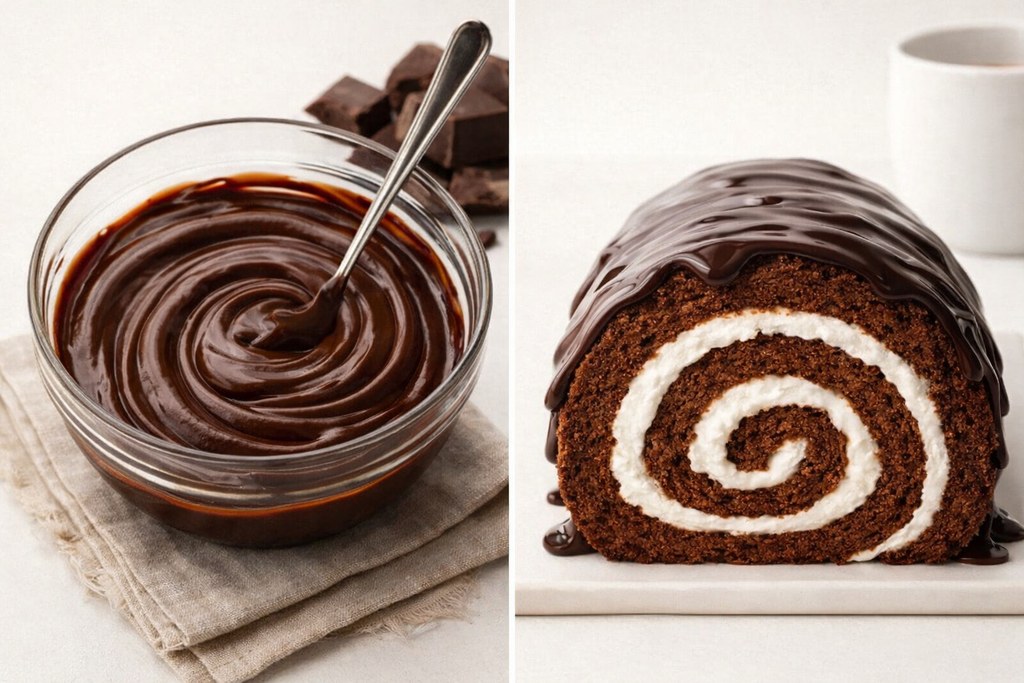
Final assembly: After completely cooling, unwrap, layer whipped cream filling over the top, roll it up again (removing the paper or towel), and complete by topping with a sleek coat of ganache.
Spiral Cake Sweet Core
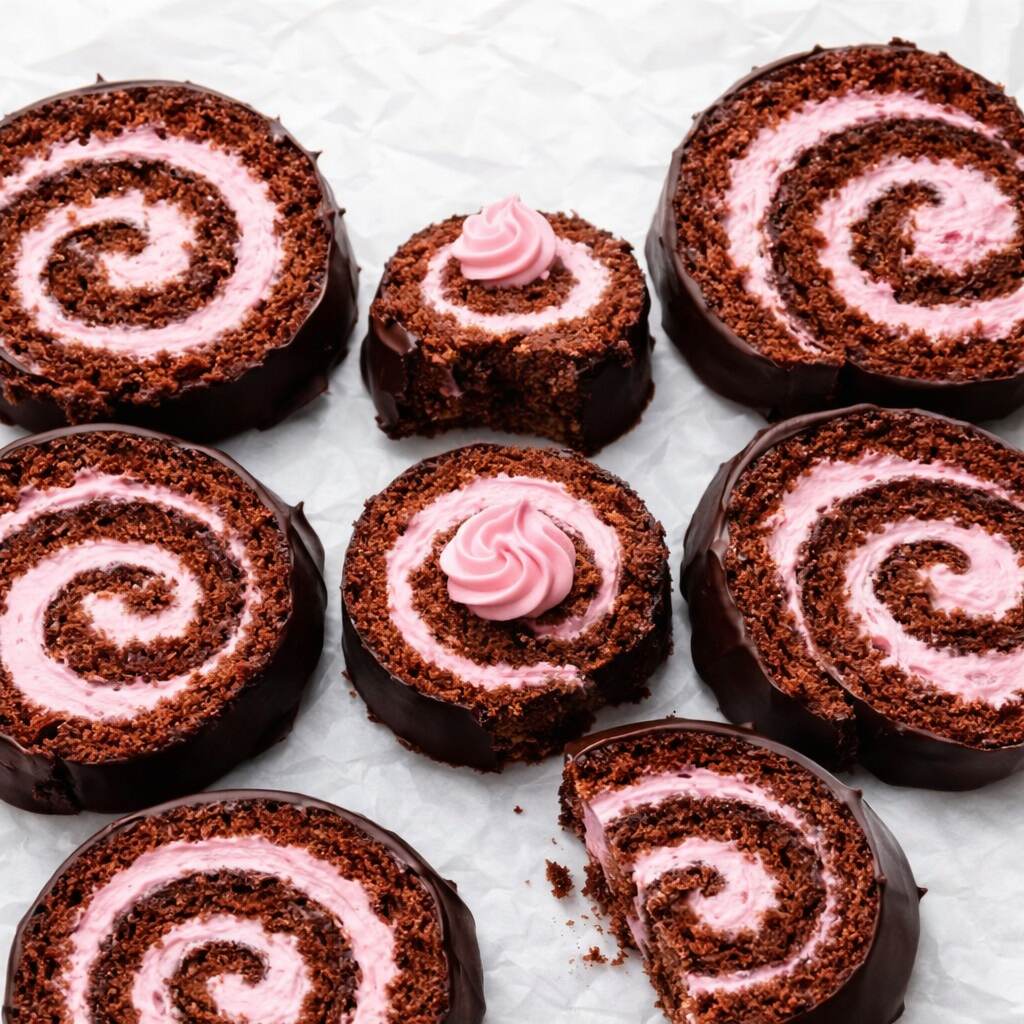
Within the twisted sponge, the velvety layer is light, silky, and laced with delightful hints of vanilla—creating a refined contrast with the rich chocolate coating that envelops the surface. As the glaze possesses a strong flavor profile, I prefer to elevate the sugar and vanilla just a bit beyond my usual whipped cream recipe. Both confectioners’ sugar and standard granulated sugar are effective here (refer to the note in my instructions). To enhance the creaminess, I frequently incorporate a dollop of store-bought marshmallow fluff, which contributes an unexpectedly enticing flavor. Everyone who tasted it was thrilled!
After the sponge is fully cooked, roll it up again (discard the parchment paper) and set it aside as you get ready to make the shiny chocolate glaze.
Should you seek a replacement for whipped cream, a smooth custard-like filling would serve as a fantastic alternative.
Silky Cocoa Glaze
Creating a glossy cocoa glaze is nearly as simple as whipping cream by hand. All you need to do is drizzle hot cream over finely chopped high-quality chocolate and mix until it becomes a smooth, luxurious blend. If you desire a bit of shine, you can add a bit of corn syrup, although this step is completely optional.
Here are two essential techniques for perfect outcomes:
- Choose the right chocolate. Opt for baking bars from trusted brands such as Ghirardelli or Baker’s instead of chocolate chips, which contain additives that can impede smooth melting. I personally prefer a bittersweet option with approximately 60% cocoa.
- Chop the chocolate into small pieces. The finer the bits, the quicker they melt, resulting in a smoother texture and richer taste.
Ultimately, chill your cake roll once the glaze has been applied to allow it to set, facilitating neater slices (with plenty of delicious leftovers to enjoy).
Tips for an Impeccable Chocolate Swiss Roll
- Steer clear of interruptions while rolling: It’s quite usual for sponge cakes to break while being shaped, so don’t be concerned if this occurs. Even high-quality versions can occasionally rip, and you can easily mend the sponge and conceal imperfections with frosting or filling. To minimize the likelihood of fractures, begin shaping the roll when the cake is still a bit warm, and handle it delicately instead of in a hurry. Allow it to sit on the counter until it cools down completely before you unroll and apply the filling. If the sponge is cold when you open it, it is more likely to break.
- Select the appropriate baking dish: A rimmed tray measuring approximately 12×17 inches performs excellently. Alternatively, a smaller size of about 10×15 inches is also suitable, though you should increase the baking duration by about five minutes. The petite pan produces a fluffier sponge, whereas the larger tray results in a thinner, more pliable sheet. I prefer the thinner variant with a delicate cream filling as it simplifies the rolling process without cracking.
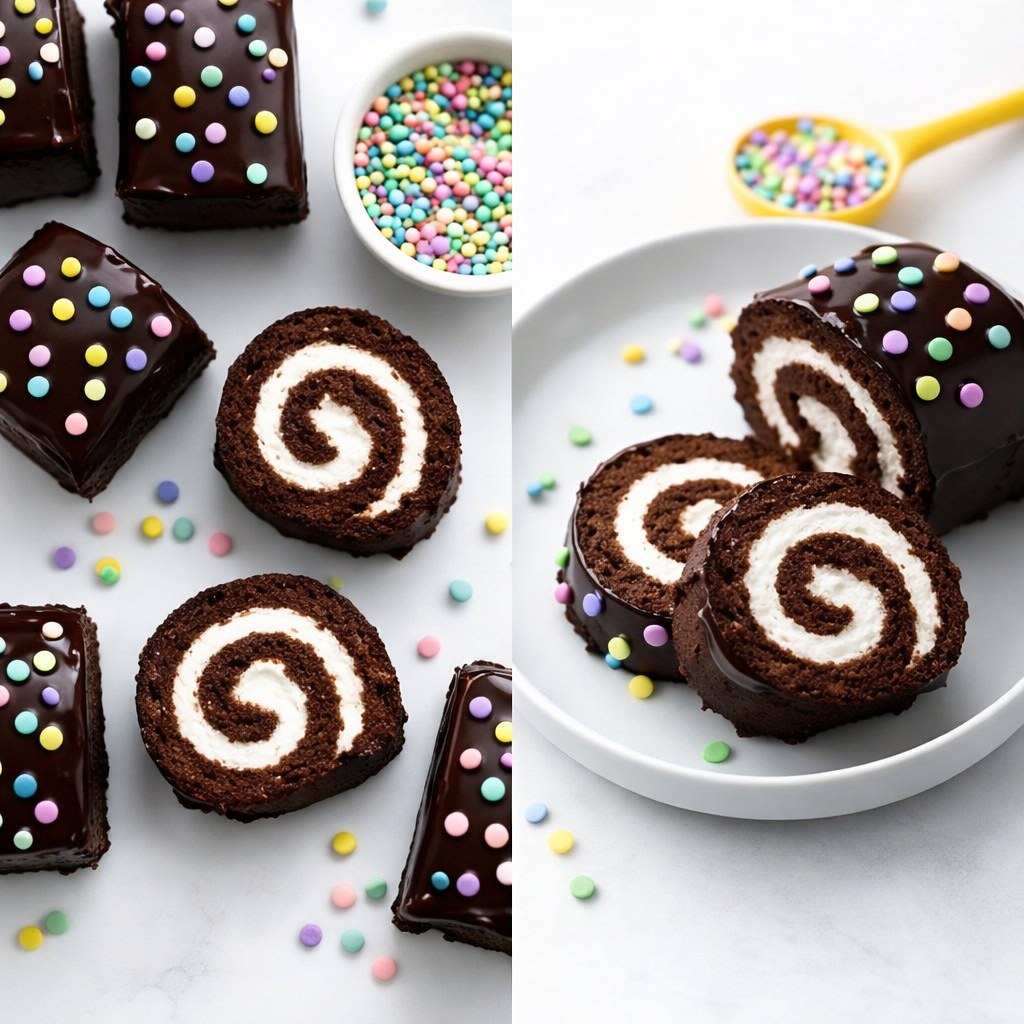
- Experiment with bite-sized servings: For a playful twist, divide the baked sponge into four rectangles and individually roll each piece. After filling, cut them in half, and you’ll end up with eight miniature Swiss rolls that look like well-known store-bought snacks.
Fluffy Chocolate Cake Roll with Cream Filling
Course: Food12
servings1
hour10
minutes700
kcal3
hours40
minutesIngredients
3/4 cup (95g) cake flour or all purpose flour (spooned & leveled)*
1/4 cup (21g) unsweetened natural or Dutch-process cocoa powder, plus more for rolling
1 teaspoon baking powder
1/2 teaspoon salt
4 large eggs, at room temperature and separated
3/4 cup (150g) granulated sugar, divided
1/4 cup (60ml) vegetable oil
1/4 cup (60ml) buttermilk or whole milk
1 and 1/2 teaspoons pure vanilla extract
1 teaspoon espresso powder (optional)
Vanilla Whipped Cream
1 cup (240ml) cold heavy cream or heavy whipping cream
3 Tablespoons (38g) granulated sugar or confectioners’ sugar
1 teaspoon pure vanilla extract
optional: 2 Tablespoons marshmallow creme (“Fluff”)
Chocolate Topping
1/2 cup (120ml) heavy cream or heavy whipping cream
one 4 ounce bar (113g) semi-sweet chocolate, finely chopped
optional for glossy shine: 1 teaspoon light corn syrup
Directions
- Set the baking chamber to a heat level equal to three hundred fifty degrees on the Fahrenheit scale, which corresponds to one hundred seventy-seven Celsius. Coat a rectangular vessel measuring roughly twelve by seventeen inches using release spray or dairy fat, then fit it with nonstick lining so removal later happens effortlessly. Lightly coat the lining as well—maximum slip is essential for this rolled dessert.
- Prepare the sponge:** Pass finely milled cake wheat, cocoa powder, chemical leavening, plus mineral seasoning through a fine strainer until evenly combined. Keep nearby.
- Using either a portable electric beater or a countertop unit equipped with balloon whisks, whip the clear portions from the eggs alongside one quarter cup (about fifty grams) of white crystals at a rapid pace for roughly four to five minutes, until airy foam forms with softly bending peaks. Transfer this mixture into a separate container.
- Returning to the same vessel—cleaning unnecessary—add the golden egg portions along with the remaining sweetener. Agitate briskly for about sixty seconds, then incorporate neutral liquid fat, dairy liquid, fragrant essence, plus concentrated coffee granules. Continue mixing quickly for approximately two minutes. The blend will appear fluid with light bubbles across the surface. Add half of the whipped whites and mix briefly at the gentlest setting for about ten seconds. Repeat using the remaining foam.
- Shake the reserved dry blend directly into the mixture, then gently bring everything together using a flexible scraper just until unified. Avoid aggressive stirring. The result should look airy and voluminous.
- Spread the mixture evenly across the prepared tray, creating a very shallow layer. Slide or tap the vessel lightly on the counter to level the surface. Heat for roughly twelve to fourteen minutes, until the top gently rebounds when touched. Avoid extended baking.
- Prepare for shaping:** While the sponge cooks, lay a large sheet of liner or a thin fabric cloth across the counter, larger than the cake itself. (A cloth often reduces splitting.) Dust the surface with roughly two spoonfuls of cocoa using a strainer. Once baked, immediately loosen the edges using a blade and flip the hot sheet onto the prepared surface. Remove the liner attached during baking. Starting from the shorter side, carefully curl the warm layer together with the liner or cloth, moving slowly and steadily. Leave the coiled cake resting at ambient conditions until fully cooled—about three hours. It may remain this way up to one full day. Cooling under refrigeration before unrolling is discouraged, as cold structure increases tearing risk.
- Prepare the cream layer:** With an electric beater or stand mixer fitted with whisks, whip heavy dairy, sweetener, plus vanilla at a moderately fast pace until medium-to-firm peaks appear, roughly two to three minutes. Blend in marshmallow spread if desired.
- Carefully uncoil the cooled sponge. Apply the cream evenly across the surface, leaving a narrow margin—about half an inch—along all edges. Gently roll again, this time without any liner. Transfer onto a metal grid positioned over a tray to catch excess topping. Let rest at ambient temperature or inside refrigeration while finishing the glaze.
- Prepare the chocolate coating:** Place finely chopped cocoa solids and optional glucose syrup into a medium container. Warm rich dairy liquid inside a small pot over gentle heat until light steaming begins—avoid vigorous boiling. Pour over the chocolate and allow it to rest for two to three minutes. Stir slowly until fully liquefied and glossy.
- Cascade the glaze generously across the rolled dessert. Any runoff may be collected and reapplied. Chill for roughly half an hour to one hour before slicing and presenting.
- Shield remaining portions and keep chilled for up to three days.